Refactoring code is part of the journey toward building sustainable apps. Whether you’re experienced or not: every developer refactors their code to improve its quality or readability. A refactor can be small enough to make you do it unconsciously, while bigger ones can become intimidating.
I’ve been developing apps for over 10+ years in which I’ve completed all kinds of code changes. During those years, I’ve created a mindset and strategy that allows me to control the outcome of a refactor and prevent myself from making code worse. Combined with my article Xcode refactoring options explained with examples, you should be empowered to succeed with any refactor.

Define the goal of your refactor
Refactoring code without a goal could lead to endless code changes. I don’t ask you to write down a plan for every code change, but it does help to think through your changes before you start.
You might realize that the code changes aren’t needed but more a nice to have. I’ve also had examples where I learned a refactor would make more sense after merging a particular branch or feature, so we don’t have to do repetitive work. By creating insights beforehand, you allow yourself to optimize.
I like to use draw.io to illustrate the bigger picture for large refactors. Creating an overview of the task ahead allows you to divide the work into chunks and increase the chances of a successful refactor.
Create Refactor Confidence
Creating refactoring confidence is the next step after creating a plan. You don’t want to worry about pressing the release button after a big refactor due to not knowing whether everything still works as expected.
Unit tests as a safeguard
A suite of unit tests that ensures the code still works as expected often results in a successful code change. I always check code coverage for the code I’m refactoring, and I would add new tests before changing code to create a safeguard for the changes I’m about to make.
Doing so allows you to perform the code changes confidently and run the tests afterward to ensure you didn’t break any logic. I’m convinced this technique speeds up refactors, even though you’ll have to spend some time writing tests. You’ll thank yourself afterward.
Embrace GIT
I’ve seen many developers commenting out code to be sure it’s not lost in case you need it sometime later. The result will be unreadable code and files cluttered with big chunks of code comments.
Embrace GIT and make use of GIT history. By using explicit comments, you’ll be able to find back old versions of your code to restore.
Small steps toward the bigger goal
Don’t start and write the whole refactor in one go. A refactor can always result in an unexpected outcome in which you want to revert the changes. You’ll be sad to go over all your code changes to only revert parts.
Often commit changes
Regularly commit your changes once you’re happy with the applied refactor of a smaller piece of code. Doing so prevents you from having to revert quality code changes for the sake of code changes that didn’t end up looking good.
Move code before changing
You often start a refactors after encountering a large file that grew over years of development. Such a refactor can be pretty intimidating, making it harder for you to create the energy to get started.
I always start by moving code into individual files without changing any core logic in these cases. Moving code is more manageable than rewriting, allowing you to create a better overview of the changes ahead. Commit your changes after the move and start rewriting piece by piece.
Keep your scope to a minimum
While touching a particular piece of code, it can be tempting to rewrite it using the latest technologies like async/await. Instead of lowering the number of compiler errors during the refactor, you’ll run into many more failures. Keeping your scope to a minimum while refactoring your code is crucial to success.
Create a to-do for yourself to perform another refactor after your initial code changes and ensure your current refactor stays manageable.
Make todos to clear your mind
Refactors require focus and the last thing you want is to fill your brain with changes you still have to perform. You’ll find yourself touching a lot of code during the refactor, making you want to change much more than initially planned. Try to keep the focus on your plan and instead add a to-do using warnings:
#warning("🛠 REFACTOR: We can start using async/await here")Benefit from refactoring tools
Xcode improves every year and helps us more easily perform refactors using all kinds of functionalities. You can extract variables and extract all occurrences, use multi-cursor editing, convert a selection into a method, or edit all in scope:
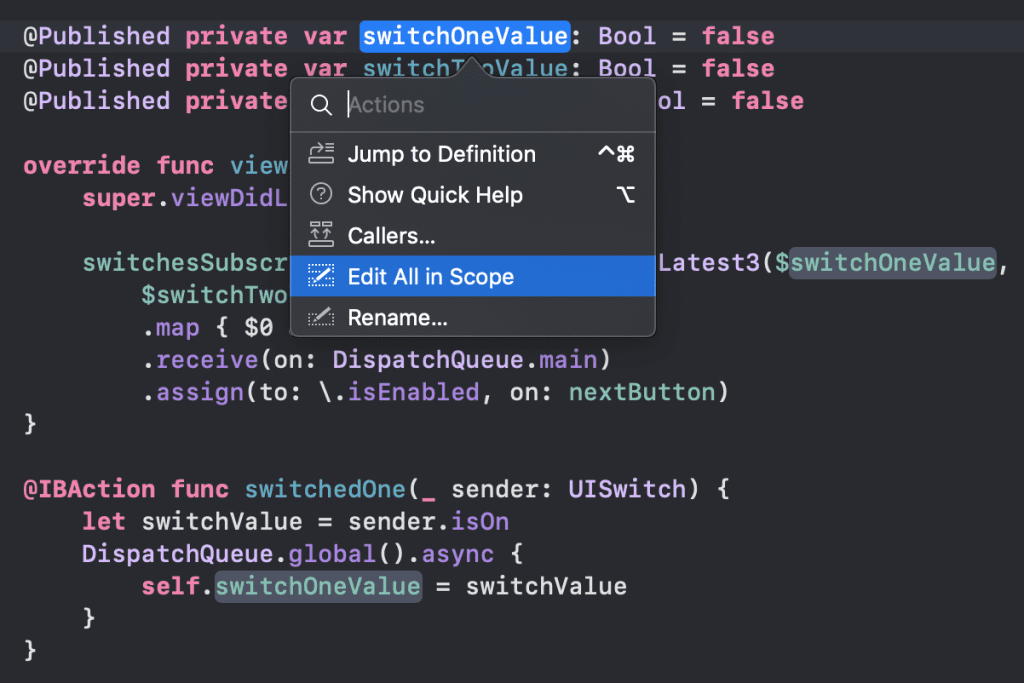
If you’re less confident using Xcode’s renaming functionality, you can always use Find & Replace. Another option is to use a regular expression for your refactor, as many did for the new “if let shorthand” functionality that arrived in Swift 5.7:
let someLengthyVariableName: Foo? = ...
let anotherImportantVariable: Bar? = ...

if let someLengthyVariableName = someLengthyVariableName, let anotherImportantVariable = anotherImportantVariable {
    ...
}
You can now write the same code as follows:
if let someLengthyVariableName, let anotherImportantVariable {
    ...
}
Following the contents of this tweet, you can replace existing code to make use of this shorter syntax:
- Go to Find -> Replace using a regular expression:
(if|guard)(\s+)(let|var) (\w*) = \4([\s,])(?!as) - Replace using the value
$1$2$3 $4$5 - Press “Replace All”
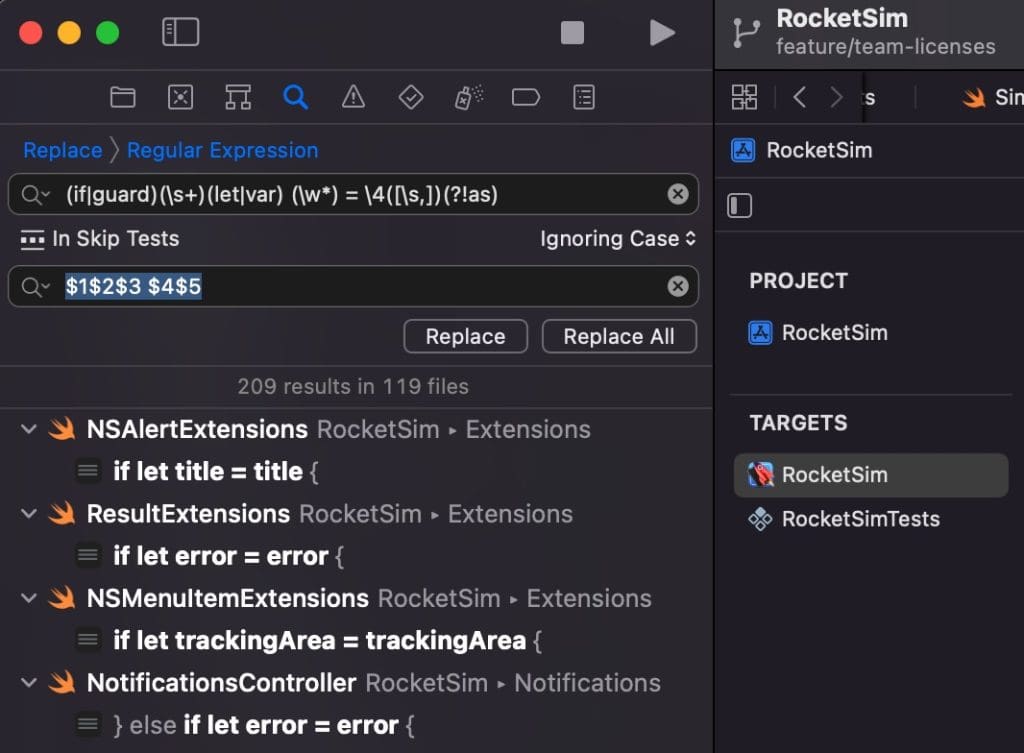
Of course, you’ve done this refactor as a separate step, allowing you to review your changes before committing. You can see that I’ve had 209 results in 119 files for RocketSim, quite a successful change!
Prevent the same mistakes
After putting a lot of time and energy into your refactor, you want to prevent yourself from having to make the same changes one week later. Of course, you can’t always prevent another refactor, but you can be smart enough to update your linters to prevent similar scenarios.
For example, updating your SwiftLint and/or SwiftFormat configurations can enforce the if-let shorthand. These linter tools allow you to define all kinds of rulers and also help you prevent writing large files or methods. Preventing is better than solving, so try to embrace the available tools.
Conclusion
Refactoring code is essential to keep your code maintainable and readable. All developers perform refactors, whether they realize it or not. While it can be intimidating to improve a large file of code, you can make it easier by creating a plan and committing it often.
If you like to prepare and optimize, even more, check out the optimization category page. Feel free to contact me or tweet me on Twitter if you have any additional tips or feedback.
Thanks!