WWDC 2021 introduced iOS 15 with many API changes, including improvements to presenting sheets in UIKit with the new UISheetPresentationController. iOS 14 already introduced the new sheet presentation style. Still, up until iOS 15, we didn’t have the possibility to create an Apple Maps-like implementation of the sheet with a smaller height.
The new UISheetPresentationController comes with more customization options like adjusting the height and adding a grabber to the top for improved affordance.

Presenting a sheet in UIKit
Presenting sheets in UIKit is as easy as using the present method within a view controller:
class ViewController: UIViewController {

    override func viewDidLoad() {
        super.viewDidLoad()
    }

    @IBAction func openSheet() {
        // Create the view controller.
        let sheetViewController = SheetViewController(nibName: nil, bundle: nil)

        // Present it w/o any adjustments so it uses the default sheet presentation.
        present(sheetViewController, animated: true, completion: nil)
    }
}
The default presentation style makes it present view controllers as a sheet. Without changing anything, our view controller is presented as follows:
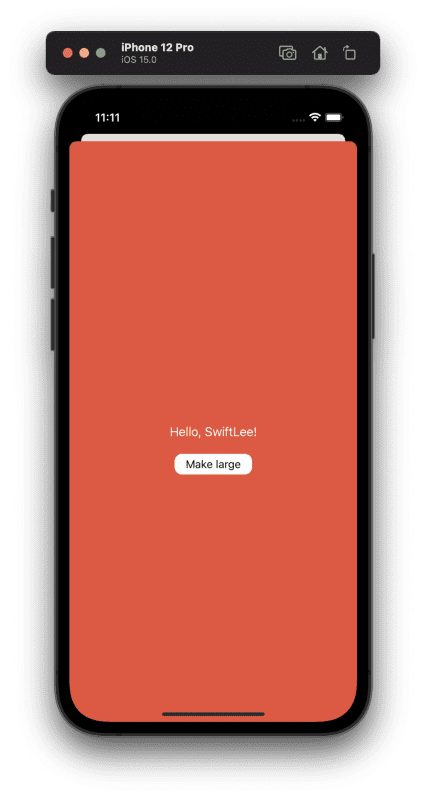
Although this looks great, we might have scenarios in which we want to present the view controller in a smaller size.
Defining detents to allow different sheet sizes
We can add different size configurations to our sheets by defining detents in our presented view controller. Currently, there are only two predefined sizes for medium and large presentations. It’s yet to be seen whether we can also present sheets in custom-defined heights.
Defining detents can be done inside the viewDidLoad method of the view controller you’re presenting:
override func viewDidLoad() {
super.viewDidLoad()
if let presentationController = presentationController as? UISheetPresentationController {
presentationController.detents = [
.medium(),
.large()
]
}
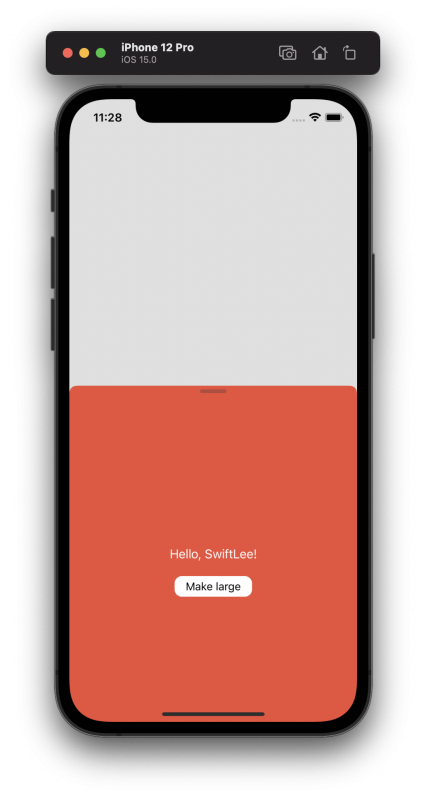
}Once set, our view controller uses the height of the first defined detent upon presentation. In this example, we defined medium first, so our view controller is presented with a medium height. We get scrolling behaviors for free to scroll between different detents:
This is great and already opens up more possibilities with sheets in UIKit. However, it might not be clear enough to our users that they can drag the sheet, for which it’s great to add a grabber.
Adding a visible grabber for improved user experience
To improve the user experience when presenting sheets in UIKit, it’s good to add a little indicator showing that the user can drag the sheet. We can do this by setting the prefersGrabberVisible property to true:
if let presentationController = presentationController as? UISheetPresentationController {
    presentationController.detents = [
        .medium(),
        .large()
    ]
    presentationController.prefersGrabberVisible = true
}
Doing so, adds a little grabber on the top of the presented view controller:
Our users are now more likely to understand that our view can be dragged to a bigger size.
Adjusting the height of a sheet programmatically
Another common scenario is to adjust the height of a sheet programmatically, either after a button press or after a certain event in your app. In this case, I’ve added a button to the presented view controller, which will toggle between different sheet sizes. The button action looks as follows:
@IBAction func toggleSize() {
    // Unwrap the presentation controller using the right type.
    guard let presentationController = presentationController as? UISheetPresentationController else { return }

    // Animate the changes.
    presentationController.animateChanges {
        // The selected detent identifier represents the most recent detent that the user selects or that you set programmatically. It's nil at start.
        if presentationController.selectedDetentIdentifier == .medium || presentationController.selectedDetentIdentifier == nil {
            presentationController.selectedDetentIdentifier = .large
            button.setTitle("Make small", for: .normal)
        } else {
            presentationController.selectedDetentIdentifier = .medium
            button.setTitle("Make large", for: .normal)
        }
    }
}
In this action, we start by unwrapping our presentation controller into the UISheetPresentationController type. This allows us to access the APIs we need.
We use the animateChanges method to apply our changes with a nice animation. Without using the method, our sheet would jump from small to large and vice versa.
The selected detent identifier represents the most recent detent that the user selects or that you set programmatically. As we didn’t set it from the start and we didn’t have any user selection happening, we need to check for nil values. We use the same location to update our button title accordingly.
Conclusion
Presenting sheets in UIKit has improved a lot in iOS 15 and allows us to set different sizes. The new UISheetPresentationController comes with several customization options that mimic the Apple Maps kind of sheets. Adding a grabber and UI control to change the size will make the user experience even better.
If you like to learn more tips on Swift, check out the Swift category page. Feel free to contact me or tweet to me on Twitter if you have any additional tips or feedback.
Thanks!