

Swift Testing is the modern framework for writing tests in Swift, built around expressive macros like @Test, #expect, and #require. It’s the successor to XCTest and the default testing framework for new projects in Xcode. Instead of dozens of assertion methods, you work with a single expressive macro that tells you exactly why a test failed.
The framework embraces Swift Macros and reduces the boilerplate code you must write for repetitive tests. In this article, I’ll guide you through everything you need to get productive with Swift Testing, with links to in-depth guides for each feature along the way.

Writing tests using Swift Testing
If you’re new to testing, there’s not much to compare. However, if you’re used to XCTests, quite a few things are changing when writing tests using the Swift Testing framework.
First of all, we’ll have to import a different framework:
import TestingAfter this import, we can start defining our first tests. What’s interesting here is that we can define tests globally:
import Testing
@testable import SwiftTestingPlayground

@Test func personFullName() {
    let person = Person(firstName: "Antoine", lastName: "van der Lee")
    #expect(person.fullName == "Antoine van der Lee")
}
Note that we’re importing SwiftTestingPlayground using the @testable attribute to allow access to internal types like the Person struct.
We’ve defined the test using a new @Test macro, which replaces the XCTest test method prefix. Inside the test, we’re making use of the #expect macro, which replaces assertions like XCAssert. Make sure to forget the old habit of writing test as a prefix. I actually started writing this article with a test method named testPersonFullName , which is no longer needed due to the @Test macro.
After running the test for the first time, we can look into the test navigator and evaluate the hierarchy:
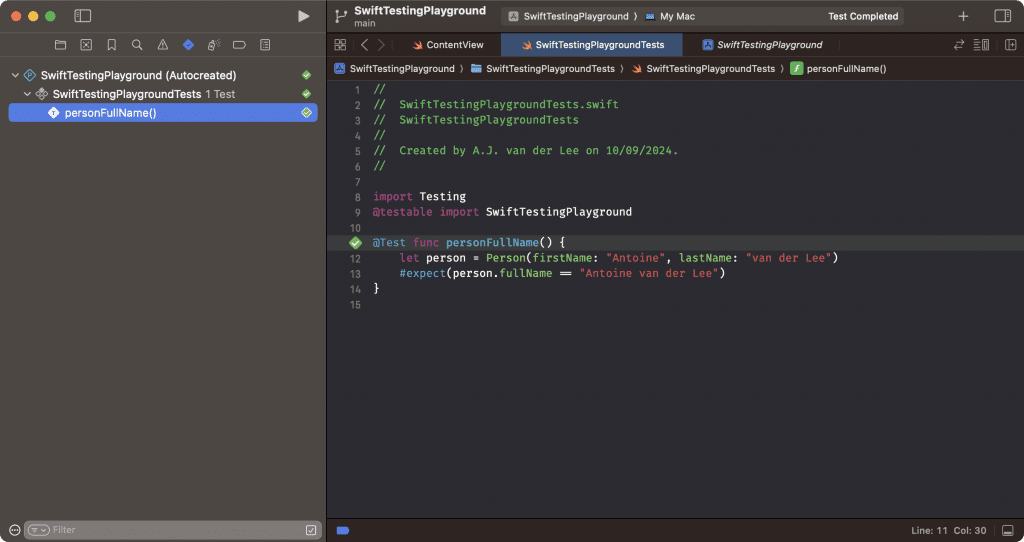
While the global test works fine in a small project like this, you’re likely looking for a better way to organize your tests.
Organizing tests in Swift Testing
The Swift Testing framework allows you to organize tests using metadata like traits and tags or by wrapping tests using structs. Let’s see how a parent struct affects the organization of tests.
In this case, we’re testing person-specific code. Therefore, it makes sense to call our wrapper PersonTests:
import Testing
@testable import SwiftTestingPlayground

struct PersonTests {
    @Test func fullName() {
        let person = Person(firstName: "Antoine", lastName: "van der Lee")
        #expect(person.fullName == "Antoine van der Lee")
    }
}
We can rename the test method to no longer contain “person” since the outer struct makes this clear enough.
Assume you’re going to write more tests soon, you might want to go one step further and add another layer called Names to focus on name-related tests only:
import Testing
@testable import SwiftTestingPlayground

struct PersonTests {

    @Test func initialization() {
        let person = Person(firstName: "Antoine", lastName: "van der Lee")
        #expect(person.firstName == "Antoine")
        #expect(person.lastName == "van der Lee")
    }

    struct Names {
        @Test func fullName() {
            let person = Person(firstName: "Antoine", lastName: "van der Lee")
            #expect(person.fullName == "Antoine van der Lee")
        }
    }
}
The updated hierarchy inside the test navigator looks as follows:
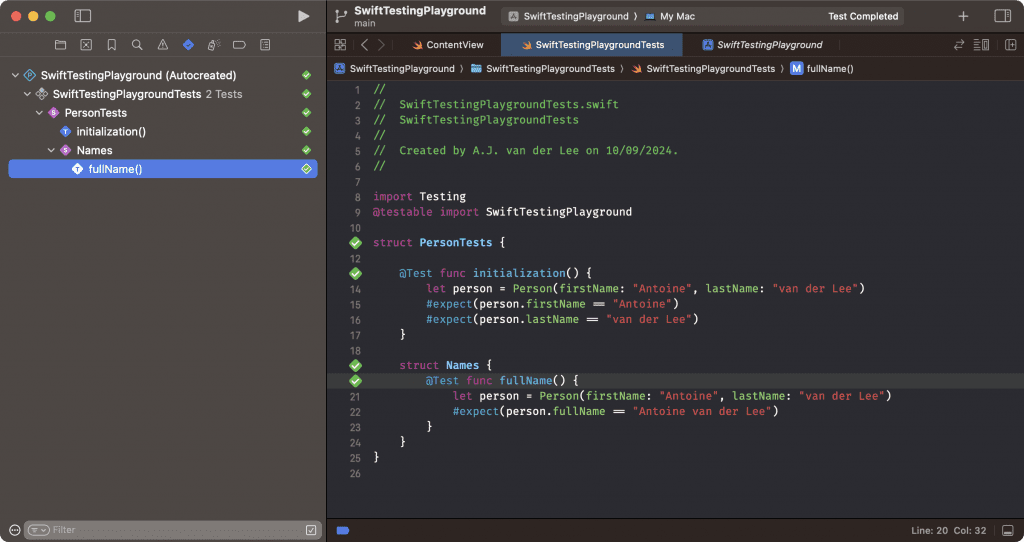
These are just the basics of test organization. In Using Traits to annotate and customize test behavior, I dive deeper into tags and conditional test execution.
Taking a closer look at the #expect macro
Swift Testing is driven by macros from which the #expect macro has most of the magic. While we had to use all kinds of assertion methods in XCTest, we can now focus on a single method that works magically with anything you use as input.
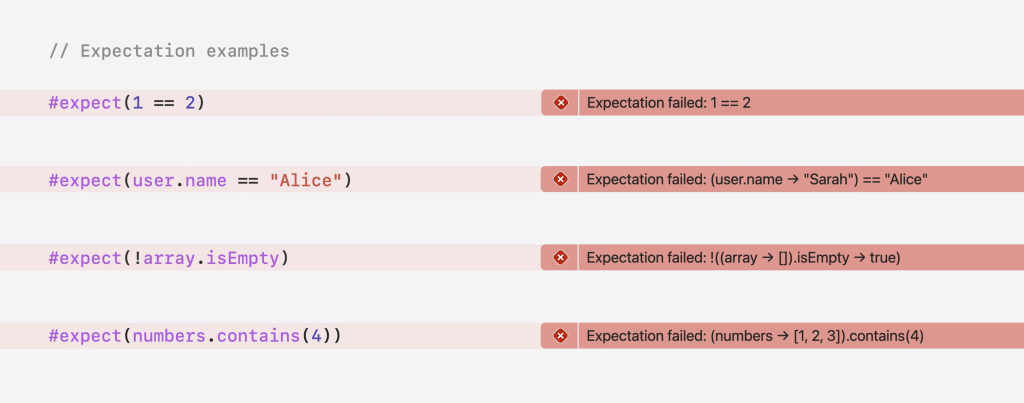
There are many ways to define conditional statements, and the macro is smart enough to transform them into specific failure outputs. This becomes even better when you decide to show more details inside Xcode:
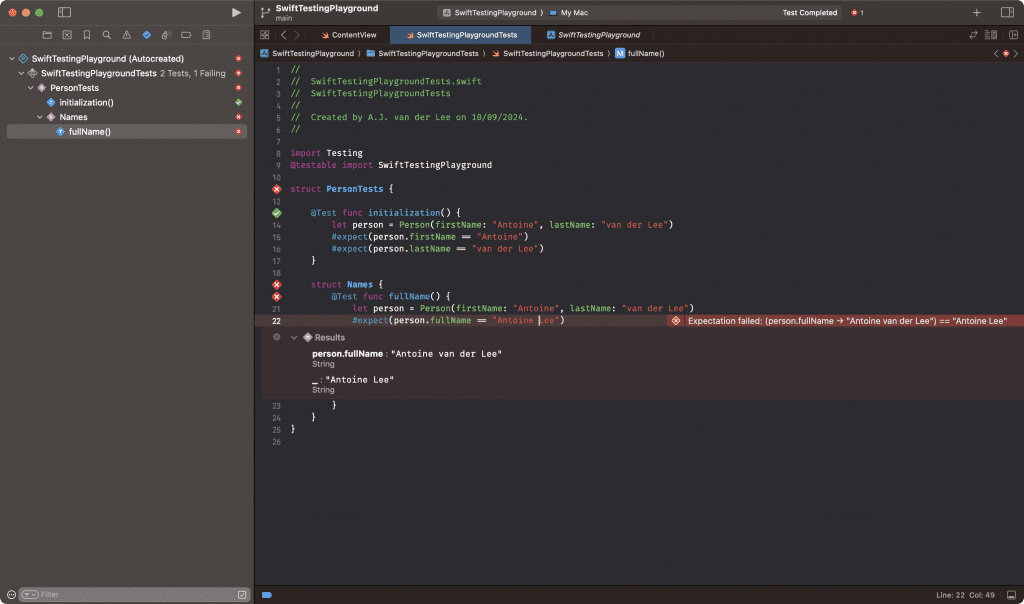
These details will help you solve tests more quickly by making determining what caused the failure easier. In this case, we can see that the person’s full name is defined as “Antoine van der Lee” while our input String matches “Antoine Lee”.
You can learn more about all supported expressions in Using the #expect macro for Swift Testing.
Using the #require macro
When using XCTest, we’ve learned that we can use XCTUnwrap to unwrap an optional or fail the test if it returns nil.
func testFullName() throws {
    let person = Person(firstName: "Antoine", lastName: "van der Lee")
    let unwrappedPerson = try XCTUnwrap(person)
    XCTAssertEqual(unwrappedPerson.fullName, "Antoine van der Lee")
}
In Swift Testing, we can create similar behavior by using the #require macro return value:
@Test func fullName() throws {
    let person = Person(firstName: "Antoine", lastName: "van der Lee")
    let unwrappedPerson = try #require(person, "Person should be constructed successfully")
    #expect(unwrappedPerson.fullName == "Antoine van der Lee")
}
You can learn more about this functionality by reading Using the #require macro for Swift Testing.
Reducing boilerplate code using Parameterized Tests
Parameterized tests are an advanced feature of the Swift Testing framework. By using arguments as input for a single test case, you’ll be able to reduce boilerplate code and maintain fewer test cases.
This is an example of a parameterized test which takes two zipped collections as an argument:
@Test(arguments: zip([Feature.userDefaultsEditor, .networkMonitor], [10, 5]))
func testLimitedFreeUsage(_ feature: Feature, tries: Int) {
    #expect(feature.isNumberOfTriesWithinFreeLimit(tries))
}
You can read more about this feature in my article Parameterized tests in Swift: Reducing boilerplate code.
Testing fatal errors with exit tests
Since Swift 6.2, you can finally test code that’s expected to terminate the process, like precondition and fatalError statements. An exit test runs its body inside a new child process and validates how that process exits:
extension BankAccount {
    func withdraw(_ amount: Int) {
        precondition(amount <= balance, "Insufficient balance")
        // ...
    }
}

@Test func withdrawingTooMuchTriggersPrecondition() async {
    await #expect(processExitsWith: .failure) {
        let account = BankAccount(balance: 100)
        account.withdraw(200)
    }
}
Before exit tests, these code paths were impossible to cover: the crash would take your whole test run down with it. A few things to be aware of: exit tests require Swift 6.2 and Xcode 26 or later, they run on macOS and Linux but not on iOS, and any value you capture inside the body must conform to both Sendable and Codable since it’s passed into the child process. You can read more in Apple’s exit testing documentation.
Attaching values to tests
Swift Testing lets you attach values to a test, which makes diagnosing failures a lot easier, especially on CI where you can’t rerun a test quickly. You can attach strings, data, files, and even images:
@Test func salesReportAddsUp() async throws {
    let report = await generateSalesReport()
    Attachment.record(report.csvData, named: "sales-report.csv")
    try report.validate()
}
Attachments show up inside Xcode’s test report after a run finishes. On top of that, types conforming to Encodable automatically become attachable when you import Foundation, so you can record your domain models directly. More details can be found in Apple’s attachments documentation.
Migrating existing XCTests to Swift Testing
If you’ve written tests before, you’re likely interested in how to migrate them to Swift Testing. Apple also knew about this requirement and decided to write an in-depth migration article.
Not everything should migrate, though. UI automation tests using XCUIApplication and performance tests using XCTMetric still require XCTest. Both frameworks can coexist in the same test target, so you can migrate incrementally: convert assertions first, then reorganize your suites, and finally introduce parameterized tests where you spot repetition.
Writing Swift Testing code with AI
If you’re using AI coding agents like Claude, Codex, or Cursor, you don’t have to explain these best practices in every prompt. I’ve bundled my Swift Testing knowledge into an Agent Skill that teaches your agent to write tests the way this article describes: using #expect and #require correctly, reducing repetition with parameterized tests, and organizing suites with traits and tags.
You can read how it works and install it via Swift Testing Agent Skill: Write high quality tests with AI.
Conclusion
Swift Testing transforms how you write tests in Swift with expressive macros like #expect and #require, parameterized tests, and newer additions like exit tests and attachments. It’s the default choice for new projects, while XCTest remains available for UI automation and performance testing.
If you want to improve your testing knowledge even more, check out the Swift Testing category page. Feel free to contact me or tweet me on Twitter if you have any additional tips or feedback.
Here are a few more articles for you to make the most out of Swift Testing:
- Swift Testing explained with code examples
- Swift Testing Agent Skill: Write high quality tests with AI
- Parameterized tests in Swift: Reducing boilerplate code
- Using the #require macro for Swift Testing
- Vapor and Swift Testing: Running tests in parallel
- Using the #expect macro for Swift Testing
- Using Traits to annotate and customize test behavior
Thanks!