Swift Macros got introduced in the WWDC 2023 release of Swift 5.9. They are a new way for you to extend Swift with new kinds of expressions, allow creating of expressive libraries, and eliminate extraneous boilerplate.
As part of the vision of Macros, Swift Macros introduce a new way to extend the compiler with custom compile-time checks. You might think you don’t need macros as you can solve the same using reusable methods, but a few unique features make them exceptional.

What are Swift Macros?
Swift Macros allow you to extend the compiler with custom compile-time checks. You can use them to analyze code and emit rich compiler errors to guide developers toward correct usage. Lastly, you can use Swift Macros to generate new code that will be written into your files at compile time, enabling you to remove boilerplate code.
An excellent example of a macro allows you to validate URLs at compile time, returning an unwrapped value when the URL is valid:
let swiftLeeBlogURL = #URL("https://www.avanderlee.com")Notice that we’re using the hashtag # in front of URL to call into our macro. While we go over all details of the implementation later, in short, you can say the underlying code looks somewhat like this:
let swiftLeeBlogURL = {
    guard let swiftLeeBlogURL = URL(string: "https://www.avanderlee.com") else {
        /// Throw compiler error
    }
    return swiftLeeBlogURL
}()
Our macro validates the URL and emits a compile-time error if the URL is invalid. This is an incredible use case and prevents us from running into runtime crashes when we try to unwrap an invalid URL.
In this example, we’re using a so-called freestanding expression macro. This is just one of the currently seven available different roles:
- @freestanding(expression)
Creates a piece of code that returns a value - @freestanding(declaration)
Creates one or more declarations - @attached(peer)
Adds new declarations alongside the declaration it’s applied to - @attached(accessor)
Adds accessors to a property - @attached(memberAttribute)
Adds attributes to the declarations in the type/extension it’s applied to - @attached(member)
Adds new declarations inside the type/extension it’s applied to - @attached(conformance)
Adds conformances to the type/extension it’s applied to
As you can see, there are two main types of macros:
- Freestanding: declared using the hashtag
e.g. #URL(…) - Attached: declared using the at sign
e.g. @Observable
You can attach multiple roles to a macro, depending on your requirements. They form a powerful toolset to extend the compiler with reusable functionality.

FREE 5-Day Email Course: The Swift Concurrency Playbook
A FREE 5-day email course revealing the 5 biggest mistakes iOS developers make with with async/await that lead to App Store rejections And migration projects taking months instead of days (even if you've been writing Swift for years)
How to write a custom Macro
To start writing your custom macro, you’ll have to start a new package in Xcode via File → New → Package... and select Swift Macro:
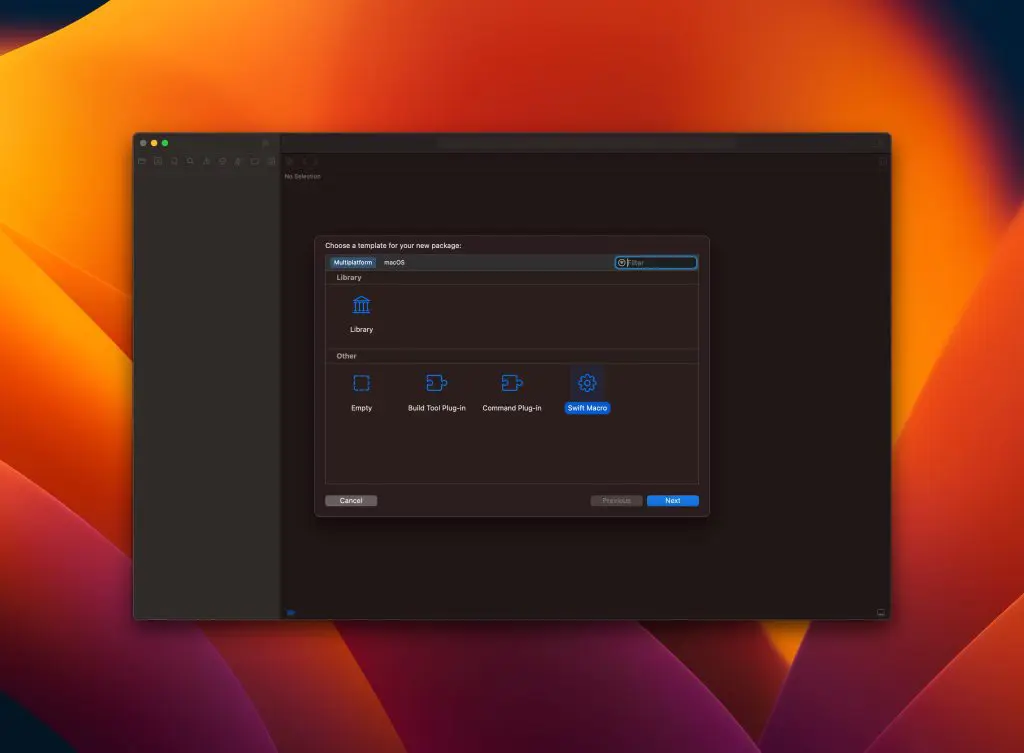
Xcode will generate a new Swift Package containing the following structure:
- An exploration library that publicly exposes the macro functionality
- A client library containing a main execution file to run and test your macros
- The compiler plugin containing all macro implementation details
- A testing target to write tests for your implementation
If you’re new to Swift packages, I encourage you to first read Swift Package Manager framework creation in Xcode.
Theoretically, you’ll only need the exploration library and compiler plugin definition. The client executable can help test your macro in isolation, so I recommend keeping that around. Applying test-driven development while writing your macros is helpful, meaning you’ll instantly validate your implementation via unit tests.
Defining the public Macro
Let’s first have a look at the exploration library. The library contains a single Swift file and defines a stringify macro as an example:
/// A macro that produces both a value and a string containing the
/// source code that generated the value. For example,
///
///     #stringify(x + y)
///
/// produces a tuple `(x + y, "x + y")`.
@freestanding(expression)
public macro stringify<T>(_ value: T) -> (T, String) = #externalMacro(module: "SwiftMacrosExplorationMacros", type: "StringifyMacro")
For the sake of this article and as an example, we’re going to replace this default implementation with our custom one for unwrapping URLs:
/// A macro that produces an unwrapped URL in case of a valid input URL.
/// For example,
///
///     #URL("https://www.avanderlee.com")
///
/// produces an unwrapped `URL` if the URL is valid. Otherwise, it emits a compile-time error.
@freestanding(expression)
public macro URL(_ stringLiteral: String) -> URL = #externalMacro(module: "SwiftMacrosExplorationMacros", type: "URLMacro")
We’ve applied the freestanding expression role and assigned our externally defined macro using the compiler-plugin name as a module reference. Make sure to match the module name with the name of your plugin as found inside your Package.swift file. The type has to match the instance name of the macro itself as defined inside the plugin.
Writing the URL unwrapping implementation
After defining our public accessor, we must create a matching macro instance. In our case, we have to match the type name URLMacro and ensure it conforms to the ExpressionMacro protocol:
public struct URLMacro: ExpressionMacro {
    public static func expansion(
        of node: some FreestandingMacroExpansionSyntax,
        in context: some MacroExpansionContext
    ) throws -> ExprSyntax {
        print(node.argumentList.map { $0.expression })

        return "URL(string: \"https://www.avanderlee.com\")!"
    }
}
The above example demonstrates a hardcoded example that will always return our expected URL. While we’re about to make that dynamic, it’s good to have a look at the print statement output:
[
    StringLiteralExprSyntax
    ├─openQuote: stringQuote
    ├─segments: StringLiteralSegmentsSyntax
    │ ╰─[0]: StringSegmentSyntax
    │   ╰─content: stringSegment("https://www.avanderlee.com")
    ╰─closeQuote: stringQuote
]
This is an example of an abstract syntax tree and is essential for you to be aware of when developing custom macros. I recommend swift-ast-explorer.com as a playground to familiarize yourself with this kind of syntax.
In our case, we want to extract the contents of the string literal segment. Once we have the input string, we should use the string initializer to ensure it’s a valid URL. The implementation looks as follows:
public struct URLMacro: ExpressionMacro {
    public static func expansion(
        of node: some FreestandingMacroExpansionSyntax,
        in context: some MacroExpansionContext
    ) throws -> ExprSyntax {
        guard
            /// 1. Grab the first (and only) Macro argument.
            let argument = node.argumentList.first?.expression,
            /// 2. Ensure the argument contains of a single String literal segment.
            let segments = argument.as(StringLiteralExprSyntax.self)?.segments,
            segments.count == 1,
            /// 3. Grab the actual String literal segment.
            case .stringSegment(let literalSegment)? = segments.first
        else {
            throw URLMacroError.requiresStaticStringLiteral
        }

        /// 4. Validate whether the String literal matches a valid URL structure.
        guard let _ = URL(string: literalSegment.content.text) else {
            throw URLMacroError.malformedURL(urlString: "\(argument)")
        }

        return "URL(string: \(argument))!"
    }
}
In any case of failure, we’ll throw a custom Swift error:
enum URLMacroError: Error, CustomStringConvertible {
    case requiresStaticStringLiteral
    case malformedURL(urlString: String)

    var description: String {
        switch self {
        case .requiresStaticStringLiteral:
            return "#URL requires a static string literal"
        case .malformedURL(let urlString):
            return "The input URL is malformed: \(urlString)"
        }
    }
}
Xcode will show the error at compile time in case you’re submitting an invalid input URL:

You’ll notice the error shows up before building your project. This shows the added value macros can bring as they let you know as early as possible when writing invalid code.
There are many more possibilities for you to explore, including richer compiler errors with “Fix it” actions. Stay tuned for future articles covering other roles and enhanced implementations.
Testing your Swift Macro
Now that we’ve explored an example implementation, it’s time to write a test. Xcode automatically generates a test target for you, including an example unit test for the stringify implementation. We can leverage that unit test and write a custom test for a valid input URL:
func testValidURL() {
assertMacroExpansion(
#"""
#URL("https://www.avanderlee.com")
"""#,
expandedSource: #"""
URL(string: "https://www.avanderlee.com")!
"""#,
macros: testMacros
)
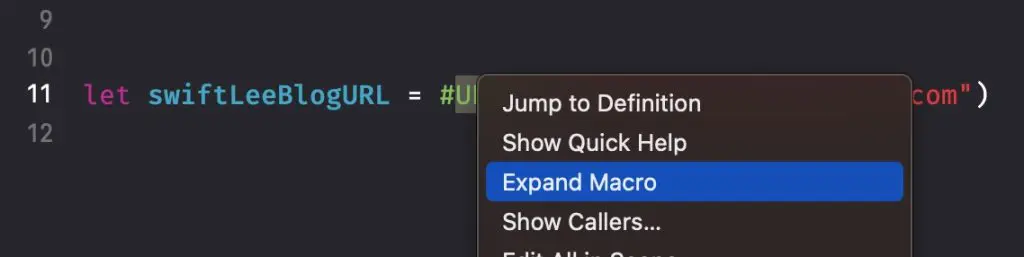
}The macro expansion assertion requires passing in an input string matching the macro definition. The expanded source matches what you will see if you expand the macro in Xcode. You can do this by right-clicking your macro and selecting “Expand Macro”:
Finally, we need to tell our assertion how to match the input macro definition with the right implementation:
let testMacros: [String: Macro.Type] = [
    "URL": URLMacro.self // #URL should use URLMacro
]
Validating compiler errors
After validating our success case, it’s time to write a test for any emitted errors. We can make use of the same assertion, but we need to add an extra parameter to match the thrown failure:
func testURLStringLiteralError() {
    assertMacroExpansion(
        #"""
        #URL("https://www.avanderlee.com/\(Int.random())")
        """#,
        expandedSource: #"""

        """#,
        diagnostics: [
            DiagnosticSpec(message: "#URL requires a static string literal", line: 1, column: 1)
        ],
        macros: testMacros
    )
}
We will receive the literal error since we passed in a non-literal string. Due to the mistake, there’s no expanded source as a result. You can write a similar test for the other failure case: a great challenge for you to validate your learnings.
Should I write custom Macros?
When macros got first introduced, one of my friends asked me why he should even consider using them. At first, he didn’t see the added value and wondered why he wouldn’t just write reusable extensions.
Let me start by saying you shouldn’t feel obligated to learn how to write custom macros. They are an advanced feature of Swift, and it’s more than acceptable to build apps without them. You can also leverage available open-source macros and get used to how those work at an implementation level.
Looking at our URL unwrapping example, you could also decide to write:
let swiftLeeBlogURL = URL(string: "https://www.avanderlee.com")!This code works perfectly fine; you’re sure the URL works and would otherwise notice while testing your app. However, you don’t benefit from compile-time safety, so it’s a tradeoff. In this case, I’d recommend benefiting from the code I shared in this article if you don’t feel empowered to write custom implementations yourself.
Conclusion
Swift Macros are a powerful addition to Xcode and allow us to enrich the compiler with custom checks and code generation. We’ve only looked at one of the seven roles, so there’s more to explore. You should not feel obligated to learn how to write custom macros: it’s more than okay not to use them at all or to benefit from existing implementations.
If you like to improve your Swift knowledge, even more, check out the Swift category page. Feel free to contact me or tweet to me on Twitter if you have any additional tips or feedback.
Thanks!