Apple announced Swift 6 during WWDC 2024 as a major release of their programming language. It became first available in Xcode 16 and aims to create a fantastic development experience. Many of the latest more prominent features like async/await have been part of the road toward this major version bump.
This major language version release contains new features but requires intense migration. Such migration can quickly become intimidating and complex without a proper plan. I’ve migrated the WeTransfer SDK, which consists of 20+ packages, and I know from experience what it takes to migrate. Let’s dive into a little background story of Swift 6, followed by what’s new and how to migrate.
The idea behind Swift 6
Before diving into what’s new and how to migrate, it’s important to understand why Swift 6 is a major milestone. Knowing the why will make the how much clearer.
The Swift team outlined their focus areas for 2023 and detailed the roadmap to Swift 6, providing a clear vision of the language’s future. Each Swift 5.x release played a role in preparing us for this transition—features like async/await in Swift 5.5, which seemed incremental at the time, were actually key building blocks.
Swift 6 is the culmination of these gradual improvements, bringing together years of progress to push the language forward.
The goals of Swift 6
Swift 6 is a major release of Apple’s primary programming language. This release had a few specific goals to improve the development experience.
Eliminating all data races
Swift 6’s goal has always been to eliminate all data races. Once you migrate your projects to Swift 6, you’ll notice several warnings related to Sendable and concurrency. These warnings guide you towards making your project thread-safe, eliminating data races and race conditions (they’re not the same).
Some of your app’s crashes are likely related to data races, while you have no clue how to reproduce them. Don’t be surprised to see them disappear after migrating successfully.
Strict Concurrency Checking
To get to a point of eliminating all data races, you need to have strict concurrency checking in place. That’s why you’ll see a lot of warnings and errors in your projects as soon as you switch to Swift 6 language mode (how to do that follows later in this article).
Stricter rules make concurrent code safer and help you to apply the concept of Swift concurrency correctly.
More deterministic execution
Enforcing the previous two goals will result in a more deterministic execution. Your code should become more predictable, reducing unexpected runtime issues. You might have been battling those EXC_BAD_ACCESS crashes in the past—hopefully, this is something you won’t have to do anymore after migrating to Swift 6.
What’s new in Swift 6?
Before you dive into what’s new, I want you to know that you won’t find many fancy new features in this language update. Features like async/await in Swift 5.5 were brand new and exciting—Swift 6 mainly focuses on enforcing stricter concurrency checking.
Enhanced concurrency support
It’s not brand new, but it’s a next-level iteration. Previous language updates prepared us for this, but now you’ll experience a more strict concurrency checker with fewer false positives. Data-race safety checks were previously available as warnings through the -strict-concurrency=complete compiler flag. Now, they’ll result in compiler errors when diagnosing potential data races.
Related to this, Swift 6 also introduced a new Synchronization library. This library won’t be used by many of you but offers low-level concurrency APIs, including atomic operations and a new mutex API.
Typed throws
More predictable code will result in code that’s easier to reason about. Typed throws will help with this as it reduces the number of error types to prepare you for at implementation level.
/// Using throws(ValidationError) we specify the error type to always be `ValidationError`
static func validate(name: String) throws(ValidationError) {
    guard !name.isEmpty else {
        throw ValidationError.emptyName
    }
    guard name.count > 2 else {
        throw ValidationError.nameTooShort(nameLength: name.count)
    }
}
As you can see in the method above, we’re defining the expected error type to be ValidationError. At the implementation level, we only have to take care of error cases of this type. You can read more about this feature in my dedicated article: Typed throws in Swift explained with code examples.
Manage dependency creep with access-level modifiers on import declarations
You’re probably familiar with access-level modifiers like public, private, and internal for classes, methods, and properties. Starting with Swift 6, you can also apply these to package imports:
internal import FrameworkDependency
private import FrameworkDependencyOnlyForThisFile
package import FrameworkDependencyOnlyForFilesInThisPackage
Using these access-level modifiers helps indirect clients to determine whether they can skip loading transitive dependencies. You’ll expose fewer dependencies to top-level clients, reducing the number of dependencies to check during compiling. In other words, this allows you to manage dependency creep. You can read more about this in SE-409 Access level on imports.
Many more improvements
I’ve mentioned the most prominent changes of Swift 6 above. Yet, this language update contains many more improvements that you might find interesting depending on your project’s specifics.
Swift 6 contains an extensive list of merged proposals, but I believe it’s better to not mention them all specifically. Swift can be seen as a complex language, but only if you focus on all the features it provides. Some are just not required for regular app development, so it could be a decision for you not to clutter your mind either.
Yet, I do want to highlight a new functional method that allows you to call count(where:):
[1, 2, 3, -1, -2].count(where: { $0 > 0 }) // → 3I bet many of you have been using a custom extension for this. Note though, you should not use this to check whether an array contains a certain element. In that case, it’s more performant to use:
[1, 2, 3, -1, -2].contains(where: { $0 > 0 }) // → trueThese little improvements make writing apps in Swift more joyfull.
I do want to specifically mention that Swift 6 contains a lot of proposals that improve Swift Concurrency. Yet, my goal with my blog has always been to deliver Swift language features in an approachable way, so I suggest to either go over the proposals yourself if you’re interested or focus on the warnings and compiler errors you’ll get once migrating your project specifically.

FREE 5-Day Email Course: The Swift Concurrency Playbook
A FREE 5-day email course revealing the 5 biggest mistakes iOS developers make with with async/await that lead to App Store rejections And migration projects taking months instead of days (even if you've been writing Swift for years)

Incrementally migrating your Xcode Projects and packages to Swift 6
The time it takes to migrate your projects to Swift 6 depends on the type and size of your project. I recommend incremental adoption in all cases to isolate the changes and to enable you to open pull requests that aim to be small enough for reviews.
You’ll follow the same steps for migrating modules (Swift Packages) as for Xcode projects, but you’ll apply build settings inside the Package.swift file. Each migration follows the following steps:
- Determine an isolated part of your project. This will either be an individual target, test target, or module.
- Enable upcoming language features for Swift 6, one by one.
- Increase the strict concurrency checking from minimal to targeted and finally to complete.
- After fixing all warnings in each step, you can change the language mode to Swift 6.
Before diving into details, here’s a bit of mental guidance since it can be quite the ride for more extensive projects:
- Take your time
- Don’t panic
- It’s fine to have warnings in your project during the migration
With that in mind, we’re ready to dive into more details.
1. Determining an isolated part of your project
It’s generally recommended to focus on an isolated piece of code when doing large refactors. Migrating to Swift 6 is definitely a potentially large refactor, so it’s essential to pick a piece of isolated code. By this, I mean code that can be compiled in isolation. Examples are targets or individual modules.
If you can, try to pick an app extension with fewer code files. This will allow you to familiarize yourself with migrating a part of your code to Swift 6.
2. Enable upcoming Swift 6 language features, one by one
The next step would be to enable upcoming language features one by one. You can do this by going into build settings and searching for “Upcoming features”:
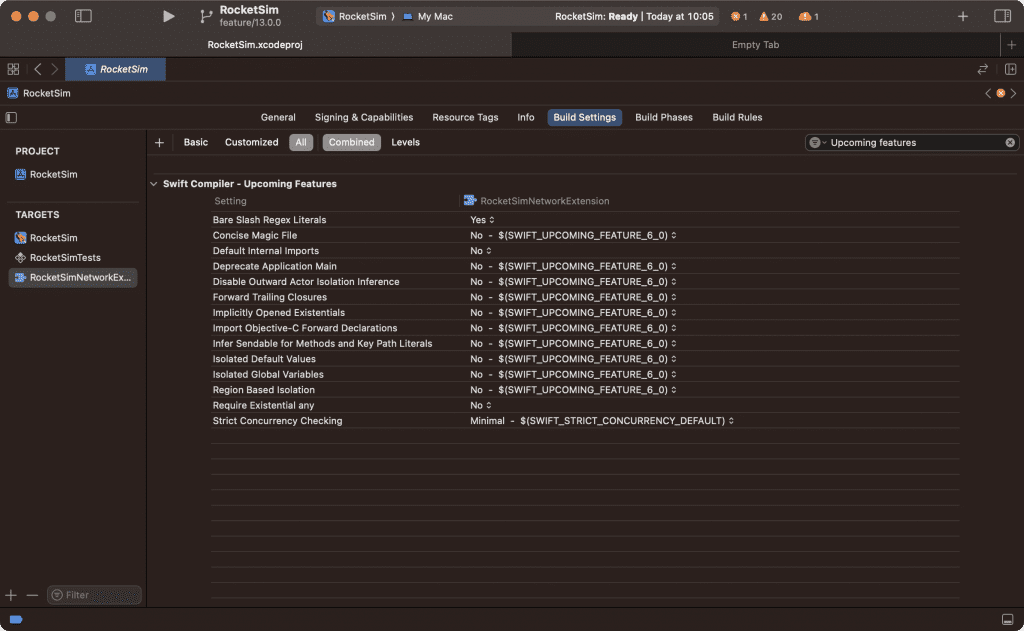
The filtered list of build settings shows available upcoming language features and the strict concurrency checking setting. I recommend focusing on the build settings that contain the $(SWIFT_UPCOMING_FEATURE_6_0) variable, as these relate to Swift 6 directly. These features will also be enabled automatically when you change the project’s language feature to version six.
You’ll likely see new warnings after enabling one of the upcoming features. Some of these warnings will become errors when you’ve updated your language version, so try to fix as many as you can. Once done, open a pull request with just these changes before moving towards the next upcoming feature.
For Swift packages, you can enable upcoming features as follows:
.target(
name: "WindowMonitoring",
dependencies: [],
swiftSettings: [
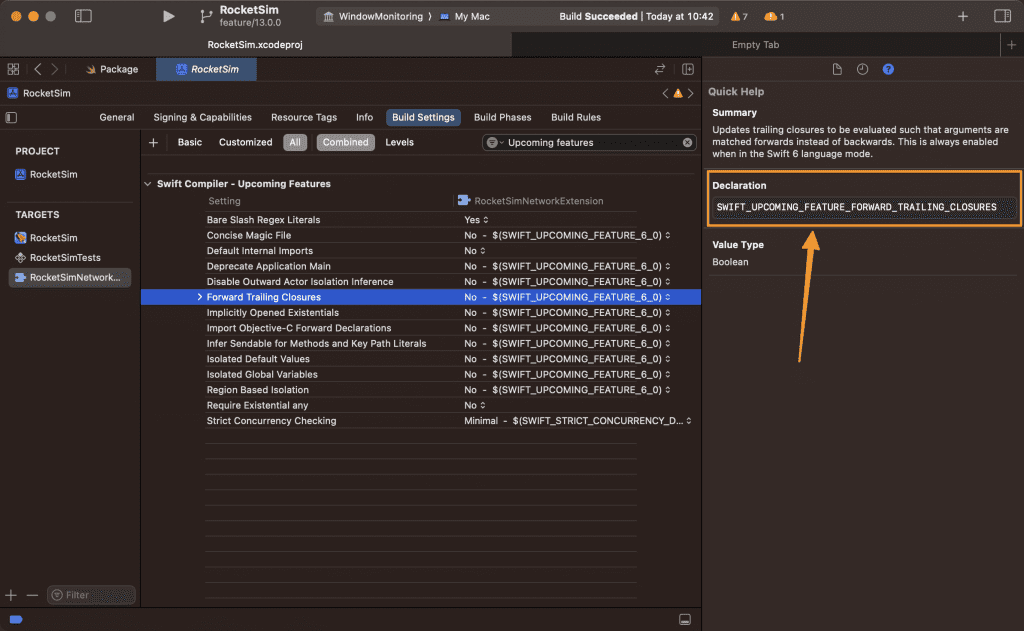
.enableUpcomingFeature("SWIFT_UPCOMING_FEATURE_FORWARD_TRAILING_CLOSURES")
]
)The key for each upcoming feature can be found inside Xcode’s Quick Help after selecting the build setting:
3. Enabling Strict Concurrency Checking
Enabling upcoming features one by one prepares your project for strict concurrency checking. The strict concurrency checking build setting controls the level of Sendable enforcement and actor-isolation checking performed by the Swift compiler.
There are three levels to pick from:
- Minimal: Enforce Sendable constraints only where they have been explicitly adopted and perform actor-isolation checking wherever code has adopted concurrency.
- Targeted: Enforce Sendable constraints and perform actor-isolation checking wherever code has adopted concurrency, including code that has explicitly adopted Sendable.
- Complete: Enforce Sendable constraints and actor-isolation checking throughout the entire project or module.
Each step results in stricter checking and potentially more warnings. Don’t go too fast here, and adopt each level individually. After fixing the warnings for each level, you can open a pull request and continue to the next level.
If you’re using Swift packages, you can change the strict concurrency level as follows:
.target(
    name: "CoreExtensions",
    dependencies: ["Logging"],
    path: "CoreExtensions/Sources",
    swiftSettings: [
        /// Used to be like this in Xcode 14:
        SwiftSetting.unsafeFlags(["-Xfrontend", "-strict-concurrency=complete"]),

        /// Xcode 15 & 16. Remove `=targeted` to use the default `complete`. Potentially isolate to a platform to further reduce scope.
        .enableExperimentalFeature("StrictConcurrency=targeted", .when(platforms: [.macOS]))
    ]
)
You can find more details in my dedicated article for this build setting. The warnings (or errors) triggered after enabling this setting give you insights into areas of improvement. As a team, I recommend enabling this setting by default to migrate your codebase gracefully. Code implementations like networking layers can be a great start since they’ll likely allow you to adopt async/await higher up in more places.
4. Change the Swift Language Version to Swift 6
The final step of the migration requires you to change the Swift Language Version to Swift 6. Go into the build settings and search for Swift Language Version:
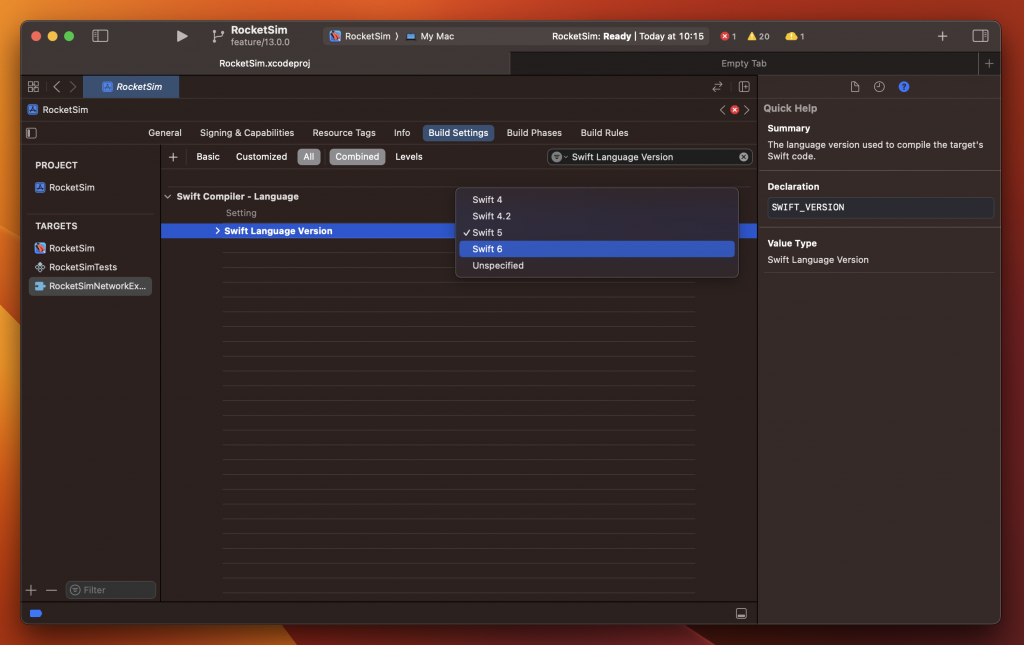
You might still run into new warnings and errors after enabling, but you’ve likely eliminated a bunch of warnings already due to the incremental migration steps.
For packages, you can set the swift-tools-version to 6.0 to enable Swift 6 language mode for all targets:
// swift-tools-version:6.0
// The swift-tools-version declares the minimum version of Swift required to build this package.

import PackageDescription
This is the first line inside your Package.swift files. To update a specific package target to an older language version, you’ll need to adopt the following Swift setting:
.target(
    name: "WindowMonitoring",
    dependencies: [],
    swiftSettings: [
        .swiftLanguageMode(.v5) // Still requires Swift 5
    ]
)
Note that you can remove any other Swift Settings for upcoming features or strict concurrency checking since they’ll be enabled by default after updating the language version.
Frequently Asked Questions (FAQ) related to Swift 6
I’m sure many questions pop up when you consider migrating your project. Here’s a list of commonly asked questions to help you out.
No, all projects, packages, and dependencies can migrate independently. That also means that you can migrate your projects before any 3rd party dependencies do.
Even in this case, you won’t notice anything. You can migrate your project when you are ready, independently from any dependencies.
It’s essential to understand it’s not only about getting rid of closures in favor of async/await. By using the concurrency framework, you’ll allow the compiler to validate your code for thread safety. The concurrency strictness warnings will indicate which types must become sendable, preventing you from creating data races and runtime exceptions.
As described in my article about existential any, Swift 6 will eventually force you to use any in front of existentials to indicate the impact on performance. I recommend reading up on existentials and deciding whether you want to start using an explicit indication of existentials today using the upcoming language feature.
Swift 6 was released during WWDC 2024 on June 11th and became officially available with Xcode 16.
Conclusion
With the major release of Swift 6, it’s time to update our project and packages and eliminate all data races. By performing the migration incrementally, you allow yourself to open pull requests with smaller changes. Ultimately, you’ll benefit from compile-time safety and stricter concurrency checking, preventing nasty bugs and crashes.
If you like to learn more tips on Swift, check out the Swift category page. Feel free to contact me or tweet to me on Twitter if you have any additional tips or feedback.
Thanks!