Swift offers migration tooling to help you migrate existing code to new upcoming features. Swift Evolution proposals on GitHub will mention an upcoming feature flag that you can use to opt in early. For most of these features, it’s likely that they’ll become the default in the future. Therefore, it’s essential to know how to adopt them gracefully.
Migrating manually to upcoming features is one of the 5 biggest mistakes iOS Developers make with async/await. For some features, it might be fine, but others can drastically impact your app’s performance. Let’s dive in!

How to access Swift’s Migration Tooling
Swift’s migration tooling works for both Xcode projects and Swift packages. Inside Xcode’s build settings you can search for Upcoming feature and use the dropdown to see if a feature supports migration:
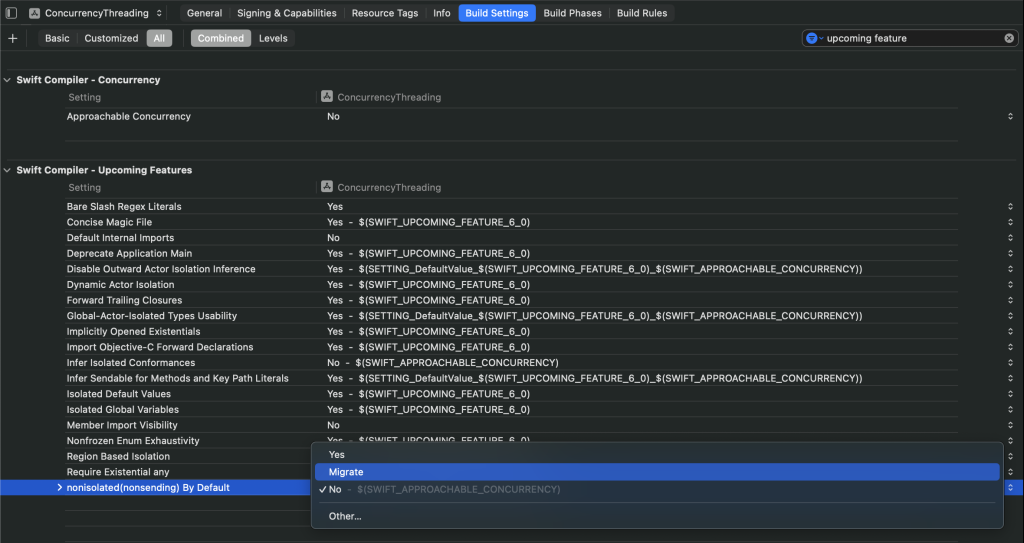
The Migrate option is a temporary setting. You’ll only enable it while migrating.
How does the Migration Tooling work?
After selecting Migrate, you need to build your project. Xcode’s compiler will perform checks on your code, and it shows a warning for methods that an upcoming feature will impact:
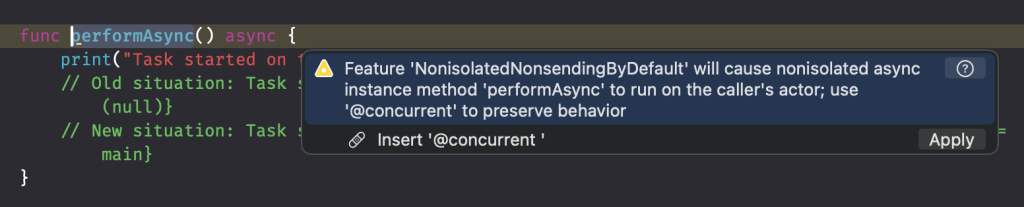
As you can see, we get the option to apply a fix by using the @concurrent attribute. This makes sense as we’re migrating to an upcoming feature called nonisolated(nonsending) by default. I dive deeper into this specific feature in my article @concurrent explained with code examples.
Better understanding migration warnings
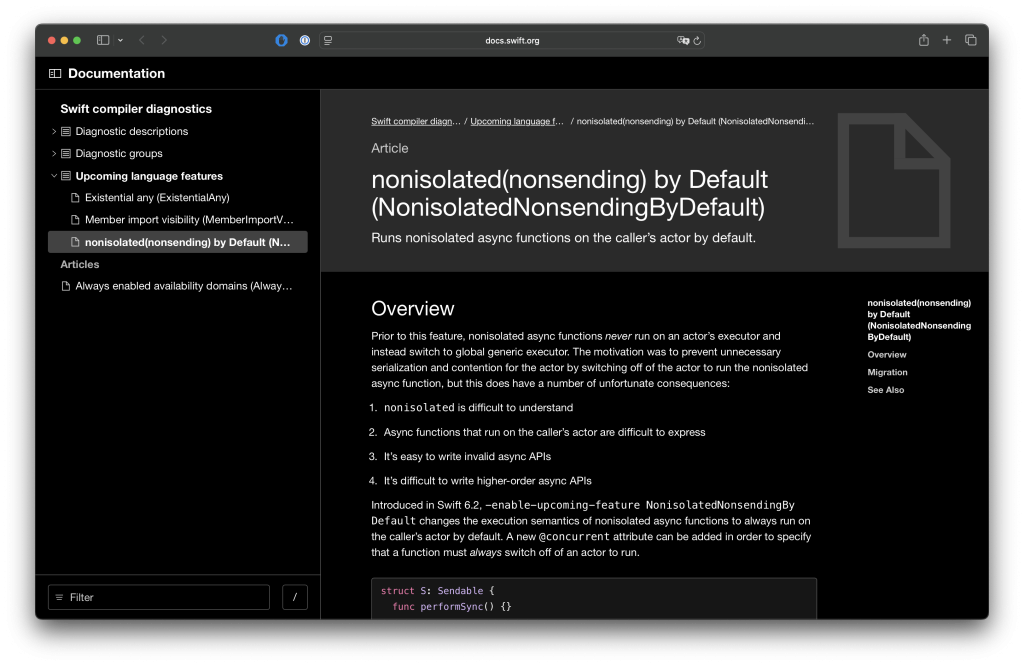
Some warnings might be intimidating. You’re migrating to a new feature, which comes with new learnings. Luckily enough, the Swift team thought about this, and they’ve added a question mark to the warning (see image above). Clicking this questionmark will navigate you to a detailed page for the warning:

FREE 5-Day Email Course: The Swift Concurrency Playbook
A FREE 5-day email course revealing the 5 biggest mistakes iOS developers make with with async/await that lead to App Store rejections And migration projects taking months instead of days (even if you've been writing Swift for years)
Migration Tooling for Swift Packages & automatically applying changes
You don’t have to do everything manually, and you can also apply changes automatically. Xcode’s build setting is just a little bit limited. On top of that, Xcode’s build settings only apply to your Xcode project. You’ll have to use a different approach for Swift packages.
I handle both automatic migration and the migration of Swift packages extensively in my Swift Concurrency Course.
Understanding the risks of migrating manually
Now that you know how to migrate using Swift’s migration tooling, I want you to understand better why it’s risky to migrate manually. Take the following code example:
class NotSendable {

    func performAsync() async {
        print("Task started on thread: \(Thread.currentThread)")
    }
}
This is a nonisolated class that does not conform to Sendable. It has a single async method called performAsync, and it prints out the current thread using a custom computed property on Thread (source code is in my free 5-day email course).
Imagine calling this method from a @MainActor attributed instance:
@MainActor
struct NewThreadingDemonstrator {

    func demonstrate() async {
        print("Starting on the main thread: \(Thread.currentThread)")
        // Prints: Starting on the main thread: <_NSMainThread: 0x6000006b4040>{number = 1, name = main}

        let notSendable = NotSendable()
        await notSendable.performAsync()

        /// Returning on the main thread.
        print("Resuming on the main thread: \(Thread.currentThread)")
        // Prints: Resuming on the main thread: <_NSMainThread: 0x6000006b4040>{number = 1, name = main}
    }
}
I’ve added print statements already for this code, since its threading won’t change due to the migration we’re about to do.
Now, let’s focus on the upcoming feature we’ve discussed before: nonisolated(nonsending) by default. This is the current threading behavior of our performAsync method before enabling the upcoming feature:
class NotSendable {

    func performAsync() async {
        print("Task started on thread: \(Thread.currentThread)")
        // Task started on thread: <NSThread: 0x600003694d00>{number = 8, name = (null)}
    }
}
As you can see, the task started on a background thread. In other words, it switched the isolation domain away from the @MainActor.
Manually enabling nonisolated(nonsending) by default
We’re now going to manually enable the upcoming feature. This means we’re not getting any help from Swift’s migration tooling and we’re not applying any code changes.
Our earlier defined method suddenly behaves differently:
class NotSendable {

    func performAsync() async {
        print("Task started on thread: \(Thread.currentThread)")
        // Task started on thread: <_NSMainThread: 0x6000006b4040>{number = 1, name = main}
    }
}
Suddenly, our method is no longer running on a background thread. Instead, it’s also performed on the main thread, potentially blocking the UI and decreasing the user’s experience.
If we would’ve used Swift’s migration tooling, it would have suggested us to apply @concurrent to retain the old behavior:
class NotSendable {

    @concurrent func performAsync() async {
        print("Task started on thread: \(Thread.currentThread)")
        // Task started on thread: <NSThread: 0x600003694d00>{number = 8, name = (null)}
    }
}
For those unfamiliar, nonisolated(nonsending) basically means:
- not-isolated to any isolation domain
- not-sending callers to a different isolation domain
In other words, methods attributed with nonisolated(nonsending) will take over the isolation domain of its callee, which is why we noticed a change to the main thread—we inherited it from the @MainActor attributed callee.
Conclusion
Swift’s migration tooling is a blessing for those with an existing codebase. I recommend adopting these upcoming features from the start for new projects, but definitely benefit from migration tooling in existing ones. Manually migrating large pieces of code can easily introduce new performance issues, making a migration much harder to complete.
This article demonstrates just one of the five biggest mistakes I see developers make when migrating to Swift Concurrency. If you’re ready to learn about the other 4 mistakes, I highly recommend to join my free 5-day email course.
Thanks!