Data validation in apps is important to make sure we save data conforming to the business rules. A name should be of a certain length and can’t contain invalid characters. It’s tempting to write all this logic in a new “Validator” class while we do a lot of this directly in our Core Data model configuration.
By doing so we make sure that we never end up with invalid data by verifying inputs upon saving the managed object context. We don’t have to call our validation logic from multiple places in our project. Instead, we’ve got it all defined in our managed object model class and we keep it all centralized.

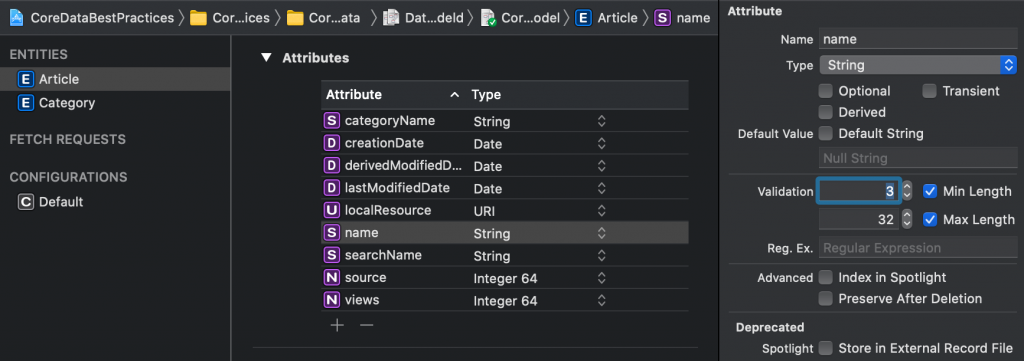
Adding data validation requirements in a entity configuration
One of the ways to add data validation is by setting this up in the entity configuration. In the following example, we’ve set the minimum length of our name attribute to be 3 characters and the maximum length to 32.
Whenever we save a name with an invalid input we’ll get an appropriate error:
Error Domain=NSCocoaErrorDomain Code=1670 “name is too short.”
It depends per attribute type whether or not we can add validation rules inside our attribute configuration. Whenever this is not possible we can make use of the validation methods available in the NSManagedObject class. These methods are also the right place to catch the above error and convert the localised string before it’s been shown to the user.
Making use of the validation methods inside an NSManagedObject subclass
If the attribute validation is not enough or when you want to be more flexible in defining validation logic you can decide to override the data validation methods available in the NSManagedObject subclass.
You might want to consider to always use these methods for your validation. Whenever your validation logic changes, you can simply update the code without having to do a Core Data model migration. This can save you a lot of time because model migrations can be quite hard to do sometimes.
There are three data validation methods we can override:
validateForInsert()validateForUpdate()validateForDelete()
For each of those it’s important to call super so that any default validation still occurs.
The methods themselves describe best when they’re called. It’s either validation on insert, update, or deletion. It’s important to point out that any logic you’ll write for insertions is likely also needed upon update. You don’t want the name to be updated to a short string while the same would fail upon insertion.
Therefore, I’ve written the following example code. Imagine having protected names for new articles added for which we want to check before insertion and updates. Whenever the title is protected, we throw an error which prevents the data from getting saved.
extension Article {
    enum Error: Swift.Error, LocalizedError {
        case protectedName(name: String)

        var recoverySuggestion: String? {
            switch self {
            case .protectedName(let name):
                return "The name '\(name)' is protected and can't be used."
            }
        }
    }

    override func validateForInsert() throws {
        try super.validateForInsert()
        try validateName()
    }

    override func validateForDelete() throws {
        try super.validateForDelete()
        /// Optionally a place to validate before deletion and cancel a deletion.
    }

    override func validateForUpdate() throws {
        try super.validateForUpdate()
        try validateName()
    }

    private func validateName() throws {
        let protectedNames: [String] = ["swiftlee", "antoine", "nsspain"]

        guard !protectedNames.contains(name.lowercased()) else {
            throw Error.protectedName(name: name)
        }
    }
}
We can easily append new protected names and we can add additional validation logic if required. By using an extension, we allow ourselves to write the code in a distinct file, keeping our validation logic centralized and easy to overview.
Once again, the right error is thrown whenever we want to insert or update data:
(lldb) po error
▿ Error
  ▿ protectedName : 1 element
- name : "Swiftlee"Conclusion
Data validation prevents invalid data from being inserted. Business rules can be applied and with the available validation methods we have the flexibility to validate any data before insertion, updates, and deletions. Validation might be settable inside the attribute configuration but be aware that it requires a Core Data model migration whenever you want to update your validation rules.
If you like to improve your Core Data knowledge, even more, check out the Core Data category page. Feel free to contact me or tweet to me on Twitter if you have any additional tips or feedback.
Thanks!