Constraints in Core Data are part of an entity configuration. Settings like the entity name and Spotlight display name might be easy to understand while constraints are a bit less known.
However, they can be super useful to maintain a unique set of data. Constraints can take away the need to filter out for existing entries and allow to merge updated values with existing values using a custom merging policy set on a managed object context.

Maintaining a unique set of Core Data entries
To explain to you how constraints in Core Data work we’re going to configure a User entity in a Core Data model:
final class User: NSManagedObject, Identifiable {

    @NSManaged var name: String?
    @NSManaged var email: String?
    @NSManaged var publicIdentifier: String!

    override func awakeFromInsert() {
        super.awakeFromInsert()

        setPrimitiveValue(UUID().uuidString, forKey: #keyPath(User.publicIdentifier))
    }
}
Our entity contains a name, email, and a public identifier. The email is unique to the user and there should, obviously, only exist one. Our goal is to implement a structure in which we ensure this uniqueness.
To learn more about using awakeFromInsert in combination with primitive values I recommend reading my blog post NSManagedObject events: handling state in Core Data.
Without using constraints in our entity configuration we could easily end up with code looking like this:
if userExists {
    // Update existing user with given values
} else {
    // Insert new user with given values
}
This could easily lead to a lot of extra code to build up a fetch request with a given predicate. On top of that, you need to look up for existing values using a fetch request which is less performant!
Using SwiftUI to visualize constraints in Core Data
To show you exactly how this works we’re going to use a SwiftUI view which is making use of Core Data:
import SwiftUI

struct ContentView: View {

    @Environment(\.managedObjectContext) var managedObjectContext
    @FetchRequest(entity: User.entity(), sortDescriptors: []) var users: FetchedResults<User>

    var body: some View {
        NavigationView {
            VStack {
                List(users, id: \.self) { user in
                    VStack(alignment: .leading) {
                        Text(user.name ?? "Ghost")
                        Text(user.publicIdentifier)
                            .font(.footnote)
                    }
                }
            }
            .navigationBarTitle("Users")
            .navigationBarItems(leading:
                Button("Add") {
                    let user = User(context: managedObjectContext)
                    user.name = "Antoine van der Lee"
            }, trailing:
                Button("Save") {
                    try! self.managedObjectContext.save()
            })
        }
    }
}
This creates a basic view with a list of users and navigation bar buttons to add new users and save the new entries. For the sake of this example, we’re consistently adding a user with the same name. Without constraints, we could easily end up with the following list after saving:
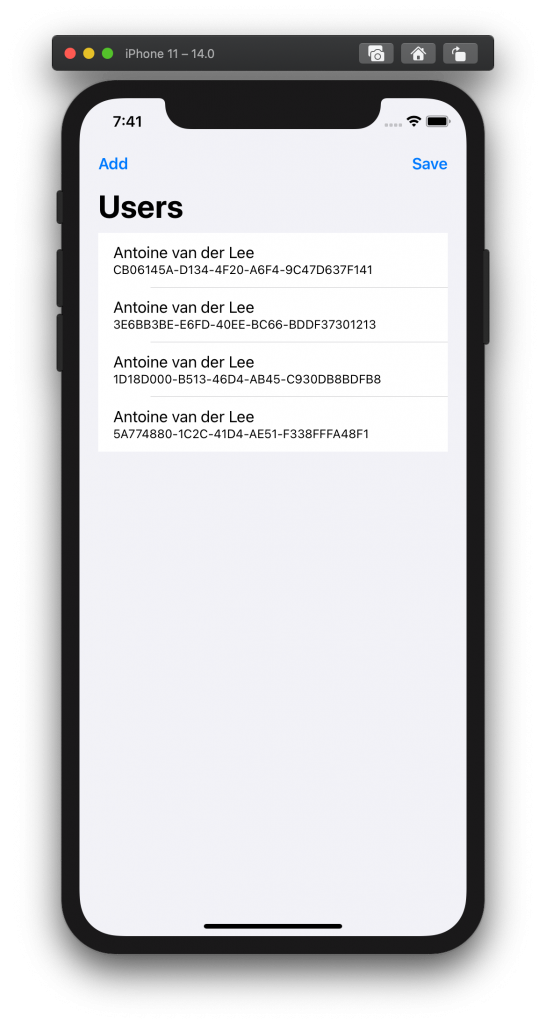
There’s no logic in place to prevent us from having multiple users with the same name.
Let’s change this by adding constraints to our data model:
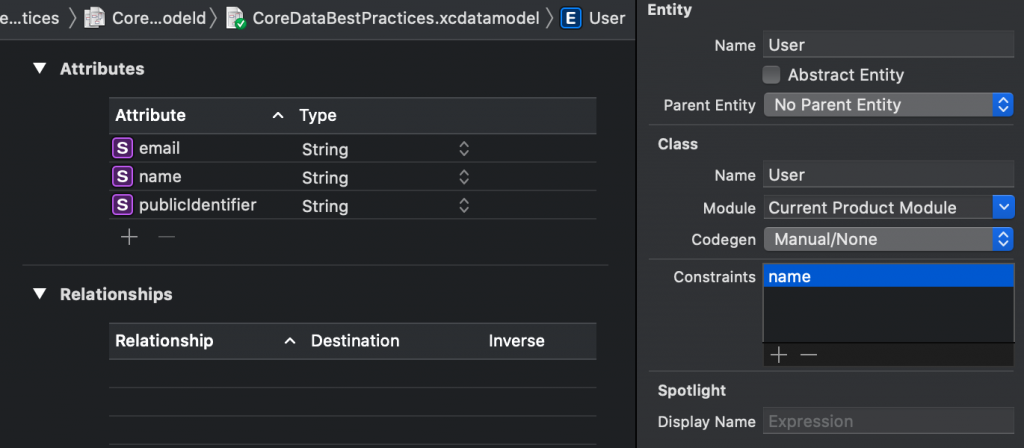
Underneath the class section, you’ll find an option to configure constraints. This is a comma-separated list of attribute names.
In our case, we’re adding the name attribute to make this property unique. It makes sure that it’s not possible to add multiple users with the same name.
Adjusting the merge policy to handle conflicts
With the above-configured constraints we can run our app and realize that our changes fail to save:
Fatal error: ‘try!’ expression unexpectedly raised an error: Error Domain=NSCocoaErrorDomain Code=133021 “(null)” UserInfo={NSExceptionOmitCallstacks=true, conflictList=(
“NSConstraintConflict (0x600003130dc0) for constraint (\n name\n): database: (null), conflictedObjects: (\n \”0x60000243c660 \”,\n \”0x600002414c20 \”\n)”
As you can see, our constraint is working and disallows saving an entry with the same name. However, our context does not yet know how to merge multiple entries for which we need to set a merge policy.
We can do this by setting the mergePolicy property on our managed object context:
persistentContainer.viewContext.mergePolicy = NSMergeByPropertyObjectTrumpMergePolicyThe policy defaults to an error policy that comes down to raising an error as we’ve seen before. Without going over all available policies there are two I’d like to point out:
NSMergeByPropertyStoreTrumpMergePolicy
External changes trumping in-memory changes.NSMergeByPropertyObjectTrumpMergePolicy
In-memory changes trumping external changes.
In other words, they define whether existing values are replaced by new values or not.
We can use our sample view to see how this works in action by taking a look at the public identifier which is visible in the cells. By using NSMergeByPropertyObjectTrumpMergePolicy we can see that our new entry’s public identifier is used in the final version. Using NSMergeByPropertyStoreTrumpMergePolicy we can see that our existing entry’s public identifier remains.
This is an important difference to be aware of and the best policy for your project can be different from the best policy for another project. New values that didn’t exist in the existing entity will be added with the merge.
After all, our application is working nicely and merges new entries with our existing entry. We end up with having only unique users in our database without writing any extra logic to check for users with a given name.
Conclusion
Constraints in Core Data allow us to set restrictions to our dataset. We prevent having duplicate entries with our model definition and take away the need to write logic to fetch and search for existing values. We both gain performance wins and we have less code to write.
If you like to improve your Swift knowledge, even more, check out the Swift category page. Feel free to contact me or tweet to me on Twitter if you have any additional tips or feedback.
Thanks!