Async await is part of the new structured concurrency changes that arrived in Swift 5.5 during WWDC 2021. Concurrency in Swift means allowing multiple pieces of code to run at the same time. This is a very simplified description, but it should give you an idea already of how important concurrency in Swift is for the performance of your apps. With the new async methods and await statements, we can define methods that perform work asynchronously.
You might have read about the Swift Concurrency Manifesto by Chris Lattner before, which was announced a few years back. It described the future ahead, which has been made concrete with the release of Swift 6 in 2024. Now that it’s finally here, we can simplify our code with async-await and make our asynchronous code easier to read.

What is async?
Async stands for asynchronous and can be seen as a method attribute, making it clear that a method performs asynchronous work. An example of such a method looks as follows:
func fetchImages() async throws -> [UIImage] {
    // .. perform data request
}
The fetchImages method is defined as async throwing, which means that it performs a failable asynchronous job. If everything goes well, the method returns a collection of images or throws an error.
How async replaces closure completion callbacks
Async methods replace the often-seen closure completion callbacks. Completion callbacks were common in Swift to return from an asynchronous task, often combined with a Result type parameter. The above method would have been written as follows:
func fetchImages(completion: (Result<[UIImage], Error>) -> Void) {
    // .. perform data request
}
Defining a method using a completion closure is still possible in Swift today, but it has a few downsides that are solved by using async instead:
- You have to call the completion closure in each possible method exit. Not doing so may result in the app waiting indefinitely for a result.
- Closures are more complicated to read. Reasoning about the order of execution is not as easy as it is with structured concurrency.
- Retain cycles need to be avoided by using weak references.
- Implementors must transfer the result to obtain the outcome. Try-catch statements are not allowed at the implementation level.
These downsides are based on the closure version using the Result enum. Some projects might still make use of completion callbacks without this enumeration:
func fetchImages(completion: ([UIImage]?, Error?) -> Void) {
    // .. perform data request
}
Defining a method like this makes it even harder to reason about the outcome on the caller’s side. Both value and error are optional, which requires us to perform an unwrap in any case. Unwrapping these optionals results in more code clutter, which does not help improve readability.
What is await?
Await is the keyword to be used for calling async methods. You can see them as best friends in Swift, as one will never go without the other. You could say:
“Await is awaiting a callback from his buddy async”
Even though this sounds childish, it’s not a lie! We could take a look at an example by calling our earlier defined async throwing fetch images method:
do {
    let images = try await fetchImages()
    print("Fetched \(images.count) images.")
} catch {
    print("Fetching images failed with error \(error)")
}
It might be hard to believe, but the above code example performs an asynchronous task. Using the await keyword, we tell our program to await a result from the fetchImages method and only continue after a result arrives. This could be a collection of images or an error if anything went wrong while fetching the images.

FREE 5-Day Email Course: The Swift Concurrency Playbook
A FREE 5-day email course revealing the 5 biggest mistakes iOS developers make with with async/await that lead to App Store rejections And migration projects taking months instead of days (even if you've been writing Swift for years)
What is structured concurrency?
Structured concurrency with async-await method calls makes it easier to reason about the execution order. Methods are linearly executed without going back and forth, as you would with closures.
To explain this better, we can look at how we would call the above code example before structured concurrency arrived:
// 1. Call the method
fetchImages { result in
    // 3. The asynchronous method returns
    switch result {
    case .success(let images):
        print("Fetched \(images.count) images.")
    case .failure(let error):
        print("Fetching images failed with error \(error)")
    }
}
// 2. The calling method exits
As you can see, the calling method returns before the images are fetched. Eventually, a result is received, and we return to our flow within the completion callback. This is an unstructured order of execution and can be hard to follow. This is especially true if we perform another asynchronous method within our completion callback, which would add another closure callback:
// 1. Call the method
fetchImages { result in
    // 3. The asynchronous method returns
    switch result {
    case .success(let images):
        print("Fetched \(images.count) images.")

        // 4. Call the resize method
        resizeImages(images) { result in
            // 6. Resize method returns
            switch result {
            case .success(let images):
                print("Decoded \(images.count) images.")
            case .failure(let error):
                print("Decoding images failed with error \(error)")
            }
        }
        // 5. Fetch images method returns
    case .failure(let error):
        print("Fetching images failed with error \(error)")
    }
}
// 2. The calling method exits
Each closure adds another level of indentation, which makes it harder to follow the order of execution.
Rewriting the above code example by making use of async-await explains best what structured concurrency does:
do {
    // 1. Call the method
    let images = try await fetchImages()
    // 2. Fetch images method returns

    // 3. Call the resize method
    let resizedImages = try await resizeImages(images)
    // 4. Resize method returns

    print("Fetched \(images.count) images.")
} catch {
    print("Fetching images failed with error \(error)")
}
// 5. The calling method exits
The order of execution is linear, so it is easy to follow and reason about. Understanding asynchronous code becomes easier when we perform complex tasks.
Structured concurrency is not only about the order of execution. There are structured and unstructured tasks, both with different behaviors. If you’re curious to learn more about these, I encourage you to check out my in-depth concurrency course at www.swiftconcurrencycourse.com.
Async methods call in a function that does not support concurrency
While using async-await for the first time, you might run into an error like:

This error occurs when attempting to call an asynchronous method from a synchronous calling environment that does not support concurrency. We can solve this error by either defining our fetchData method as async as well:
func fetchData() async {
    do {
        try await fetchImages()
    } catch {
        // .. handle error
    }
}
However, this would move the error to a different place. Instead, we could use the Task.init method to call the asynchronous method from a new task that does support concurrency and assign the outcome result to a property in our view model:
final class ContentViewModel: ObservableObject {

    @Published var images: [UIImage] = []

    func fetchData() {
        Task { @MainActor in
            do {
                self.images = try await fetchImages()
            } catch {
                // .. handle error
            }
        }
    }
}
The Task initializer method creates a new asynchronous context for asynchronous methods. We must use the @MainActor attribute since we’re updating a @Published property that triggers UI updates. You can learn more about this in my article MainActor usage in Swift explained to dispatch to the main thread.
The fetch data method returns as soon as the async method is called, after which all asynchronous callbacks will happen within the closure.
Adopting async-await in an existing project
When adopting async-await in existing projects, you want to be careful not to break all your code simultaneously. When performing big refactors like these, it’s good to consider maintaining old implementations for the time being so you don’t have to update all your code before you know whether your new implementation is stable enough. This is similar to deprecating methods in an SDK, which is used by many different developers and projects.
You’re not obligated to do so, but running old methods side-by-side makes it easier to try out async-await in your project. On top of that, Xcode makes it super easy to refactor your code and also provides an option to create a separate async method:
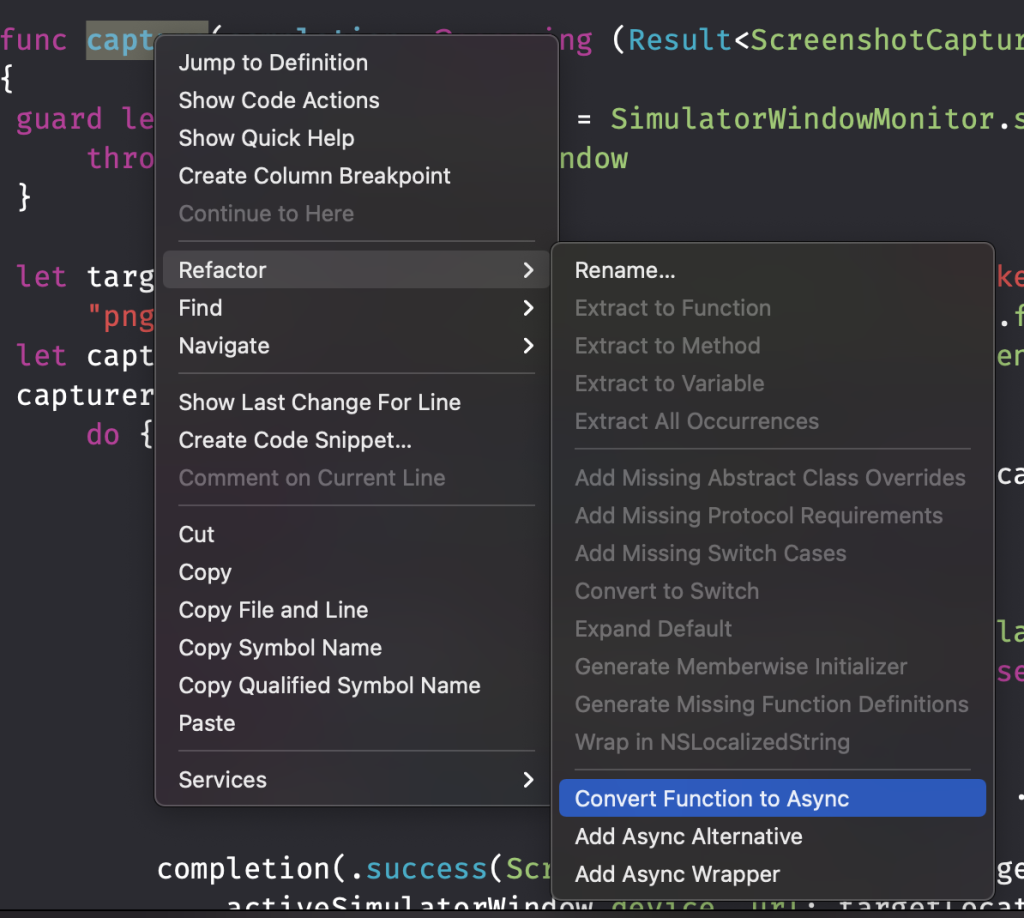
Each refactor method has its purpose and results in different code conversions. To understand better how this works, we’ll use the following code as refactor input:
struct ImageFetcher {
    func fetchImages(completion: @escaping (Result<[UIImage], Error>) -> Void) {
        // .. perform data request
    }
}
Convert Function to Async
The first refactor option converts the fetch images method into an async variant without keeping the non-async alternative. This option is useful if you prefer not to maintain your old implementation. The resulting code looks as follows:
struct ImageFetcher {
    func fetchImages() async throws -> [UIImage] {
        // .. perform data request
    }
}
Add Async Alternative
The add async alternative refactor option makes sure to keep the old implementation in place but does take care of adding an available attribute:
struct ImageFetcher {
@available(*, renamed: "fetchImages()")
func fetchImages(completion: @escaping (Result<[UIImage], Error>) -> Void) {
Task {
do {
let result = try await fetchImages()
completion(.success(result))
} catch {
completion(.failure(error))
}
}
}
func fetchImages() async throws -> [UIImage] {
// .. perform data request
}
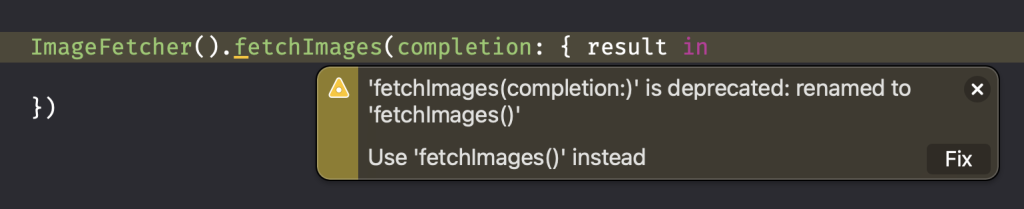
}The available attribute is helpful for knowing where to update your code towards the new concurrency variant. However, the default implementation Xcode provides does not come with any warning since it’s not marked as deprecated. To do so, you’ll need to adjust the available marker as follows:
@available(*, deprecated, renamed: "fetchImages()")You can learn more about the available marker in my article How to use the #available attribute in Swift.
The benefit of using this refactor option is that it allows you to progressively adapt to the new structured concurrency changes without converting your complete project at once. Building in between is valuable, so you know that your code changes work as expected. Implementations that make use of the old method will get a warning as follows:
You can progressively change your implementations throughout your project and use the provided fix button in Xcode to automatically convert your code to use the new implementation.
Add Async Wrapper
The final refactor method will result in the easiest conversion since it will simply make use of your existing code:
struct ImageFetcher {
    @available(*, renamed: "fetchImages()")
    func fetchImages(completion: @escaping (Result<[UIImage], Error>) -> Void) {
        // .. perform data request
    }

    func fetchImages() async throws -> [UIImage] {
        return try await withCheckedThrowingContinuation { continuation in
            fetchImages() { result in
                continuation.resume(with: result)
            }
        }
    }
}
The newly added method uses the withCheckedThrowingContinuation method, which was introduced in Swift to convert closure-based methods without much effort. Non-throwing methods can use the withCheckedContinuation, which works the same but does not support throwing errors.
These two methods suspend the current task until the given closure is called to trigger the continuation of the async-await method. In other words, you’ll have to make sure to call the continuation closure based on the callback of your closure-based method. In our example, this comes down to calling the continuation with our result value returned from the original fetch images callback.
Picking the right async-await refactor method for your project
These three refactor options should be enough to convert your existing code into async alternatives. Depending on the size of your project and the amount of time you have for the refactor, you should pick a different refactor option. However, I would strongly advise progressively applying changes since it allows you to isolate parts that changed, making it easier to test whether your changes work as expected.
Migrating to Swift 6
Migrating your project to async/await is a significant refactor, but it’s not the only one you should schedule on your roadmap. With the release of Swift 6 at WWDC ’24 and Swift 6.2 at WWDC ’25, we can eliminate all data races using structured concurrency and compile-time code validation.
Depending on your project, you might be better off migrating to Swift 6+ before rewriting your code to async/await alternatives. However, since structured concurrency supports Swift 6’s compile-time checks, I recommend migrating to async/await before following my detailed steps for migrating to Swift 6.
Make sure to read my article Swift 6.2: A first look at how it’s changing Concurrency right after, since it drastically influences how we work with Swift Concurrency.
Will async await be the end of the Result enum?
We’ve seen that async methods replace asynchronous methods that use closure callbacks. We could ask ourselves whether this will be the end of the Result enum in Swift. In the end, we don’t really need them anymore as we can make use of try-catch statements in combination with async-await.
The Result enum won’t disappear anytime soon, as it’s still used in many places throughout Swift projects. However, I won’t be surprised to see it deprecated once the adoption rate of async-await increases. Personally, I’ve not been using the Result enum anywhere else except in completion callbacks. Once I have entirely used async-await, I won’t use the enum anymore.
Continuing your journey into Swift Concurrency
The concurrency changes are more than just async-await and include many new features you can benefit from in your code. We barely touched the surface; I did not even mention Sendable or Task Groups, which are both essential parts of Swift Concurrency.
Now that you’ve learned about the basics of async and await, it’s time to dive into other new concurrency features:
- Swift 6.4: What’s New in Concurrency
- Using Xcode Instruments to optimize Swift Concurrency Code
- Unexpected Task suspension points in Swift Concurrency
- Immediate tasks in Swift Concurrency explained
- Agent Skills explained: Replacing AGENTS.md with reusable AI knowledge
- 9 months of a Swift Concurrency Course
- Approachable Concurrency in Swift 6.2: A Clear Guide
- MainActorMessage & AsyncMessage: Concurrency-safe notifications
- Why Swift Migration Tooling Matters
- The 5 biggest mistakes iOS Developers make with async/await
- Async await in Swift explained with code examples
- Global actor in Swift Concurrency explained with code examples
- Combine and Swift Concurrency: A threading risk
- Threads vs. Tasks in Swift Concurrency
- Modern Swift Lock: Mutex & the Synchronization Framework
- Swift Concurrency & Swift 6 Course (Launch offer)
- Default Actor Isolation in Swift 6.2
- @concurrent explained with code examples
- Swift 6.2: A first look at how it’s changing Concurrency
- What is Structured Concurrency?
- Task.sleep() vs. Task.yield(): The differences explained
- Swift 6: What’s New and How to Migrate
- MainActor usage in Swift explained to dispatch to the main thread
- How to Use URLSession with Async/Await for Network Requests in Swift
- Concurrency-safe global variables to prevent data races
- Unit testing async/await Swift code
- Thread dispatching and Actors: understanding execution
- @preconcurrency: Incremental migration to concurrency checking
- Detached Tasks in Swift explained with code examples
- Task Groups in Swift explained with code examples
- Sendable and @Sendable closures explained with code examples
- AsyncSequence explained with Code Examples
- AsyncThrowingStream and AsyncStream explained with code examples
- Tasks in Swift explained with code examples
- Nonisolated and isolated keywords: Understanding Actor isolation
- Async let explained: call async functions in parallel
- Actors in Swift: how to use and prevent data races
Conclusion
Async-await in Swift allows for structured concurrency, improving the readability of complex asynchronous code. Completion closures are no longer needed, and calling into multiple asynchronous methods one after another is a lot more readable. Several new types of errors can occur, which require new knowledge around concurrency to solve. With the release of Swift 6 at WWDC ’24 and Swift 6.2 at WWDC ’25, it became even more important to start migrating your projects. There’s no better time to start diving deeper into concurrency using the Swift Concurrency Course.
Thanks!