Rich notifications on iOS allow us to make the boring default notification just a little nicer by adding images, GIFs, and buttons. Introduced in iOS 10 and enhanced in later OS updates it’s a feature that cannot miss when you support notifications in your app.
Testing push notification on iOS
Before we start implementing it’s required to have a good testing environment. This all starts with having the right tools at hand.
Testing with Xcode 11.4 and above
Xcode 11.4 makes it a lot easier for us to test push notifications as we can now test remote notifications right from the terminal in the iOS Simulator. This practice is explained in detail in my blog post Testing push notifications on the iOS simulator.
Testing with earlier Xcode versions
You can test push notifications in multiple ways, like from the terminal or from a Mac app. The latter is recommended as it gives you a user interface which makes it easier to fill in any details.
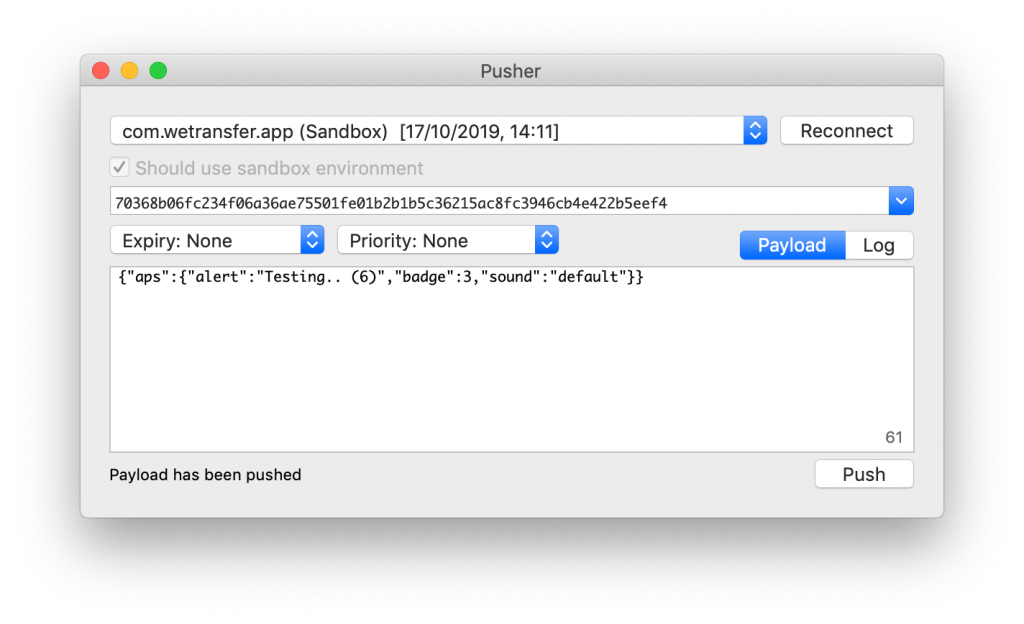
I’ve been using a Mac app called NWPusher for years now and it never let me down. It’s very simple and easy to use and comes with the following interface:

It requires you to select your push certificate after which you can connect to Apple’s Push Notification Service (APNS). The application will let you know whether the connection has been successfully established from the log.
Getting the iOS push notification token
To test any notifications you have to have the push notification token which you can easily fetch in Swift. In your AppDelegate you can add the following method which will print out the device token to the console:
func application(_ application: UIApplication, didRegisterForRemoteNotificationsWithDeviceToken deviceToken: Data) {
    let deviceToken: String = deviceToken.map { String(format: "%02.2hhx", $0) }.joined()
    print("Device token is: \(deviceToken)")
}
Sending a test notification
After you’ve set up the NWPusher application it’s time to send a first test notification. Make sure that you’ve requested push notification permissions to receive loud notifications. Otherwise, you’ll likely only see the badge symbol being updated.
If everything goes well and you’ve received your first notification you’re all set to implement rich notifications support.
Testing push notifications on the iOS Simulator
Although there’s a solution available by including a framework to your project, it’s outdated and not recommended to use. It tries to replicate the way Apple sends push notifications but it’s not said to be exactly the same. Especially if it’s not maintained anymore!
Therefore, it’s highly recommended to test push notifications on a real device until Apple makes it possible to test rich notifications on the simulator.
Creating a custom push notification with an image
Creating a custom push notifications with an image as media attachment makes a notification look a lot nicer. In other words, it makes it a richer notification!

To do this, we need to create a new Notification Service Extension which will modify the content of a remote notification before it’s delivered to the user. This can be any kind of notification like changing the title, as well as downloading an image.
The extension will only be called if the following requirements are met:
- The remote notification is configured to display an alert
- The payload of the remote notification includes the
mutable-contentkey with a value set to 1
Note that you cannot modify silent notifications or those that only play a sound or badge the app’s icon.
Adding a Notification Service Extension
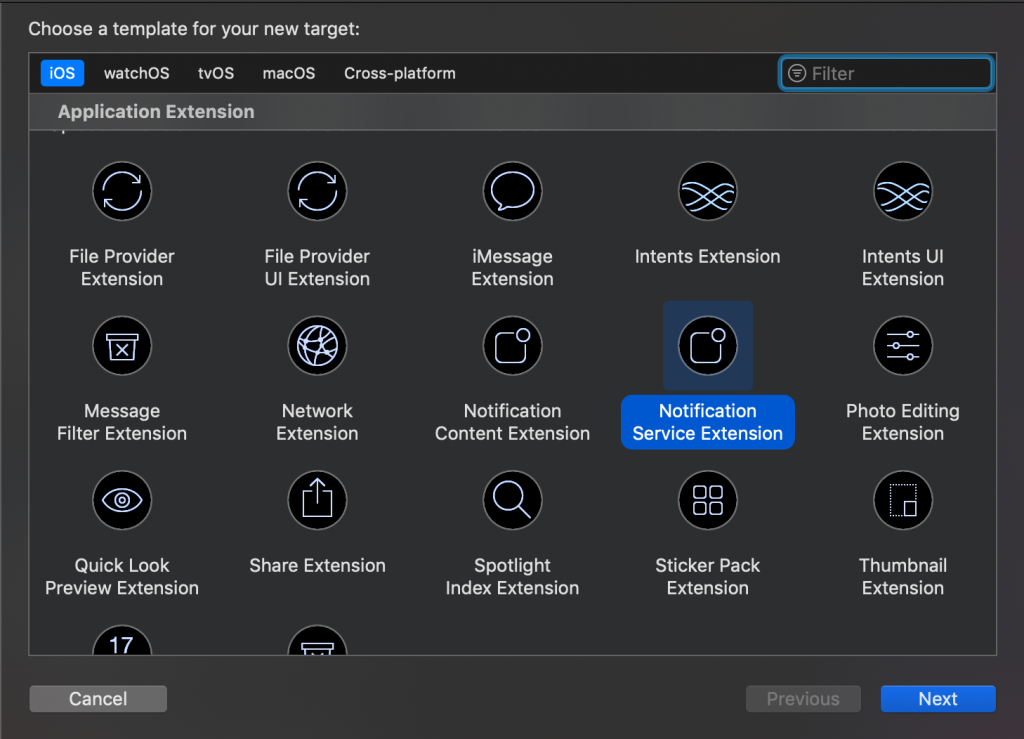
A Notification Service Extension can be added right in Xcode by selecting File -> New -> Target.

This will create a new Swift file containing a class which inherits from UNNotificationServiceExtension. This is our entry point for catching a remote notification and adjusting it before it’s been displayed to the user.
Adding an image to a push notification
To add an image as a media attachment to a push notification we need to adjust the code of our UNNotificationServiceExtension class. We will perform the following steps:
- Check if an image URL exists
- Download the image and save to disk
- Attach the image file URL to the notification
- Send back the modified notification
For this, we create two new extensions that get the image URL from the notification request and saves it to disk.
extension UNNotificationRequest {
    var attachment: UNNotificationAttachment? {
        guard let attachmentURL = content.userInfo["image_url"] as? String, let imageData = try? Data(contentsOf: URL(string: attachmentURL)!) else {
            return nil
        }
        return try? UNNotificationAttachment(data: imageData, options: nil)
    }
}

extension UNNotificationAttachment {

    convenience init(data: Data, options: [NSObject: AnyObject]?) throws {
        let fileManager = FileManager.default
        let temporaryFolderName = ProcessInfo.processInfo.globallyUniqueString
        let temporaryFolderURL = URL(fileURLWithPath: NSTemporaryDirectory()).appendingPathComponent(temporaryFolderName, isDirectory: true)

        try fileManager.createDirectory(at: temporaryFolderURL, withIntermediateDirectories: true, attributes: nil)
        let imageFileIdentifier = UUID().uuidString + ".jpg"
        let fileURL = temporaryFolderURL.appendingPathComponent(imageFileIdentifier)
        try data.write(to: fileURL)
        try self.init(identifier: imageFileIdentifier, url: fileURL, options: options)
    }
}
It saves the file using a UUID followed by the JPG file extension. If your service is returning a different file type you can adjust the code accordingly. This would also be the place to change JPG to GIF in case you want to support displaying GIFs.
To actually make use of this code we have to adjust the default implemented didReceive method:
final class NotificationService: UNNotificationServiceExtension {

    private var contentHandler: ((UNNotificationContent) -> Void)?
    private var bestAttemptContent: UNMutableNotificationContent?

    override func didReceive(_ request: UNNotificationRequest, withContentHandler contentHandler: @escaping (UNNotificationContent) -> Void) {
        self.contentHandler = contentHandler
        bestAttemptContent = (request.content.mutableCopy() as? UNMutableNotificationContent)

        defer {
            contentHandler(bestAttemptContent ?? request.content)
        }

        guard let attachment = request.attachment else { return }

        bestAttemptContent?.attachments = [attachment]
    }

    override func serviceExtensionTimeWillExpire() {
        // Called just before the extension will be terminated by the system.
        // Use this as an opportunity to deliver your "best attempt" at modified content, otherwise the original push payload will be used.
        if let contentHandler = contentHandler, let bestAttemptContent = bestAttemptContent {
            contentHandler(bestAttemptContent)
        }
    }
}
The code will use the default notification content as a best attempt fallback, tries to fetch the attachment and returns the modified notification if this all succeeds.
Do note that the didReceive method has a limited amount of time to perform its task. If your method is not calling the completion block before it runs out of time the serviceExtensionTimeWillExpire() method will be called with the best attempt content available by that time. If you didn’t adjust anything yet, it will fall back to the original content.
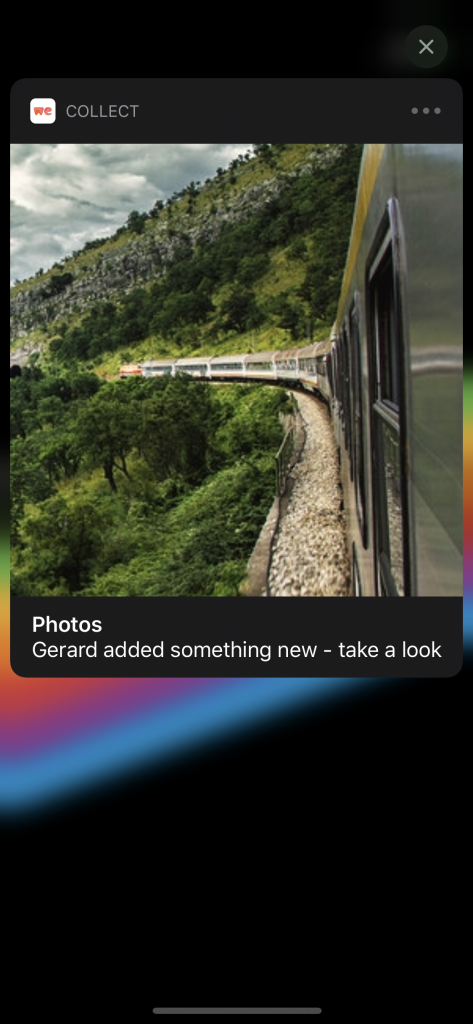
This is all the code we need to display an image in the notification and results in our first rich notification!
Adding push notification interaction buttons
The next step would be to add interactive action buttons to your rich notifications. Notifications containing buttons are also known as Actionable Notification Types.
For this to work, we need to register a so-called notification category in which we can register the buttons. Every notification within that category will show the registered buttons underneath the content when being displayed in detail.
Declaring your custom notification categories and actions
For actionable notification types to work we need to register notification categories containing the actions at launch time within the main app.
private func registerNotificationCategories() {
    let openBoardAction = UNNotificationAction(identifier: UNNotificationDefaultActionIdentifier, title: "Open Board", options: UNNotificationActionOptions.foreground)
    let contentAddedCategory = UNNotificationCategory(identifier: "content_added_notification", actions: [openBoardAction], intentIdentifiers: [], hiddenPreviewsBodyPlaceholder: "", options: .customDismissAction)
    UNUserNotificationCenter.current().setNotificationCategories([contentAddedCategory])
}
Calling this method from your application(_:didFinishLaunchingWithOptions:) method will register an “Open Board” action button for all notifications in the content_added_notification category. We are using this category in the Collect by WeTransfer app for every notification that’s been triggered for newly added content.
It’s important to give your actions a unique identifier as it’s the only way to distinguish one action from another. This even counts for actions that belong to different categories. In the above example, we’re using the UNNotificationDefaultActionIdentifier as we’re only adding one action.
Adding the category to your rich notification
The next step is adding the category to your push notification. This can be done by adding the category key to the “aps” dictionary of the JSON payload:
{
	"aps": {
		"category": "content_added_notification",
		"alert": {
			"title": "Photos",
			"body": "Antoine added something new - take a look"
		},
		"mutable-content": 1
	},
	"image_url": "https://www.example.com/image_url"
}
Another way would be to simply reuse our Notification Service Extension by adjusting the code inside the didReceive method:
override func didReceive(_ request: UNNotificationRequest, withContentHandler contentHandler: @escaping (UNNotificationContent) -> Void) {
    self.contentHandler = contentHandler
    bestAttemptContent = (request.content.mutableCopy() as? UNMutableNotificationContent)

    defer {
        contentHandler(bestAttemptContent ?? request.content)
    }

    /// Add the category so the "Open Board" action button is added.
    bestAttemptContent?.categoryIdentifier = "content_added_notification"

    guard let attachment = request.attachment else { return }

    bestAttemptContent?.attachments = [attachment]
}
This, however, only works for notifications that also have added the mutable-content to the JSON payload.
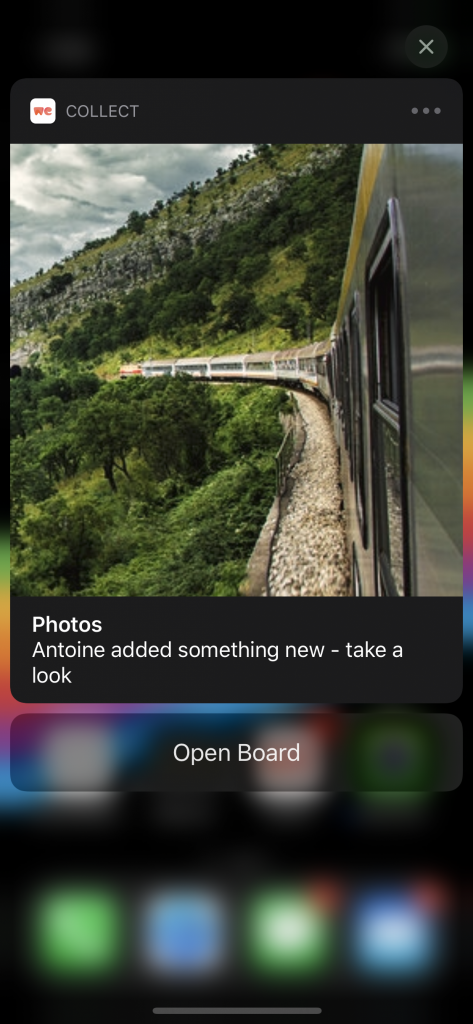
This will be enough to show the notification with our “Open Board” action button:

Handling the rich notification button callback
The system launches your app in the background once a user selects a notification action. It will notify the delegate which should be set on the shared UNUserNotificationCenter instance. We can use the userNotificationCenter(_:didReceive:withCompletionHandler:) method to identify the selected action and perform the related action.
func userNotificationCenter(_ center: UNUserNotificationCenter, didReceive response: UNNotificationResponse, withCompletionHandler completionHandler: @escaping () -> Void) {
    defer {
        completionHandler()
    }

    /// Identify the action by matching its identifier.
    guard response.actionIdentifier == UNNotificationDefaultActionIdentifier else { return }

    /// Perform the related action
    print("Open board tapped from a notification!")

    /// .. deeplink into the board
}
Always make sure to call the completionHandler when you’re done executing the action. We can do this easily by using a defer statement.
Conclusion
That was it! A great way to enrich your app with rich notifications. It took us less than an hour to implement in the Collect app so there’s no reason to hold back!
If you want to learn more about notifications I recommend this great talk by Kaya Thomas which goes into more detail: Customizing Your Notifications for iOS 12. For now, this was it!
Thanks!