Testing private methods and variables is often something we run into when writing tests for our applications. You could think that it’s needed to fully verify that your code is working as expected and it helps you to get to that 100% code coverage.
If you’re new to unit testing in Swift, you might first want to read my article “Unit tests best practices in Xcode and Swift”.

I can start this post by telling you that I don’t have the answer to actually make it possible to test private methods and variables. Yes, we could implement “hacky solutions” to expose our private methods but those will add so-called “code smell” that’s only written for tests. Instead, I’d like to change your perspective and show you that you don’t have to test private methods and variables. At least, not directly.
100% Code coverage should not be your goal
Before diving into the possibilities we have I’d like to explain that it should not be your goal to reach the 100% code coverage. It can take quite some time to reach it either way and it’s often not worth the investment.
Instead, it’s better to focus on writing quality tests for the important flows in your code. Especially in cases where you don’t have a lot of time to write tests, it’s better to forget about reaching 100%. You will both feel a lot better while also saving you a lot of time (and possible headaches).
How do I verify that my private code is working?
I can hear you thinking:
But how do I make sure my private code is working correctly?
Sometimes, even if you don’t care about reaching 100% code coverage, you still find yourself in a scenario of willing to validate a certain piece of private code.
All private code should be accessible somewhere through a public API. If everything would’ve been private, you would never be able to even use the code.
There are cases in which your code is only accessible from the class itself and it gets activated through the class initializer. Take the following code example of a session monitor that is sending a signal to our tracker when the app enters foreground or background mode:
final class Tracker {
    private var hasActiveSession: Bool = false

    func startNewSession() {
        hasActiveSession = true
    }

    func stopCurrentSession() {
        hasActiveSession = false
    }
}

final class SessionMonitor {

    private let tracker: Tracker

    init(tracker: Tracker) {
        self.tracker = tracker
        startObserving()
    }

    private func startObserving() {
        NotificationCenter.default.addObserver(self, selector: #selector(startSession), name: UIApplication.willEnterForegroundNotification, object: nil)
        NotificationCenter.default.addObserver(self, selector: #selector(endSession), name: UIApplication.didEnterBackgroundNotification, object: nil)
    }

    @objc private func startSession() {
        tracker.startNewSession()
    }

    @objc private func endSession() {
        tracker.stopCurrentSession()
    }
}
In this case, we nicely isolated all the logic and only exposed the bare minimum: the initializer itself. However, we do want to validate that our startSession and endSession methods are getting called correctly when the willEnterForegroundNotification and didEnterBackgroundNotification are getting called.
There are multiple ways of achieving this of which one might be tempting to do: making both the tracker and hasActiveSession non-private and read them from the unit test. This works and is probably a fast solution to our problem but it does require moving away from our nicely isolated API. Instead, we could introduce a new protocol and work with dependency injection.
Dependency injection as a solution to validating private code
Dependency injection makes it possible to validate private code by injecting a mocked version of a certain instance. In our case, this means creating a mocked version of our Tracker instance.
To do this, we first need to introduce a new SessionTracking protocol:
protocol SessionTracking {
    func startNewSession()
    func stopCurrentSession()
}
We can then make our Tracker instance conform to this protocol:
final class Tracker: SessionTracking {
    private var hasActiveSession: Bool = false

    func startNewSession() {
        hasActiveSession = true
    }

    func stopCurrentSession() {
        hasActiveSession = false
    }
}
And finally, we can make our SessionMonitor class work with our newly defined protocol:
final class SessionMonitor {

    private let tracker: SessionTracking

    init(tracker: SessionTracking) {
        self.tracker = tracker
        startObserving()
    }

    private func startObserving() {
        NotificationCenter.default.addObserver(self, selector: #selector(startSession), name: UIApplication.willEnterForegroundNotification, object: nil)
        NotificationCenter.default.addObserver(self, selector: #selector(endSession), name: UIApplication.didEnterBackgroundNotification, object: nil)
    }

    @objc private func startSession() {
        tracker.startNewSession()
    }

    @objc private func endSession() {
        tracker.stopCurrentSession()
    }
}
At this point, nothing really has changed. Our code is still working exactly the same as before. However, we’ve opened up the door to inject a mocked version of our Tracker instance which can be used to catch outgoing requests from our SessionMonitor. In other words, we can validate that the Tracker instance is getting called for each of the notifications.
Making use of a mocked version of a class
To actually make use of our new protocol in tests we can create a MockedTracker instance that is conforming to our SessionTracking protocol:
final class MockedTracker: SessionTracking {
    private(set) var hasActiveSession: Bool = false

    func startNewSession() {
        hasActiveSession = true
    }

    func stopCurrentSession() {
        hasActiveSession = false
    }
}
It’s really simple and basically only sets the hasActiveSession property to true or false.
We can use this MockedTracker in our unit test as follows:
final class SessionMonitorTests: XCTestCase {

    private var monitor: SessionMonitor!

    /// It should signal the tracker upon foreground background changes.
    func testSessionRound() {
        let tracker = MockedTracker()
        monitor = SessionMonitor(tracker: tracker)

        XCTAssertFalse(tracker.hasActiveSession)

        NotificationCenter.default.post(name: UIApplication.willEnterForegroundNotification, object: nil)
        XCTAssertTrue(tracker.hasActiveSession)

        NotificationCenter.default.post(name: UIApplication.didEnterBackgroundNotification, object: nil)
        XCTAssertFalse(tracker.hasActiveSession)
    }
}
We’re doing a few things here:
- We’re firstly creating a
MockedTrackerinstance which we can use to read thehasActiveSessionproperty - A
SessionMonitorinstance is created by injecting theMockedTrackeras a dependency. Note that we’re saving the instance in a class variable to make sure it’s not released before the test is finished. - After validating that our initial
hasActiveSessionvalue is set to false we’re posting the expected notifications and we validate the correct outcome
This was all that was needed to test our private SessionMonitor methods without exposing them publicly. This is a great improvement but it’s not yet covering all our needs! Indeed, we still have a Tracker instance to test and we would like to make sure that this instance is working as expected as well.

FREE 5-Day Email Course: The Swift Concurrency Playbook
A FREE 5-day email course revealing the 5 biggest mistakes iOS developers make with with async/await that lead to App Store rejections And migration projects taking months instead of days (even if you've been writing Swift for years)
Exposing internal variables and methods as a final resort
In the case of the Tracker instance we’re in a scenario where we want to read out our private hasActiveSession property. Our earlier defined MockedTracker is used to test our SessionMonitor but takes away the opportunity to test our actual Tracker class.
To do this, we can make use of the @testable attribute for importing our target:
@testable import MyApplicationThe @testable attribute only works for a module compiled with testing enabled. This is the case when you’re running your tests and that means it can be used in your test classes. Using this attribute triggers a few things:
- It activates elevated access for the module you’re importing in that scope
- This means that classes and class members marked as internal or public start behaving as if they were marked open
- Other entities, like structs, act if as if they were declared public
To explain this in a bit more detail we go back to our earlier defined class:
final class Tracker: SessionTracking {
    private var hasActiveSession: Bool = false

    func startNewSession() {
        hasActiveSession = true
    }

    func stopCurrentSession() {
        hasActiveSession = false
    }
}
Without using the @testable import MyApp we would not be able to access it in our test and run into an error like:
“Use of unresolved identifier ‘Tracker'”
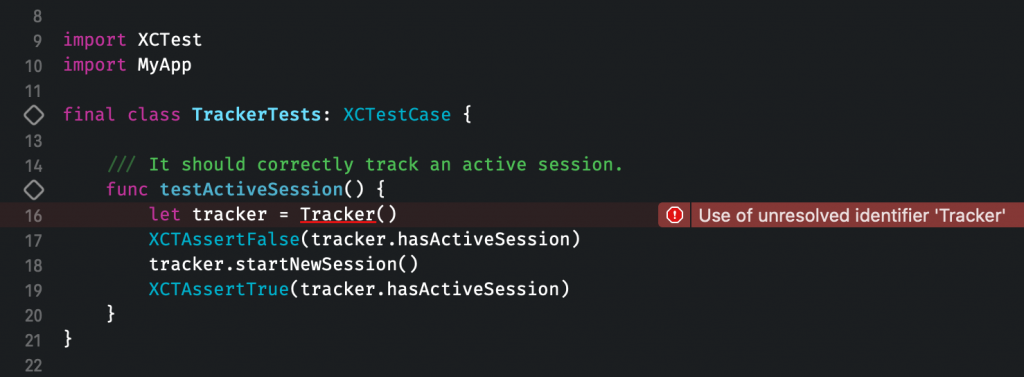
After adding the @testable attribute we can at least access our Tracker instance but we still run into the fact that our hasActiveSession is private and not accessible:
‘hasActiveSession’ is inaccessible due to ‘private’ protection level
There’s only one solution to this and that is actually making it non-private. However, there is an in-between solution that only exposes read access:
final class Tracker: SessionTracking {
    private(set) var hasActiveSession: Bool = false

    func startNewSession() {
        hasActiveSession = true
    }

    func stopCurrentSession() {
        hasActiveSession = false
    }
}
We’ve added private(set) to our property which makes it only possible to write from within our class. It does allow internal read access from outside of the class which is enough for writing our test.
Conclusion
In the end, we’ve enabled writing tests for all our use-cases. It turns out that we’ve also managed to reach 100% code coverage but this should not be your main goal. Try to write quality tests that cover most of your use-cases. If dependency injection is not helping you to reach your goal you can decide to expose read access for your properties.
If you like to improve your Swift knowledge, even more, check out the Swift category page. Feel free to contact me or tweet to me on Twitter if you have any additional tips or feedback.
Thanks!