The redacted view modifier in SwiftUI allows us to create a so-called skeleton view while our data is loading. Using a skeleton view instead of a spinner lets the user get a sense of how our views will look once the data is loaded. The user experience is smoother and gives the feeling of faster loading.
I’ve often been using the redacted view modifier while developing apps in SwiftUI but never felt fulfilled. I was always looking for ways to make it easier to set placeholder copy or to disable the redacting modifier once loading completes. I’ve written a few useful extensions to solve this, which I’ll share along the way in this article while explaining how you can use the redacted view modifier in SwiftUI.

Using the Redacted View Modifier in SwiftUI
In this article, we’re going to make use of an article view as an example to demonstrate how the redacted modifier works:
struct Article {
    let title: String
    let author: String
}

struct ArticleView: View {

    @State var article: Article?

    var body: some View {
        VStack(alignment: .leading) {
            Text(article?.title ?? "")
                .font(.headline)
            Text(article?.author ?? "")
                .font(.subheadline)
        }.padding()
    }
}
Running the view without any redacting modifiers results in the following preview:
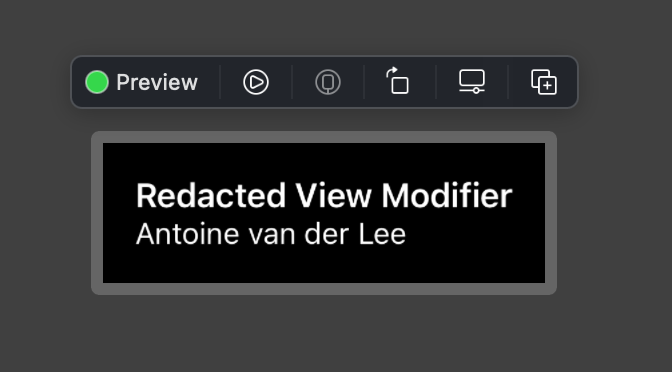
As you can see, we have a title and an author label resulting in an article view. The view currently looks excellent, but it would look much different when there’s no article loaded yet:
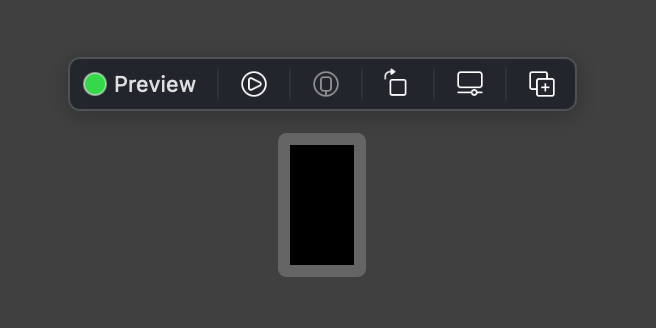
A common approach would be to show a spinner while the article is loading. The article view itself would be hidden during loading and show up once data arrives. While this works fine, the user experience is less fluent as the view kind of ‘jumps’ into its final loaded state:
The user experience would be better if we had the final view structure while the data loads. We can create this behavior by making use of the redacted view modifier:
struct ArticleView: View {

    var article: Article?

    var body: some View {
        VStack(alignment: .leading) {
            Text(article?.title ?? "placeholder-copy-title")
                .font(.headline)
            Text(article?.author ?? "placeholder-copy-author")
                .font(.subheadline)
        }.padding()
            .redacted(reason: article == nil ? .placeholder : [])
    }
}
We make sure to set a placeholder copy when the title or author is nil, and we enable the redacted view modifier using the .placeholder reason if the article is not yet loaded. The result looks as follows:
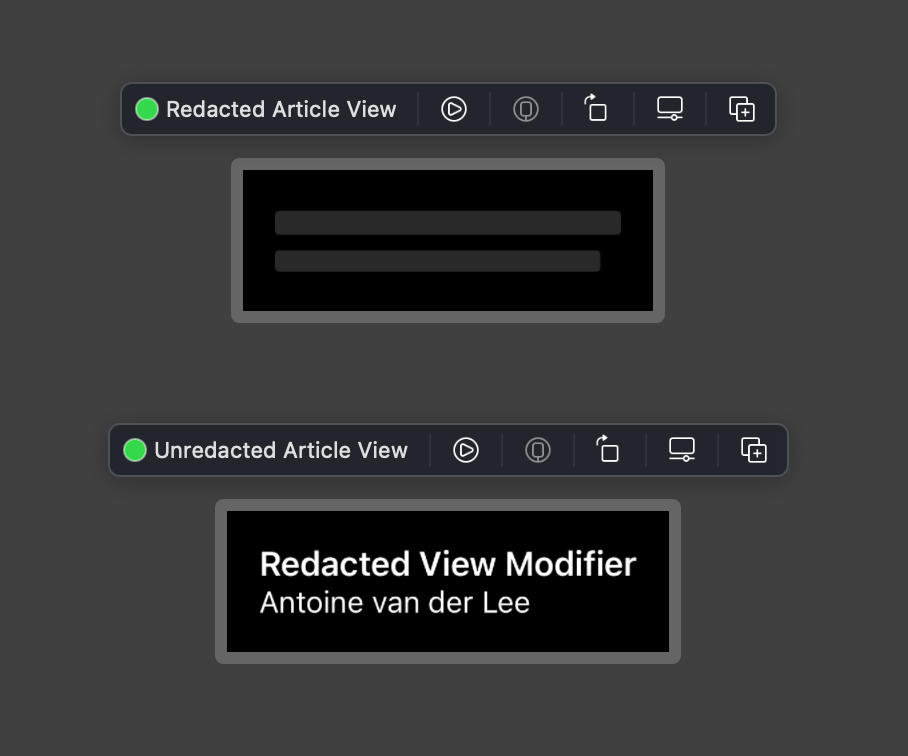
Using the above technique results in a smoother loading experience:
The skeleton view creates the same structure as the view will have once loading completes. The user can already get used to the structure of the final state while the data is loading, resulting in a smoother user experience.
Using the redacted view modifier on container views
The above example code already demonstrated that you could use the redacted view modifier on multiple views at once. In theory, you could redact a complete view with lists, text, and images by just applying the redacted view modifier on the outer container view.
When I started writing my first redacted view, I applied the redacted view modifier on each text element individually:
var body: some View {
    VStack(alignment: .leading) {
        Text(article?.title ?? "placeholder-copy-title")
            .font(.headline)

            // 1:
            .redacted(reason: article?.title == nil ? .placeholder : [])
        Text(article?.author ?? "placeholder-copy-author")
            .font(.subheadline)

            // 2:
            .redacted(reason: article?.author == nil ? .placeholder : [])
    }.padding()
}
Note that this has the benefit of showing an unredacted author text while the title is still loading. Though, in this example, it’s likely that both title and author will load simultaneously.
Therefore, you can decide to add the redacted view modifier to the container VStack element instead:
var body: some View {
    VStack(alignment: .leading) {
        Text(article?.title ?? "placeholder-copy-title")
            .font(.headline)
        Text(article?.author ?? "placeholder-copy-author")
            .font(.subheadline)
    }.padding()
        .redacted(reason: article == nil ? .placeholder : [])
}
We use a conditional check based on whether we have an article to enable the placeholder redacted reason. Since the reason parameter comes as an option set, we can return an empty array to disable the redacted modifier.
Opting out of redaction using the unredacted modifier
Redacting a container view while loading data can be an efficient way of quickly generating a skeleton view. However, there could be cases in which you want a view to being unredacted all the time while data loads.
We could add a blog label to our article view, representing the containing blog for the article:
var body: some View {
VStack(alignment: .leading) {
Text(article?.title ?? "placeholder-copy-title")
.font(.headline)
Text(article?.author ?? "placeholder-copy-author")
.font(.subheadline)
Text("avanderlee.com - SwiftLee")
.font(.caption)
.italic()
}.padding()
.redacted(reason: article == nil ? .placeholder : [])
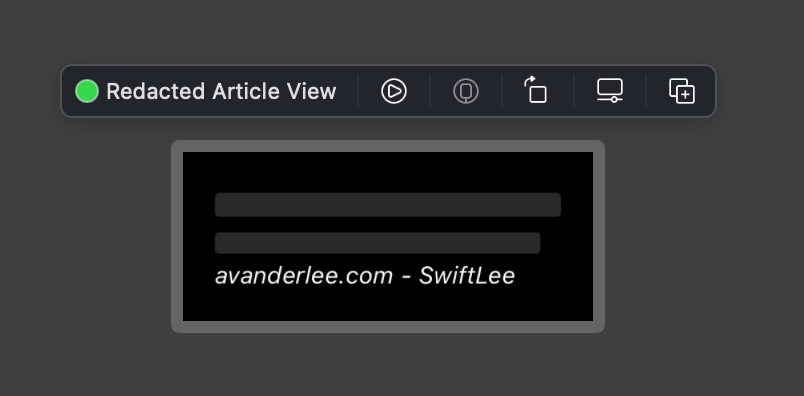
}Since we’re creating a SwiftLee articles app, we know that the blog will always be the same. Yet, during loading, the label will also be redacted:
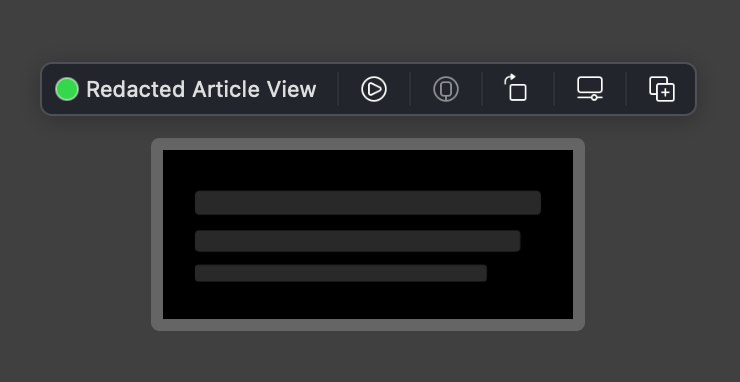
We can opt-out the blog representing text label by using the unredacted view modifier:
Text("avanderlee.com - SwiftLee")
    .font(.caption)
    .italic()
    .unredacted()
The unredacted view modifier makes sure the view will always be visible, even during redaction of the outer container:
The unredacted view modifier allows us to still use one redacted view modifier on the outer container view while still opting out specific views during loading.
Creating a String extension to create placeholder copy
One downside of using the redacted view modifier is having to create a placeholder copy of a certain length if data is not available:
Text(article?.title ?? "placeholder-copy-title")Even though it’s easy to write some dummy copy quickly, it might not be immediately apparent to other developers on your project that this is just a placeholder copy during loading.
Therefore, I like to make use of a simple extension on String allowing to create a placeholder copy of a certain length:
extension String {
    static func placeholder(length: Int) -> String {
        String(Array(repeating: "X", count: length))
    }
}
The above extension method has the added benefit of controlling how long the placeholder copy will be. You can play around with the length to create the skeleton view you had in mind:
Text(article?.title ?? .placeholder(length: 30))
    .font(.headline)
Text(article?.author ?? .placeholder(length: 15))
    .font(.subheadline)
We’re just using a repeating X to make sure the data looks like dummy data if we’re making a mistake during development. A bug could be that our placeholder shows up while data loads, in case the repeating X will indicate the mistake.
Boolean based redacting
Finally, I’d like to introduce a view extension allowing us to redact a view for a specific condition:
extension View {
    @ViewBuilder
    func redacted(if condition: @autoclosure () -> Bool) -> some View {
        redacted(reason: condition() ? .placeholder : [])
    }
}
The extension method makes use of an autoclosure condition which results in an applied redacted reason if the condition validates to true.
While the extension method isn’t doing much, it just adds a minor improvement to readability that I like:
VStack(alignment: .leading) {
    Text(article?.title ?? .placeholder(length: 30))
        .font(.headline)
    Text(article?.author ?? .placeholder(length: 15))
        .font(.subheadline)
}.redacted(if: article == nil)
The code above reads naturally to me, and I can easily predict the outcome of the skeleton view.
Conclusion
Showing a skeleton view instead of a progress view during loading results in a smoother user experience. The redacted view modifier in SwiftUI is a quick way to transform existing views into placeholder views while data is loads. We can opt-out specific views inside a redacted container using the unredacted view modifier. By using a few useful extensions, we can further improve the readability of our code.
If you like to improve your SwiftUI knowledge even more, check out the SwiftUI category page. Feel free to contact me or tweet me on Twitter if you have any additional tips or feedback.
Thanks!