The @ViewBuilder attribute is one of the few result builders available for you to use in SwiftUI. You typically use it to create child views for a specific SwiftUI view in a readable way without having to use any return keywords.
I encourage you to read my article Result builders in Swift explained with code examples if you’re new to result builders, as it will help you better understand the underlying mechanism of the @ViewBuilder attribute. In this article, I’ll show you how to use this result builder in your code extensions.

You’re using @ViewBuilder already today
It might surprise you, but you’re likely already using @ViewBuilder in your code. We can take a look at the protocol definition of a SwiftUI View:
public protocol View {
    associatedtype Body : View

    @ViewBuilder var body: Self.Body { get }
}
The body property of this protocol comes with the @ViewBuilder attribute, allowing you to benefit from the underlying implementation of the result builder. The result is that you can write your SwiftUI view body as follows:
struct ContentView: View {
    var body: some View {
        Text("Hello, world!")
            .padding()
    }
}
To explain the effect of the result builder, I would like to introduce an alternative protocol:
protocol NonResultBuilderView {
    associatedtype Body : View
    var body: Self.Body { get }
}
Adapting to this protocol would still allow you to write the same view body because we can omit the return keyword since we have a single expression:
struct ContentView: NonResultBuilderView {
    var body: some View {
        Text("Hello, world!")
            .padding()
    }
}
However, if we were to have an if-statement in our view’s body, we would run into the following error:
Function declares an opaque return type, but has no return statements in its body from which to infer an underlying type
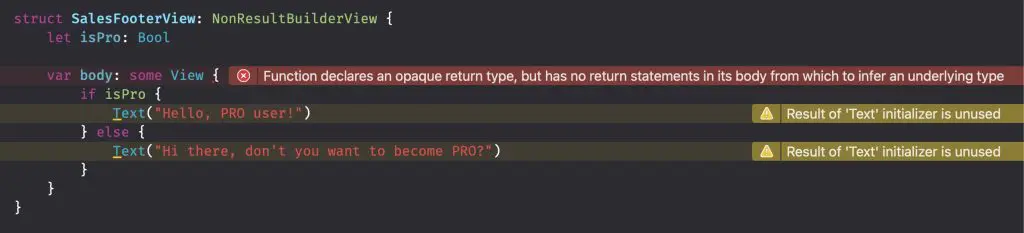
Dealing with opaque return types
The resulting errors stem from the opaque return type, which requires a consistent outcome type for the scope of the body property. You can learn more about this in my article Some keyword in Swift: Opaque types explained with code examples.
We could add a return keyword in front of the two Text elements and solve both the warnings and the errors:
struct SalesFooterView: NonResultBuilderView {
    let isPro: Bool

    var body: some View {
        if isPro {
            return Text("Hello, PRO user!")
        } else {
            return Text("Hi there, don't you want to become PRO?")
        }
    }
}
We’re conforming to the opaque return type requirements since we return a consistent Text element type.
Once we start returning a different type inside the if-statement, we will run into the same error as before:
struct SalesFooterView: NonResultBuilderView {
    let isPro: Bool

    // Error: Function declares an opaque return type, but the return statements in its body do not have matching underlying types
    var body: some View {
        if isPro {
            return Text("Hello, PRO user!")
        } else {
            return Button("Hi there, don't you want to become PRO?") {
                startPurchase()
            }
        }
    }

    func startPurchase() {
        // ...
    }
}
You can solve the above error by adding the @ViewBuilder attribute and by removing the return keywords accordingly:
struct SalesFooterView: NonResultBuilderView {
    let isPro: Bool

    @ViewBuilder
    var body: some View {
        if isPro {
            Text("Hello, PRO user!")
        } else {
            Button("Hi there, don't you want to become PRO?") {
                startPurchase()
            }
        }
    }
}
You may notice that we define the attribute within the SwiftUI view. The default View protocol defines the @ViewBuilder attribute within the interface definition, eliminating the need to add the attribute to each custom view that adapts the protocol.

FREE 5-Day Email Course: The Swift Concurrency Playbook
A FREE 5-day email course revealing the 5 biggest mistakes iOS developers make with with async/await that lead to App Store rejections And migration projects taking months instead of days (even if you've been writing Swift for years)
How to use @ViewBuilder to return a SwiftUI View
Now that we understand the @ViewBuilder attribute, let’s explore its benefits.
The first example mimics how container elements like VStack and HStack work. You’ll use the @ViewBuilder attribute inside the initializer of your custom view to allow for passing in a body-like structure of child views. In this case, the custom VHStack allows dynamically switching between a horizontal and vertical stack based on the horizontal size class:
struct VHStack<Content: View>: View {
    @Environment(\.horizontalSizeClass) var horizontalSizeClass

    let content: Content

    init(@ViewBuilder _ content: () -> Content) {
        self.content = content()
    }

    var body: some View {
        if horizontalSizeClass == .compact {
            VStack {
                content
            }
        } else {
            HStack {
                content
            }
        }
    }
}
The initializer now uses the @ViewBuilder attribute. It allows us to initialize the view just like the body of a custom SwiftUI View:
struct ContentView: View {
    var body: some View {
        VHStack {
            Text("Hello, World!")
            Text("Result Builders are great!")
        }
    }
}
Using the view builder attribute with properties
The above implementation works excellently; however, we can further optimize the code to make it more compact. We can get rid of the custom initializer and benefit from the default init we will get from structures:
struct VHStack<Content: View>: View {
    @Environment(\.horizontalSizeClass) var horizontalSizeClass
    @ViewBuilder var content: () -> Content

    var body: some View {
        if horizontalSizeClass == .compact {
            VStack {
                content()
            }
        } else {
            HStack {
                content()
            }
        }
    }
}
The @ViewBuilder marked property allows us to pass the content property directly into the HStack and VStack. Doing so makes our code even more compact and improves readability:
struct VHStack<Content: View>: View {
    @Environment(\.horizontalSizeClass) var horizontalSizeClass
    @ViewBuilder var content: () -> Content

    var body: some View {
        if horizontalSizeClass == .compact {
            VStack(content: content)
        } else {
            HStack(content: content)
        }
    }
}
Marking methods with the result builder
Another option you have is to use the @ViewBuilder attribute with method definitions. One example could be to apply an accent color on a slider based on a given system version:
extension Slider {
    @ViewBuilder
    func minimumTrackColor(_ color: Color) -> some View {
        if #available(macOS 11.0, *) {
            accentColor(color)
        } else {
            self
        }
    }
}
Note that if-statements can impact your view’s performance and animations. For more information, I encourage you to read How to create a Conditional View Modifier in SwiftUI.
Conclusion
The @ViewBuilder attribute allows you to define the body of a SwiftUI view without using a return keyword in front of every view. You can use the result builder inside initializers, method definitions, or in front of properties. Using the result builder attribute, you can create more compact code and improve readability.
If you want to improve your SwiftUI knowledge, even more, check out the SwiftUI category page. Feel free to contact me or tweet me on Twitter if you have any additional tips or feedback.
Thanks!