Test your app’s VoiceOver support using Xcode’s Simulator and create high-quality 120 FPS recordings. That’s what RocketSim’s major 15.0 release will bring, and it’s not all! We also created insights based on your networking sessions and we’re moving towards AI supportive insights.
If you’re new to RocketSim, check it out here. It’s my developer tool used by over 250+ teams and 80K developers every year. I started building it since 2019 to enhance the developer experience and it’s designed to feel cohesive with Xcode’s Simulator: it almost feels part of it. In this article, I’ll introduce you to the next big release.

Introducing a unique VoiceOver navigator
To test VoiceOver today, you would need to use either your physical device or tools like Xcode’s Accessibility Inspector. None of these are efficient, let alone help you get real insights into how your app supports VoiceOver. RocketSim already helps you with accessibility testing today, like how your Liquid Glass UI responds to “Increase Contrast” or “Reduce Transparency”. Here’s a demo of it using Apple’s Liquid Glass example app:
What’s new in this version is a brand new VoiceOver overlay. It draws rectangles around each VoiceOer element and shows numbers next to them to indicate the order in which they’re navigated:
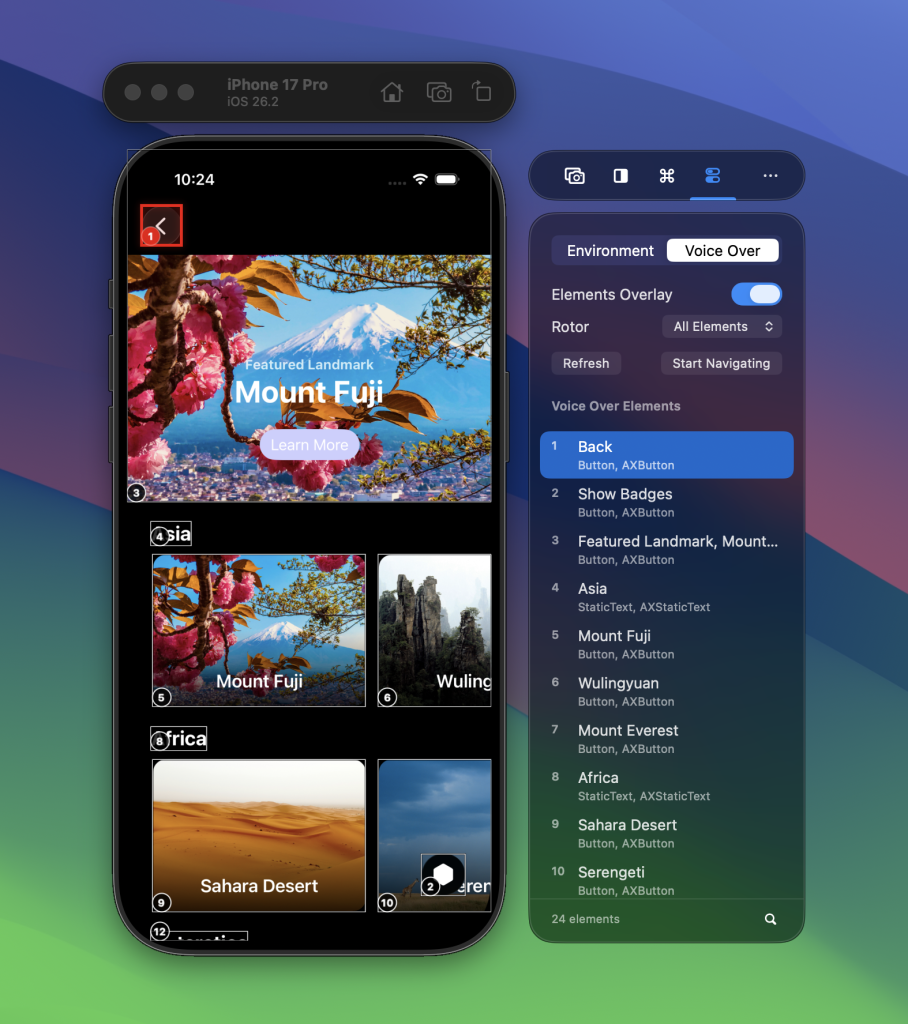
You can search for specific elements, click on elements in the side window list, or use the roter picker to see which roter grouping applies. The overlay itself is also valuable. For example, the screenshot above shows that the entire image is tappable, not just the “Learn More” button, and we can also see that number 3’s description is properly set for VoiceOver (well done, Apple!).
Navigating using arrows and enter
But what truly sets this apart is the brand-new VoiceOver navigator. It lets you navigate your app as if you were using VoiceOver. Instead of using swipes, you can use the arrows and enter key:
- Arrows up and down:
Navigate elements in the list - Arrows left and right:
Switch rotor - Enter:
Activate element aka tap on the selected element - Esc:
Exit navigation mode
Here’s how it works in action:
We need to improve our apps’ accessibility support and improve VoiceOver control. My goal is to give you the tools to do this more efficiently.

FREE 5-Day Email Course: The Swift Concurrency Playbook
A FREE 5-day email course revealing the 5 biggest mistakes iOS developers make with with async/await that lead to App Store rejections And migration projects taking months instead of days (even if you've been writing Swift for years)
120 Frames Per Second (FPS) recordings
This feature is for those that value high-quality demos of their apps. RocketSim already offers recording features like:
- Showing touches
- Adding device bezels
- Using a custom background
- Showing your app icon on a recording
And much more, but it never improved the recordings’ actual quality. In fact, it’s been using the Simulator’s standard recording, which outputs at most 30 frames per second (FPS).
If you’ve created an amazing animation and you want to showcase it to your colleagues, a higher frame rate can make a big difference. Note that you have to watch out for compression done by platforms like social media and such, but if you can work around, a higher quality video is great.
Inside RocketSim’s settings, you can enable 120 FPS recordings:
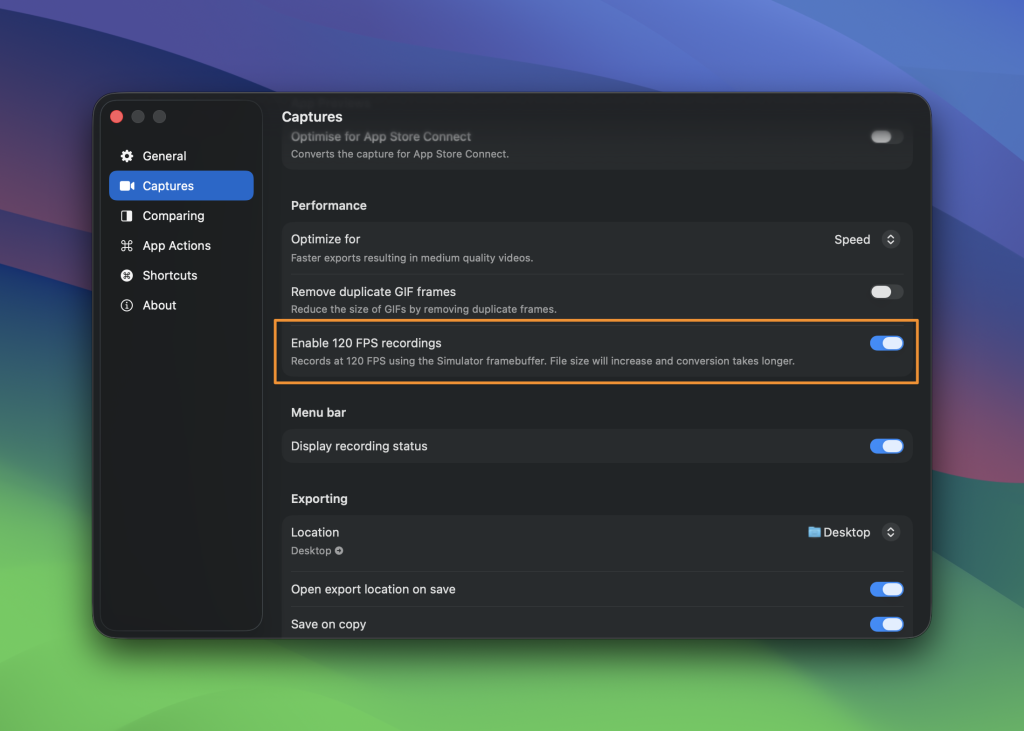
Once enabled, conversions might be slightly slower, but the output quality will be much higher. Here’s an example recording I’ve made of Apple’s sample application, though: compressions apply. You really have to try out this feature yourself locally to see the impact of 120 frames per second:
This has been a long-awaited feature, and I’m happy it’s finally here!
Networking & Build Insights
RocketSim already offers build insights and lets you inspect network requests. What’s new in this version is that we’re now also providing you with insights into the history of these in a dedicated place inside the main window.
If you’ve been debugging your app multiple times, you’ve also been called a lot of the same endpoints repeatedly. This is valuable information and can show insights like:
- Duplicated network requests
- Slowests API calls
- Caching opportunities
- Failure spikes
But also the most used API endpoints. Based on these insights, you can plan improvements to your app. We try to help you with this by providing ready-to-use agent prompts combined with actual network information:
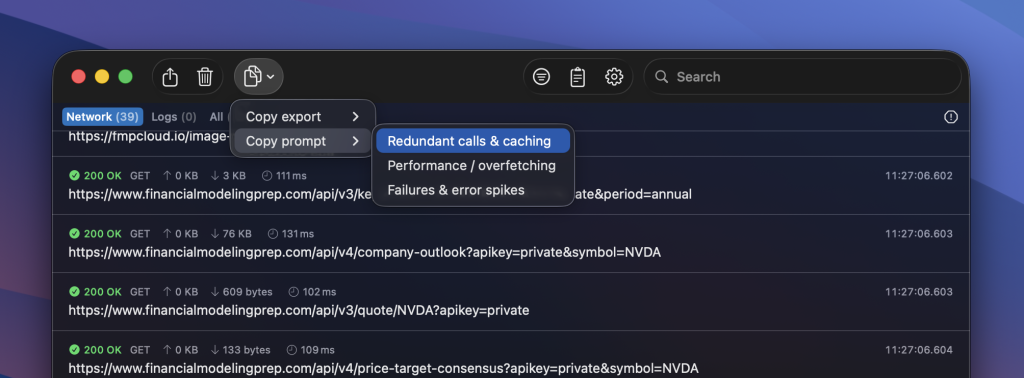
An example prompt can look as follows:
Analyze redundant calls and caching opportunities. Group by fingerprint; provide table columns: count, cache hint, dedupe window, memoization key. Then recommend batching/conditional requests:

Summary: 2026-02-24T10:26:52.025Z – 2026-02-24T10:27:39.064Z | requests: 39 | fingerprints: 26 | errors: 0 | slow(>500ms): 3
2026-02-24T10:27:02.113Z GET www.financialmodelingprep.com /api/v3/historical-chart/1day/AMZN?{apikey,from,serietype} 200 109ms in:- out:9 KB ct:application/json; charset=utf-8 #d58ed5
  stats: count:4 min:109ms p50:115ms max:124ms
2026-02-24T10:26:56.415Z GET www.financialmodelingprep.com /api/v4/score?{apikey,symbol} 200 0ms in:- out:312 bytes ct:application/json; charset=utf-8 #8a1890
  stats: count:3 min:0ms p50:105ms max:107ms
2026-02-24T10:26:55.991Z GET www.financialmodelingprep.com /api/v4/price-target-consensus?{apikey,symbol} 200 2ms in:- out:133 bytes ct:application/json; charset=utf-8 #c465e1
  stats: count:3 min:2ms p50:108ms max:110ms

...
Your agents have access to your codebase, so they can connect the dots and plan improvements accordingly.
But you also want to visually analyze your app’s networking, which is why we offer you a new Networking Insights page:
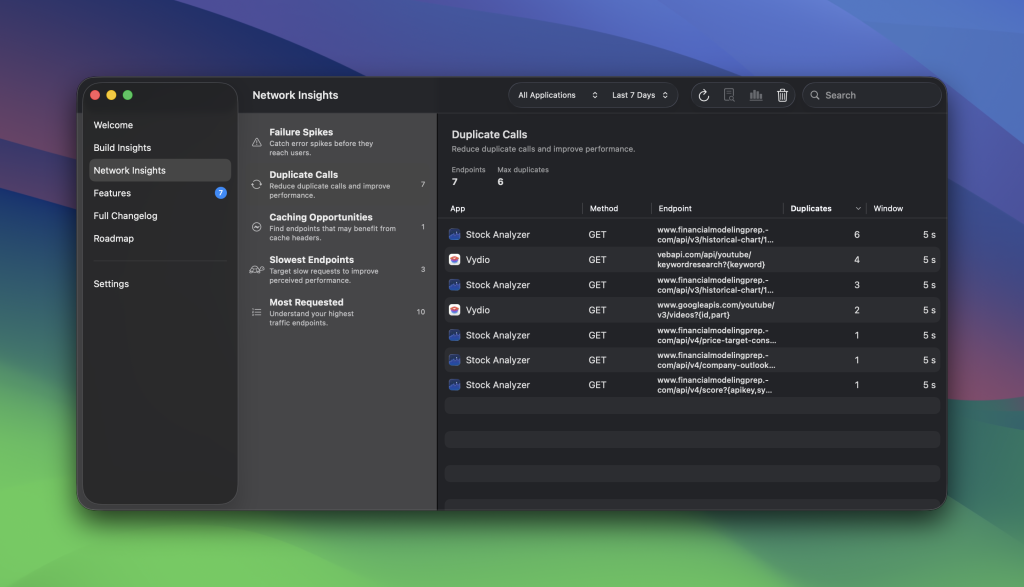
In this case, it shows insights for my Stock Analyzer and Vydio app. You can use the application selector in the toolbar to only show insights for a specific app.
Sign up for the public beta
As you can tell from this article, it’s quite a big release. I can’t just publish this without thoroughly testing it, so I’m opening up beta testing. You can join the TestFlight here.
I hope you will enjoy this big release, and I’d love to hear your feedback via email at [email protected].
Thanks!