Diffable Data Sources were introduced at WWDC 2019 as a replacement for UICollectionViewDataSource and UITableViewDataSource. The API is available on iOS 13 and up and makes it easy to set up lists of data in which changes are managed through so-called snapshots.
The Core Data team added new delegate methods to the NSFetchedResultsControllerDelegate to make it easier to work with diffable data sources in Core Data. However, it turns out that it’s very easy to make mistakes which can result in bad performance. I did not give up and managed to make Core Data work nicely together with diffable data sources for which I’m writing this blog post now.
If you want to know a quick way to set up diffable data sources throughout your project, check out my blog post Diffable Data Sources Adoption with Ease.
Creating a Diffable Data Source for Core Data
Adopting diffable data sources in Core Data starts by creating a new data source instance. In the examples given in this post, we’re focussing on collection views but the same technique can be used for table views.
The creation of a data source looks as follows:
let diffableDataSource = UICollectionViewDiffableDataSource<Int, NSManagedObjectID>(collectionView: collectionView) { (collectionView, indexPath, objectID) -> UICollectionViewCell? in
    guard let object = try? managedObjectContext.existingObject(with: objectID) else {
        fatalError("Managed object should be available")
    }

    let cell = collectionView.dequeueReusableCell(withReuseIdentifier: "cell_identifier", for: indexPath)
    /// ... Setup cell with the managed object
    return cell
}

/// Store the data source in an instance property to make sure it's retained.
self.diffableDataSource = diffableDataSource

/// Assign the data source to your collection view.
collectionView.dataSource = diffableDataSource
It follows a few steps:
- A data source instance is created with a cell provider
- Data is assigned to our cell through the cell provider property
- The data source is assigned to an instance property to make sure it’s retained.
UICollectionView‘s data source property references it’s delegate weakly and would directly release it - A collection view is connected to the data source
As you can see, we don’t fetch any data yet and we didn’t set up an initial snapshot. This is a common mistake and can easily lead to performance drains. I’m going to explain this in more detail later.
The importance of using the data from the cell provider
During the transition from an old snapshot to a new snapshot, it could be that the data source is asking for a cell for a given index path that not yet exists in the collection of fetched objects. The fetched objects in an NSFetchedResultsController are updated after the snapshot is applied but a cell can be asked before that transition finishes. This mainly happens when a transition is animated.
Therefore, it’s important to make use of the data that is provided in the cell provider instead of fetching the data manually from your fetched results controller. This way you’ll make sure to always be in sync with the current status of the data source.

FREE 5-Day Email Course: The Swift Concurrency Playbook
A FREE 5-day email course revealing the 5 biggest mistakes iOS developers make with with async/await that lead to App Store rejections And migration projects taking months instead of days (even if you've been writing Swift for years)

Implementing the new NSFetchedResultsController delegate method
Before we apply the first snapshot of data we have to set up the fetched results controller delegate method for diffable data sources. It’s a new method that’s available since iOS 13 and replaces the old style delegate didChange methods.
By implementing this new method, Core Data automatically only uses this method instead of the old ones. This makes it really easy to migrate to diffable data sources while keeping support for older iOS versions.
The implementation looks as follows:
@available(iOS 13.0, *)
func controller(_ controller: NSFetchedResultsController<NSFetchRequestResult>, didChangeContentWith snapshot: NSDiffableDataSourceSnapshotReference) {
    guard let dataSource = collectionView?.dataSource as? UICollectionViewDiffableDataSource<Int, NSManagedObjectID> else {
        assertionFailure("The data source has not implemented snapshot support while it should")
        return
    }
    var snapshot = snapshot as NSDiffableDataSourceSnapshot<Int, NSManagedObjectID>
    let currentSnapshot = dataSource.snapshot() as NSDiffableDataSourceSnapshot<Int, NSManagedObjectID>

    let reloadIdentifiers: [NSManagedObjectID] = snapshot.itemIdentifiers.compactMap { itemIdentifier in
        guard let currentIndex = currentSnapshot.indexOfItem(itemIdentifier), let index = snapshot.indexOfItem(itemIdentifier), index == currentIndex else {
            return nil
        }
        guard let existingObject = try? controller.managedObjectContext.existingObject(with: itemIdentifier), existingObject.isUpdated else { return nil }
        return itemIdentifier
    }
    snapshot.reloadItems(reloadIdentifiers)

    let shouldAnimate = collectionView?.numberOfSections != 0
    dataSource.apply(snapshot as NSDiffableDataSourceSnapshot<Int, NSManagedObjectID>, animatingDifferences: shouldAnimate)
}
Note that we’ve built in an extra check to make sure that our data source is correctly configured. We’ve also added a simple check to know whether the collection view is already presenting a set of data. If so, we’d like to animate to the new snapshot of data. If there’s no data visible yet, we want the snapshot to be applied as fast as possible without an animation so it’s visible to the user as fast as it can be.
Identifying updates with a NSFetchedResultsController
In the above code you can see that we’re building up the reloaded items ourselves. We need to do this to make sure that updates of managed objects are resulting in a reload of the items.
By default, diffable data sources compare the item identifier to determine whether a reload is needed. Even though the object itself changed, the NSManagedObjectID remains the same and it’s not seen as an update. By comparing the index of the item in both snapshots we can find out whether a reload is required.
This is all the code you need to configure a fetched results controller for diffable data sources. Up next is making sure that our initial set of data is displayed correctly.
Configuring the initial snapshot of data
Now that our data source and fetched results controller are ready we need to apply the first snapshot of data. This is often where the first mistakes are done as we tempt to approach diffable data sources with Core Data just like if we’re using it without Core Data.
A common mistake is to use the fetchedObjects property from the fetched results controller and apply that as the initial snapshot. I’ll explain later what this means but for now, the only thing we need to do is performing a fetch:
fetchedResultsController.performFetch()Make sure to only perform a fetch after you’ve set up your data source fetched results controller delegate method. This way, we make the fetched results controller responsible for setting up the initial snapshot of data and we’re sure that everything is optimized. The earlier setup delegate method is called and will apply the snapshot to our collection view.
This is all we need to make diffable data sources work with Core Data. There are a few common pitfalls that I’d like to tell you about as you might run into issues after setting everything up.
Common pitfalls you can run into
Diffable data sources are great when they’re configured in the right way. However, it’s also very easy to run into issues if you’re not setting things up like it should. While implementing this myself I’ve experienced several pitfalls which I’d like to share with you.
During this process, I’ve made use of a debug data source that allowed me to print out the changes that were applied after processing a snapshot:
/// A convenience type that can be used for debugging Diffable Data Sources (DDS).
/// Prints out every actual update that is happening.
@available(iOS 13.0, *)
final class DebugDiffableDataSourceReference<SectionIdentifier, ItemIdentifier>: UICollectionViewDiffableDataSource<SectionIdentifier, ItemIdentifier> where SectionIdentifier: Hashable, ItemIdentifier: Hashable {

    @objc func _collectionView(_ collectionView: UICollectionView, willPerformUpdates updates: [UICollectionViewUpdateItem]) {
        print("DDS updates: \(updates)")
    }
}
It implements a private API which can’t be used in production. The willPerformUpdates method will contain the set of updates as a result of comparing the snapshot before an update with the newly applied snapshot.
Pitfall 1: Using fetchedObjects as an initial snapshot
The above debugging method made me realise I was configuring the fetched results controller with a wrong set of data:
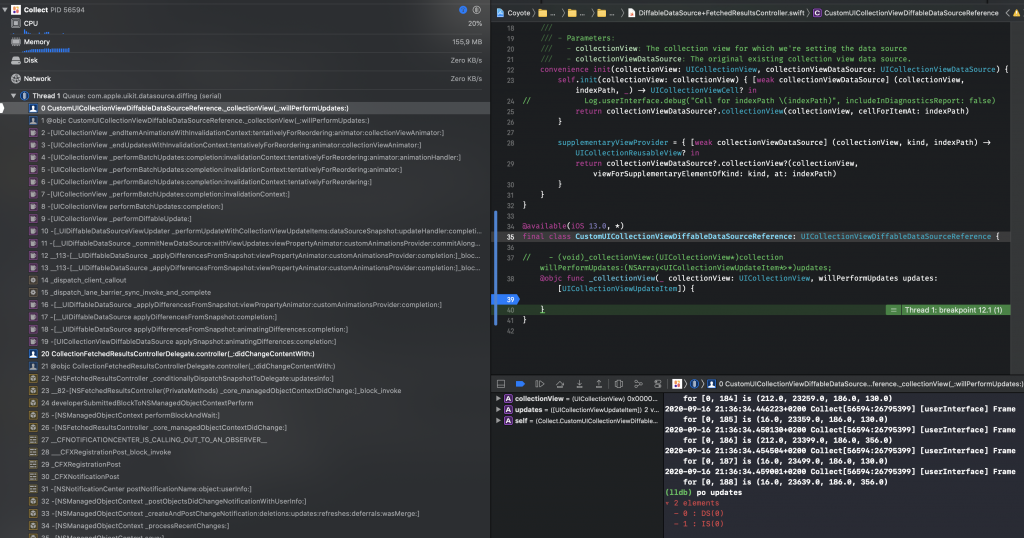
As you can see, it prints out two updates:
DS(0)which means “Delete section 0”IS(0)which means “Insert section 0”
In other words, the whole section of data was replaced with the new snapshot. Instead of inserting and deleting the items that were changed between two snapshots it was replacing all items at once. In this example, I had a collection of 900 items. To make things even worse performant: my collection view layout decided to animate all those 900 items. You can imagine that this wasn’t really performant.
The reason Core Data thought that I inserted a complete new set of data was because it actually was true. This was caused by two things:
- I used
performFetchbefore setting up the diffable data source - The initial snapshot was configured manually using the
fetchedObjectsproperty
The wrong code looked more or less as followed:
let snapshot = NSDiffableDataSourceSnapshotReference()
let numberOfSections = fetchedResultsController.sections?.count ?? 0
snapshot.appendSections(withIdentifiers: Array(0..<numberOfSections))
(0..<numberOfSections).forEach { section in
    guard let items = fetchedResultsController.sections?[section].objects else { return }
    snapshot.appendItems(withIdentifiers: items, intoSectionWithIdentifier: section)
}
diffableDataSource.applySnapshot(snapshot, animatingDifferences: false)
The main reason this is wrong is that the resulting snapshot contains a collection of NSManagedObject instances while a snapshot of NSManagedObjectID is expected. Although we could’ve created this ourselves too it’s better to just use performFetch and make the fetched results controller responsible for configuring the data.
Pitfall 2: Not using the cell provider data
During the animation from one snapshot to another the data source will create cells for animating changes. This could mean that it tries to configure cells with data that does not yet exist in the fetchedObjects array. Therefore, if you’re using data from the fetched objects array directly to configure your cells, you can run into a crash. This is because you’re going to try to fetch data for a certain index which is not yet available.
The content given by the cell provider is always in sync with the snapshots transition and makes sure that you can correctly set up your cells.
Conclusion
A fetched results controller can be configured to work with diffable data sources. Changes are automatically applied and nicely animated if required. Common pitfalls can make this process complicated but by following the right steps it can be relatively easy.
If you like to improve your Swift knowledge, even more, check out the Swift category page. Feel free to contact me or tweet to me on Twitter if you have any additional tips or feedback.
Thanks!