Unit tests in programming languages ensure that written code works as expected. Given a particular input, you expect the code to come with a specific output. By testing your code, you’re creating confidence for refactors and releases, as you’ll ensure the code works as expected after running your suite of tests successfully.
Many developers do not write tests since they believe it takes too much time, risking them missing their deadlines. In my opinion, unit tests will make you hit more deadlines since you will spend less time solving bugs or performing hotfixes for a critical issue.

This will not cover the testing of memory leaks or writing UI tests for share extensions but will mainly focus on writing better unit tests. I’ll also share my best practices which helped me to develop better and more stable apps.
What is unit testing?
Unit tests are automated tests that run and validate a piece of code (known as the “unit”) to ensure it behaves as intended and meets its design.
Unit tests have their target in Xcode and are written using the XCTest framework. A subclass of XCTestCase contains test methods to run in which only the methods starting with “test” will be parsed by Xcode and available to run.
As an example, imagine having a string extension method to uppercase the first letter:
extension String {
    func uppercasedFirst() -> String {
        let firstCharacter = prefix(1).capitalized
        let remainingCharacters = dropFirst().lowercased()
        return firstCharacter + remainingCharacters
    }
}
We want to ensure that the uppercasedFirst() method works as expected. If we give it an input antoine we expect it to output Antoine. We can write a unit tests for this method using the XCTAssertEqual method:
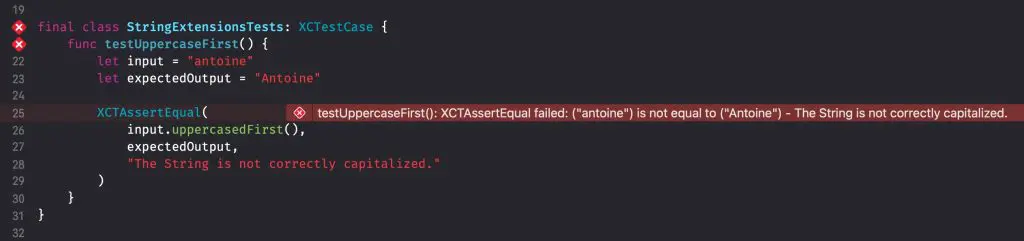
final class StringExtensionsTests: XCTestCase {
    func testUppercaseFirst() {
        let input = "antoine"
        let expectedOutput = "Antoine"
        XCTAssertEqual(input.uppercasedFirst(), expectedOutput, "The String is not correctly capitalized.")
    }
}
In case our method no longer works as expected, Xcode will show a failure using the description we provided:
Writing unit tests in Swift
There are multiple ways to test the same outcome, but it does not always give the same feedback when a test fails. The following tips help you write tests that help you solve failing tests faster by benefitting from detailed failure messages.
Naming test cases and methods
It’s essential to describe your unit tests, so you’ll understand what the test is trying to verify. You’re likely testing too many things if you cannot come up with a short name. A good name will also help you solve failing tests more quickly.
To quickly find a test case for a specific class, it’s recommended to use the same naming combined with “Tests.” Like in the above example, we named StringExtensionTests based on the fact that we’re testing a set of string extensions. Another example could be ContentViewModelTests in case you’re testing a ContentViewModel instance.
Do not use XCTAssert for everything
It’s possible to use XCTAssert for many scenarios, but it will lead to different outcomes when a test fails. The following lines of code all test precisely the same outcome:
func testEmptyListOfUsers() {
    let viewModel = UsersViewModel(users: ["Ed", "Edd", "Eddy"])
    XCTAssert(viewModel.users.count == 0)
    XCTAssertTrue(viewModel.users.count == 0)
    XCTAssertEqual(viewModel.users.count, 0)
}
As you can see, the method is using a describing name that tells to test an empty list of users. However, our defined view model is not empty and therefore, all assertions fail.

The results show why it’s essential to use the correct assertion for the type of validation. The XCTAssertEqual method gives us more context on why the assertion failed. This is shown in the red errors and console logs, which help you quickly identify failing tests.
Setup and Teardown
Parameters used in multiple test methods can be defined as properties in your test case class. You can use the setUp() method to set up the initial state for each test method and the tearDown() method to clean up. There are multiple setups and tear-down variants for you to pick, like one supporting concurrency or a throwing variant in which you can fail a test early if the set up fails.
An example could be generating a user defaults instance to use for unit tests:
struct SearchQueryCache {
    var userDefaults: UserDefaults = .standard

    func storeQuery(_ query: String) {
        /// ...
    }
}

final class SearchQueryCacheTests: XCTestCase {

    private var userDefaults: UserDefaults!
    private var userDefaultsSuiteName: String!

    override func setUpWithError() throws {
        try super.setUpWithError()
        userDefaultsSuiteName = UUID().uuidString
        userDefaults = UserDefaults(suiteName: userDefaultsSuiteName)
    }

    override func tearDownWithError() throws {
        try super.tearDownWithError()
        userDefaults.removeSuite(named: userDefaultsSuiteName)
        userDefaults = nil
    }

    func testSearchQueryStoring() {
        /// Use the generated user defaults as input:
        let cache = SearchQueryCache(userDefaults: userDefaults)

        /// ... write the test
    }
}
Doing so ensures you’re not manipulating the standard user defaults used during testing on the Simulator. Secondly, you’ll ensure you’ve got a clean state at the beginning of the test. We’ve used the tear-down method to remove the user defaults suite and clean up accordingly.
Throwing methods
Like when writing application code, you can also define a throwing test method. This allows you to make a test fail whenever a method inside the test throws an error. For example, when testing the decoding of a JSON response:
func testDecoding() throws {
    /// When the Data initializer is throwing an error, the test will fail.
    let jsonData = try Data(contentsOf: URL(string: "user.json")!)

    /// The `XCTAssertNoThrow` can be used to get extra context about the throw
    XCTAssertNoThrow(try JSONDecoder().decode(User.self, from: jsonData))
}
The XCTAssertNoThrow method can be used when the result of the throwing method is not needed in any further test execution. You should use the XCTAssertThrowsError method to match the expected error type. As an example, you could write tests for a license key validator:
struct LicenseValidator {
    enum Error: Swift.Error {
        case emptyLicenseKey
    }

    func validate(licenseKey: String) throws {
        guard !licenseKey.isEmpty else {
            throw Error.emptyLicenseKey
        }
    }
}

class LicenseValidatorTests: XCTestCase {
    let validator = LicenseValidator()

    func testThrowingEmptyLicenseKeyError() {
        XCTAssertThrowsError(try validator.validate(licenseKey: ""), "An empty license key error should be thrown") { error in
            /// We ensure the expected error is thrown.
            XCTAssertEqual(error as? LicenseValidator.Error, .emptyLicenseKey)
        }
    }

    func testNotThrowingLicenseErrorForNonEmptyKey() {
        XCTAssertNoThrow(try validator.validate(licenseKey: "XXXX-XXXX-XXXX-XXXX"), "Non-empty license key should pass")
    }
}
Unwrapping optional values
The XCTUnwrap method is best used in a throwing test as it’s a throwing assertion:
func testFirstNameNotEmpty() throws {
    let viewModel = UsersViewModel(users: ["Antoine", "Maaike", "Jaap"])

    let firstName =  try XCTUnwrap(viewModel.users.first)
    XCTAssertFalse(firstName.isEmpty)
}
XCTUnwrap asserts that an optional variable’s value is not nil and returns its value if the assertion succeeds. It prevents you from writing an XCTAssertNotNil combined with unwrapping or dealing with conditional chaining for the rest of the test code. I encourage you to read my article How to test optionals in Swift with XCTest for more details.

FREE 5-Day Email Course: The Swift Concurrency Playbook
A FREE 5-day email course revealing the 5 biggest mistakes iOS developers make with with async/await that lead to App Store rejections And migration projects taking months instead of days (even if you've been writing Swift for years)
Running unit tests in Xcode
Once you’ve written your tests, it’s time to run them. With the following tips, this has become just a bit more productive.
Using the test triangles
You can run individual tests or a suite of tests using the leading triangle:

The same square shows red or green based on the latest result of the test runs.
Re-run the latest test
Re-run your last run test again by using:
⌃ Control + ⌥ Option + ⌘ Command + G.
The above shortcut might be one of my most often used shortcuts as it helps me to quickly re-run a test after implementing a potential fix for a failing test.
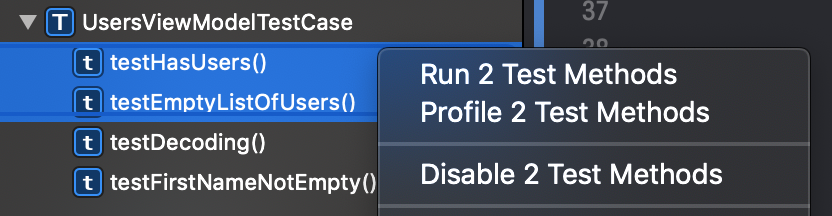
Run a combination of tests
Select the tests you want to run by using CTRL or SHIFT, right-click and select “Run X Test Methods”.
Applying filters in the test navigator
The filter bar at the bottom of the test navigator allows you to narrow your tests overview.

- Use the search field to search for a specific test based on its name
- Show only tests for the currently selected scheme. This is useful if you have multiple test schemes.
- Only show the failed tests. This will help you to quickly find which test has failed.
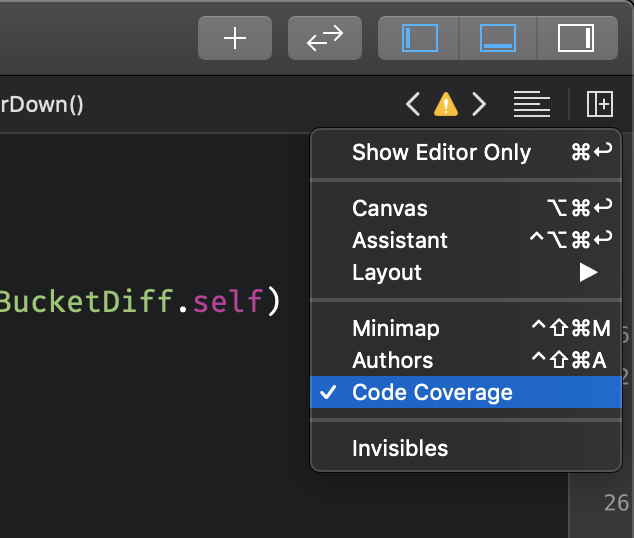
Enable coverage in the sidebar
The test iteration count shows you whether a specific piece of code is hit during the last run test.

It shows the number of iterations (18 in the above example), and a piece of code turns green when reached. When a piece of code is red, it means it was not covered during the last run of tests.
Your mindset when writing unit tests
Your mindset is a great starting point for writing quality unit tests. With a few basic principles, you ensure productivity, retain focus, and write the tests your application needs the most.
Your test code is just as important as your application code
After diving into practical tips, I want to cover a necessary mindset. Like writing your application code, you should do your best to write quality code for tests.
Think about reusing code, using protocols, defining properties if used in multiple tests, and ensuring your tests clean up any created data. This will make your unit tests easier to maintain and prevents flaky and weirdly failing tests. I encourage you to read my article Flaky tests resolving using Test Repetitions in Xcode if you’re new to flaky tests.
100% code coverage should not be your target
Although it’s a target for plenty, 100% coverage should not be your primary goal when writing tests. Make sure to test at least your most crucial business logic at first, as this is already a great start. Reaching 100% can be time-consuming, while the benefits are not always significant. It might take a lot of effort even to achieve 100%.
On top of that, 100% coverage can be pretty misleading. The above unit test example has 100% coverage as it reached all methods. However, it did not test all scenarios, as it only tested with a non-empty array. At the same time, there could also be a scenario with an empty array in which the hasUsers property should return false.
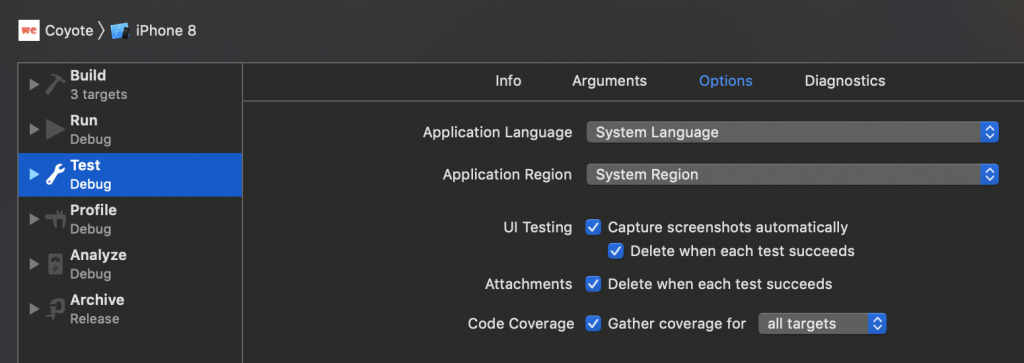
You can enable test coverage from the scheme settings window. This window can be opened by going into Product ➞ Scheme ➞ Edit Scheme.
Write a test before fixing a bug
It’s tempting to jump onto a bug and fix it as soon as possible. Although this is great, it would be even better if you could prevent the same bug from recurring in the future. By writing a unit test before fixing the bug, you ensure that the same bug is not happening again. See it as “Test-Driven Bug Fixing,” also known as TDBF from now on ;-).
Secondly, you can start writing a fix and run your new unit test to verify the fix worked. This technique is faster than running the Simulator to verify your fix worked.
Conclusion
Writing qualitative unit tests is an essential skill for a developer. You’ll be able to create confidence in your code base, ensuring you didn’t break anything before a new release. Using the correct assertions, you allow yourself to solve failing tests more quickly. Ensure to test critical business code at a minimum and avoid reaching 100% code coverage.
If you like to improve your Swift knowledge, check out the Swift category page. Feel free to contact me or tweet me on Twitter if you have any additional tips or feedback.
Thanks!