URLSessionConfiguration can be used to initialize URLSession instances in Swift. While in most cases, you’ll likely use the default configuration, you’ll also have the opportunity to create a custom configuration with non-default settings.
The default URLSessionConfiguration uses standard configurations that work best for most apps. However, no configuration fits all, and you can likely optimize it further for your specific needs. During my day-to-day job at WeTransfer, I’ve explored several opt-in configurations to maximize our networking implementation further. Let’s go over them in detail.
Creating a custom URLSessionConfiguration
Before going over specific opt-in configurations, it’s good to know how to configure a custom URLSessionConfiguration. Most of the time, you would likely use URLSession.shared which equals creating a custom instance using the default configuration:
let session = URLSession.shared

// Is equal to:
let session = URLSession(configuration: .default)
However, in cases you want to override the configuration, you can create one yourself:
let configuration = URLSessionConfiguration.default
let session = URLSession(configuration: configuration)
Note that we’re just making an individual reference to the default configuration. You can use this reference to override default settings while all other settings keep using the default value.
From this point on, you can start configuring custom settings, like adding the MockingURLProtocol from the Mocker framework:
let configuration = URLSessionConfiguration.default
configuration.protocolClasses = [MockingURLProtocol.self]
let session = URLSession(configuration: configuration)
Now that you know how to configure custom settings, it’s time to dive into a few interesting opt-in configurations.

FREE 5-Day Email Course: The Swift Concurrency Playbook
A FREE 5-day email course revealing the 5 biggest mistakes iOS developers make with with async/await that lead to App Store rejections And migration projects taking months instead of days (even if you've been writing Swift for years)

Multipath Service Type
The multipathServiceType allows you to configure the Multipath TCP connection policy for transmitting data over WiFi and cellular interfaces. By default, this property is set to none indicating that requests should not use Multipath TCP.
TCP stands for Transmission Control Protocol and can be single- or multipath. By configuring your URLSessionConfiguration to use a multipath TCP setting, you allow your network connection to use multiple paths in a single transport connection. In other words: allowing your connection to switch from WiFi to 4G if the latter is more performant.
The default URLSessionConfiguration uses a single radio for a network call, with a preference for WiFi over cellular. With Multipath TCP enabled, the URLSession initiates requests on cellular and WiFi and picks the most responsive one with a priority for WiFi.
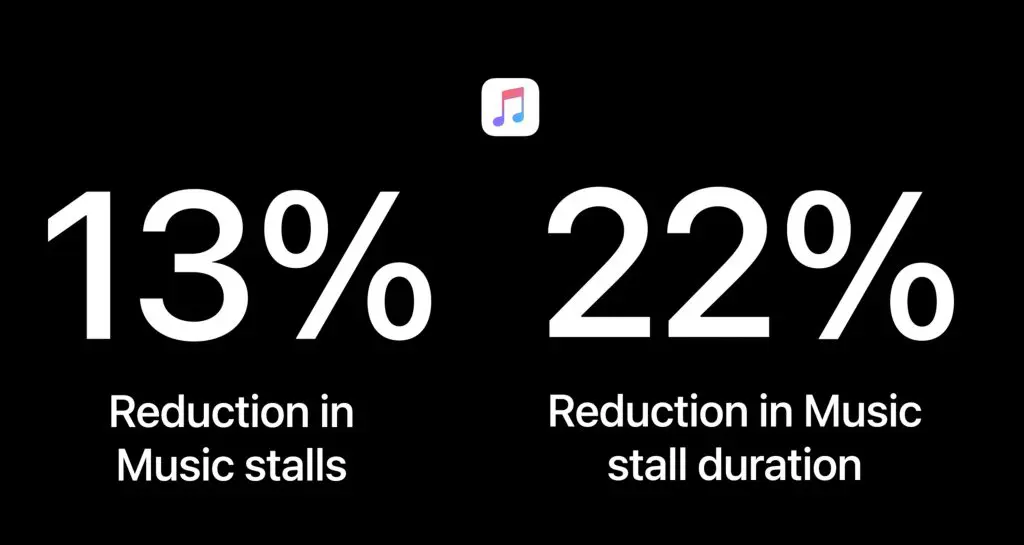
Apple enabled Multipath TCP for their Music app with great success:
How to enable Multipath TCP
First, you’ll have to enable the Multipath Entitlement in the Xcode Capabilities pane for your app target. Secondly, you can configure the multipathServiceType to a non-default value in which it’s preferred to use handover:
let configuration = URLSessionConfiguration.default
configuration.multipathServiceType = .handover

let session = URLSession(configuration: configuration)
Handover mode seamlessly transitions between WiFi and cellular, allowing an uninterrupted user experience.
Isn’t this going to lead to more cellular usage?
You might wonder whether this will lead to more cellular usage, which can be bad for the data usage of your users. However, the user’s device will always use only WiFi if connected to a reliable WiFi network. Multipath TCP only starts using cellular data when the user leaves the WiFi network range, and the signal begins to deteriorate.
Why isn’t this the default setting?
The introduction to Multipath TCP in this article makes it sound like a tremendous opt-in feature, probably making you wonder why it’s not the default. It’s not the default because it’s unsure whether your server supports Multipath TCP. Nowadays, your backend server likely supports Multipath TCP already, and you might need to enable it in the server configuration. Though: it’s essential to verify before publishing your app with Multipath TCP enabled.
Waiting for connectivity
URLSessionConfiguration allows you to configure a property called waitsForConnectivity, instructing your URLSession to wait till connectivity restores before failing a request. Connectivity can be unavailable for several reasons, like a missing VPN connection or a missing WiFi connection when allowsCellularAccess is set to false.
By default, in cases no connectivity is available, your URLSession will fail a request immediately. In the case of the WeTransfer app, we are fine waiting a little longer during a file upload, for example. Immediately failing a request directly fails a file upload, resulting in decreased user experience.
You can enable your URLSession to wait for connectivity as follows:
let configuration = URLSessionConfiguration.default
configuration.waitsForConnectivity = true

let session = URLSession(configuration: configuration)
How long will my app wait for connectivity?
Requests triggered by your URLSession will follow the timeoutIntervalForRequest property configured to be 60 seconds by default. The waitsForConnectivity configuration follows the same setting and will wait until this configured timeout. We decided to lower the default value to 30 seconds which, in our opinion, is large enough for a regular request to finish:
let configuration = URLSessionConfiguration.default
configuration.waitsForConnectivity = true
configuration.timeoutIntervalForRequest = 30

let session = URLSession(configuration: configuration)
Your request will now timeout when there’s no additional data received for 30 seconds due to missing connectivity.
Background URLSessionConfiguration exceptions
It’s important to point out the uniqueness of background URLSessionConfiguration instances. Background URLSessions always wait for connectivity, so configuring this property on such a session will have no effect.
If you’re looking for more insights regarding background sessions, I encourage you to read URLSession: Common pitfalls with background download & upload tasks.
Conclusion
The default URLSession uses a default URLSessionConfiguration that follows best-practice standards for most applications. However, there are opportunities for you to optimize the configuration by enabling Multipath TCP and allowing waiting for connectivity. Doing so allows you further to maximize the performance of network operations in your app.
If you like to improve your Swift knowledge, check out the Swift category page. Feel free to contact me or tweet me on Twitter if you have any additional tips or feedback.
Thanks!