The @Observable Macro was first introduced during WWDC 2023 to replace ObservableObject and its @Published parameters. The macro allows you to remove all published properties while still being able to redraw SwiftUI views when a change occurs automatically.
I highly recommend replacing your ObservableObject instances since the new macro prevents unnecessary SwiftUI redraws. As part of this article, I recommend reading “Debugging SwiftUI views: what caused that change?” to determine how your views respond before and after the migration.

Migrating from ObservableObject and @Published to @Observable
The Observation framework provides a type-safe and performant implementation of the observer design pattern in Swift. Like ObservableObject, the framework allows the definition of an observable object with a list of observers that get notified when a specific or general state changes.
Instead of adopting the ObservableObject protocol:
final class CounterViewModel: ObservableObject {
    @Published private(set) var count: Int = 0

    func increaseCount() {
        count += 1
    }
}
You can make use of the new @Observable macro and remove both @Published property wrappers and the ObservableObject protocol inheritance:
import Observation

@Observable
final class ObservedCounterViewModel {
    private(set) var count: Int = 0

    func increaseCount() {
        count += 1
    }
}
At the implementation level, you can remove the @ObservedObject attribute and change the property to a let:
struct CounterView: View {
    /// BEFORE:
    @ObservedObject var viewModel = CounterViewModel()

    /// AFTER:
    let viewModel = ObservedCounterViewModel()

    var body: some View {
        VStack {
            Text("Count is: \(viewModel.count)")
            Button("Increase count", action: {
                viewModel.increaseCount()
            })
        }
        .padding()
    }
}
The @Observable Macro will observe any properties inside the ObservedCounterViewModel instance and trigger necessary SwiftUI redraws if the state changes.

FREE 5-Day Email Course: The Swift Concurrency Playbook
A FREE 5-day email course revealing the 5 biggest mistakes iOS developers make with with async/await that lead to App Store rejections And migration projects taking months instead of days (even if you've been writing Swift for years)
How does @Observable work?
So far, it has looked like magic as our SwiftUI views get updated while we’ve only marked our view model with the @Observable macro. However, there’s more happening behind the scenes. As we learned in my article Swift Macros: Extend Swift with New Kinds of Expressions, you can expand a Macro and look at the implementation details:
The @Observable Macro simplifies our implementation at the surface level, but we still use a protocol and property attribute behind the scenes. Instead of adopting the ObservableObject protocol, we’re now inheriting the Observation.Observable protocol. At the same time, our count property is attributed with the @ObservationTracked Macro instead of the @Published Property Wrapper.
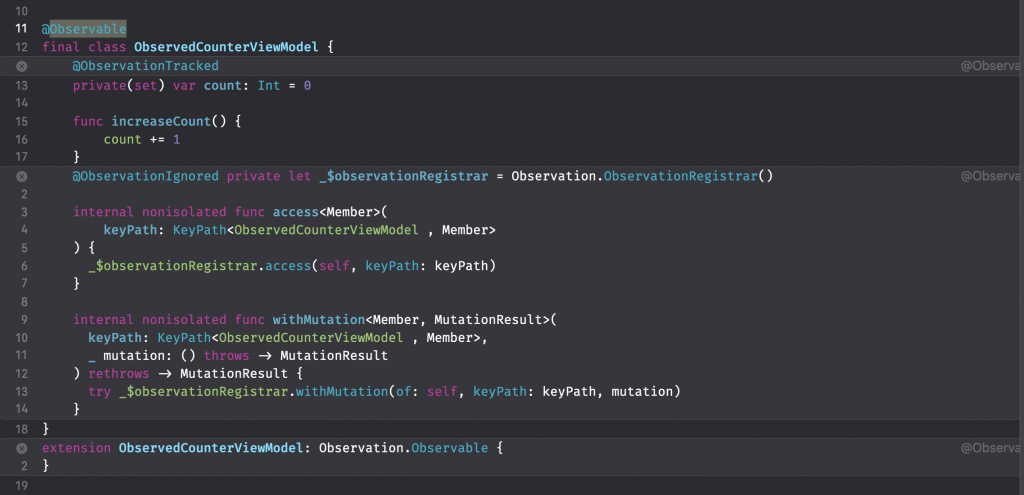
To further understand the magic of the @Observable Macro, we can expand the inner Macros as well:

Looking at the underlying implementation, it becomes clear that our count property comes with a backing _count property for storage. The latter notifies the outer observable container by implementing a custom get and set accessor that uses the access(keyPath:) and withMutation(keyPath:) methods.
These methods trigger the magic behind the scenes and communicate with any related SwiftUI views to notify of a state change. The @Observable Macro will attribute each property inside the view model but only trigger a SwiftUI View redraw if any of those properties change. Lastly, your SwiftUI view will only redraw for state changes in properties used inside the view.
Benefits of using @Observable over ObservableObject
The previous paragraph briefly explains the benefits of using the @Observable Macro over ObservableObject. It’s clear that we’re talking about SwiftUI redraw optimizations, but it’s not entirely clear why it’s so much better to step away from @Published properties.
The key benefit appears when we’re introducing another view model property:
final class CounterViewModel: ObservableObject {
    @Published private(set) var count: Int = 0

    /// Not observed by our `CounterView`.
    @Published private(set) var unrelatedCount: Int = 0

    func increaseUnrelatedCount() {
        unrelatedCount = 1
    }
}

struct CounterView: View {
    @ObservedObject var viewModel = CounterViewModel()

    var body: some View {
        /// Print any related observed changes.
        /// See: https://www.avanderlee.com/swiftui/debugging-swiftui-views/
        Self._printChanges()

        return VStack {
            Text("Count is: \(viewModel.count)")
            Button("Increase count", action: {
                viewModel.increaseUnrelatedCount()
            })
        }
        .padding()
    }
}
We’re now increasing an unrelated count since the viewModel.unrelatedCount property is not used by our CounterView. However, the Self._printChanges method shows us that our view is still being redrawn:
CounterView: @self, @identity, _viewModel changed.

CounterView: _viewModel changed.
CounterView: _viewModel changed.
If you apply the same changes to the ObservedCounterView, you will notice that the view is not notified of a state change since it’s not observing the changed value. You can imagine that this might prevent many unnecessary redraws, drastically improving your app’s performance.
Making use of bindings with the Observation framework
When migrating existing code, you might realize your view model no longer offers any bindings after moving away from @ObservedObject. For example, the following code using the dollar sign prefix won’t work:
@Observable
final class TextInputViewModel {

    var inputText: String = ""
}


struct TextInputView: View {
    let viewModel = TextInputViewModel()

    var body: some View {
        VStack {
            /// Error: Cannot find '$viewModel' in scope
            TextField("Input", text: $viewModel.inputText)
        }.padding()
    }
}
You can fix this by adding the @Bindable attribute to your view model property:
struct TextInputView: View {
    @Bindable var viewModel = TextInputViewModel()

    var body: some View {
        VStack {
            TextField("Input", text: $viewModel.inputText)
        }.padding()
    }
}
The importance of using @State with @Observable
You might have noticed that we didn’t use @State at all with our improved version using the @Observable Macro:
struct CounterView: View {
    /// BEFORE:
    @ObservedObject var viewModel = CounterViewModel()

    /// AFTER:
    let viewModel = ObservedCounterViewModel()

    /// ...
}
While this works, it’s important to realize our view model can possibly be recreated when the CounterView gets recreated by its parent view.
By wrapping the view model with @State, we’re telling SwiftUI to manage the instance’s storage:
struct CounterView: View {
    /// BEFORE:
    @ObservedObject var viewModel = CounterViewModel()

    /// AFTER:
    @State var viewModel = ObservedCounterViewModel()

    /// ...
}
Each time SwiftUI re-creates CounterView, it connects the earlier instantiated ObservedCounterViewModel, providing the view a single source of truth for the model data. By using @State, you are no longer required to use @Bindable for bindings.
Conclusion
The @Observable Macro simplifies code at the implementation level and increases the performance of SwiftUI views by preventing unnecessary redraws. You’re no longer required to use @ObservedObject, ObservableObject, and @Published. However, you still need to use @State to create a single source of truth for model data.
If you want to improve your SwiftUI knowledge, even more, check out the SwiftUI category page. Feel free to contact me or tweet me on Twitter if you have any additional tips or feedback.
Thanks!