Testing push notifications in the iOS simulator makes adding support for remote notifications much more effortless. However, you often must iterate a lot to verify that your code is working as expected.
After gaining permission to receive push notifications in your app, you can start testing out several notifications. Xcode’s Simulator supports testing both regular and Rich Notifications, depending on the JSON payload. Using tools like RocketSim, you can save Push Notification templates and execute them quickly.

Enable permission to use push notifications
Before we start testing remote push notifications, it’s important to make sure you have the right permissions to receive notifications on the iOS simulator. Otherwise, you could end up debugging to figure out why the notification is not showing up, only to realize it’s caused by missing permissions.
You can request permissions using the following code:
let center = UNUserNotificationCenter.current()
center.requestAuthorization(options: [.alert, .sound]) { granted, error in
    // If `granted` is `true`, you're good to go!
}
Or, if you’re using Swift Concurrency, you can make use of the asynchronous alternative:
Task {
    let isGranted = try await center.requestAuthorization(options: [.alert, .sound])
}
New to Concurrency? I’ve got an in-depth course at swiftconcurrencycourse.com to teach you all about it.
The first time your app calls this method, the system asks the user permission to allow the requested actions. The user can allow or deny access, and the system saves their choice. Future calls to this method won’t ask the user again. If the user gave permissions before, this code would directly execute the closure or return the granted property set to true.
You can use the permissions result to adjust your app’s behavior based on the user’s decision. For example, if the user didn’t grant permission, you might inform your notification server not to send notifications to their device.
Resetting Push Notification Permissions
If you frequently test the authentication flow, you want to reset the Push Notification Permissions. Unfortunately, you can only delete and reinstall your app to do this. Soon, however, you’ll be able to do this without an uninstall via RocketSim.
Sending a push notification to the iOS Simulator
The easiest way to test push notifications is by making use of RocketSim. You can configure so-called Quick Actions from the preferences window and define the payload you want to send:
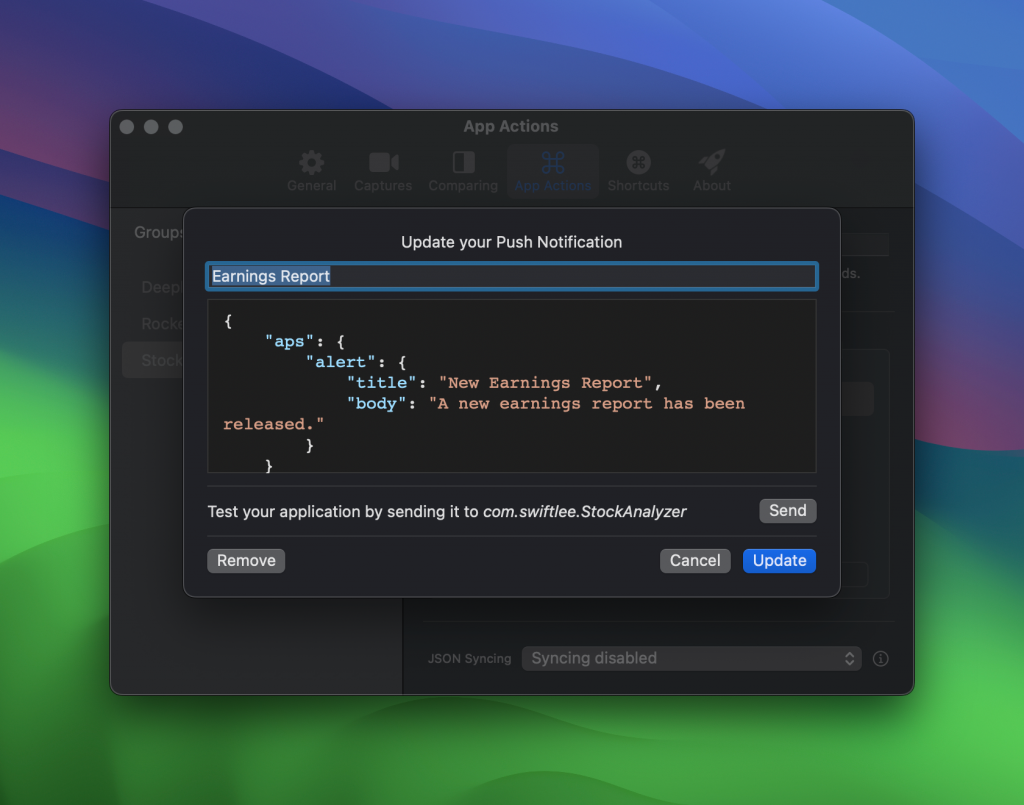
During configuration, you can test the payload before saving, allowing you to iterate on different payloads quickly. After tapping the Send button, you’ll see a notification showing up in the Simulator:
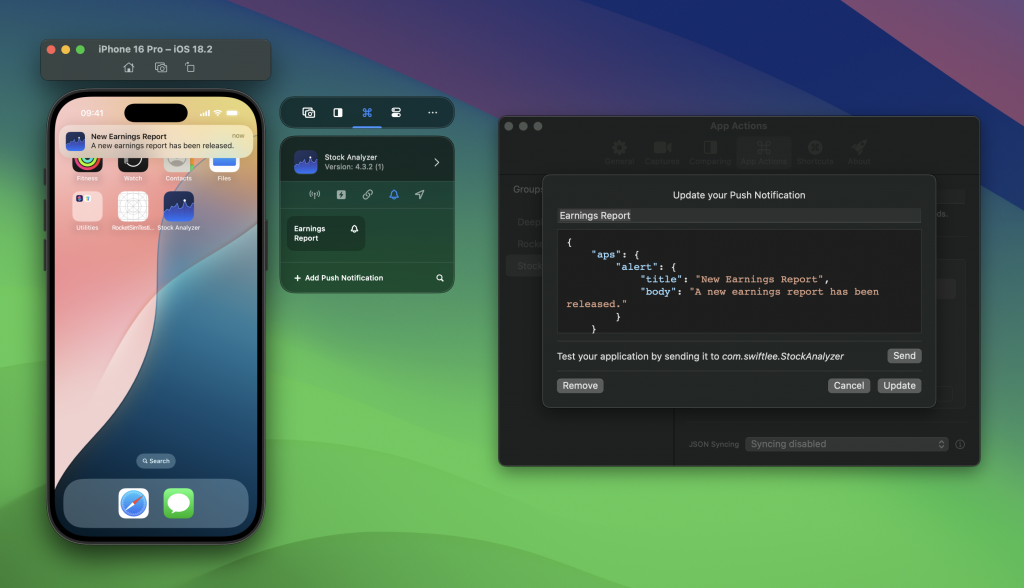
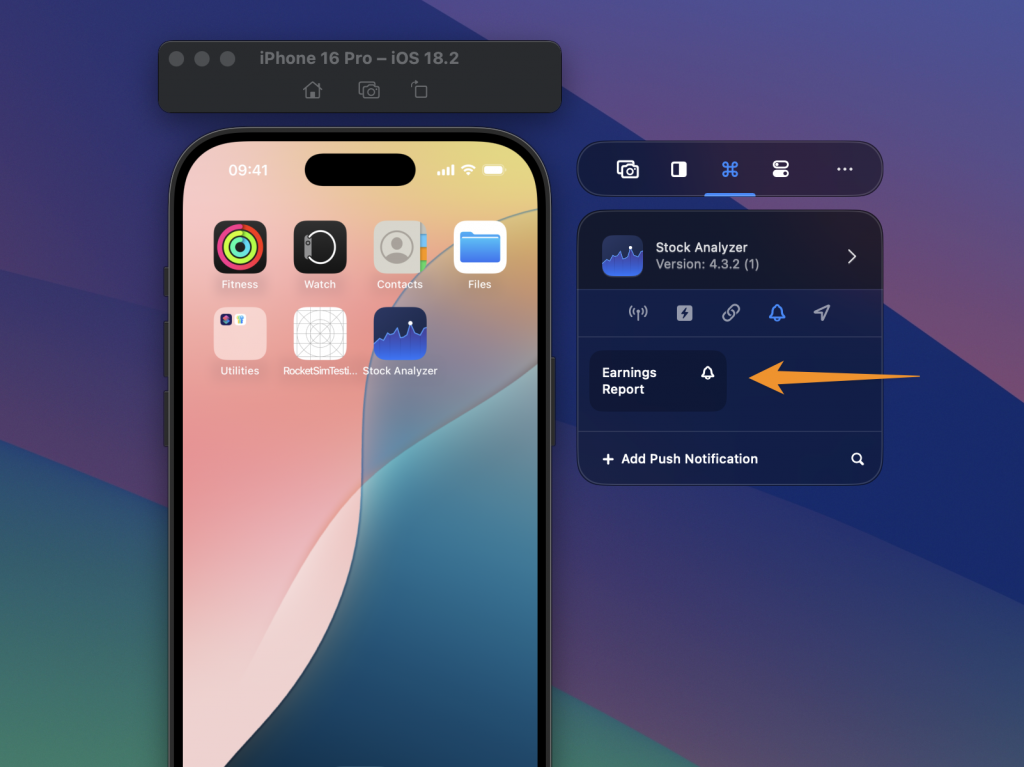
Once you’ve saved the payload you want to use, you can find a new Quick Action next to the Simulator. You can use this quick action to trigger the push notification during testing, allowing you to iterate faster.
If you’re new to RocketSim, this might be the time to try it. The Push Notifications testing feature is part of 30+ unique Xcode’s Simulator features that make you and your team more productive. You can try out RocketSim for free.
Testing push notifications using the Xcode command-line tools
If you don’t like to use 3rd party tools, you can choose to use the Xcode command-line tools to work with the simulator from the terminal. You can launch simulators, trigger universal links, and more. One of those commands allows you to send a push notification to the iOS simulator:
$ xcrun simctl push --help
Send a simulated push notification
Usage: simctl push <device> [<bundle identifier>] (<json file> | -)

	bundle identifier
	     The bundle identifier of the target application
	     If the payload file contains a 'Simulator Target Bundle' top-level key this parameter may be omitted.
	     If both are provided this argument will override the value from the payload.
	json file
	     Path to a JSON payload or '-' to read from stdin. The payload must:
	       - Contain an object at the top level.
	       - Contain an 'aps' key with valid Apple Push Notification values.
	       - Be 4096 bytes or less.

Only application remote push notifications are supported. VoIP, Complication, File Provider, and other types are not supported.
The command requires you to pass in a few arguments:
- <device>
Simply set this to booted to use the open simulator. You can also use a device identifier which you could get with thexcrun simctl list devices | grep Bootedcommand. - <bundle identifier>
Set this to the bundle identifier of the app you’re testing push notifications for. - <json file>
This should point to a JSON file on disk containing the push notification details. You could also use stdin to provide the JSON content.
An example of execution could look as follows:
$ xcrun simctl push booted com.wetransfer.app payload.json
Notification sent to 'com.wetransfer.app'
In this example, we’re using the following JSON saved to a payload.json file:
{
  "aps": {
    "alert": {
      "title": "Transfer Update",
      "body": "Your Transfer has been downloaded"
    }
  }
}
You can read more about the possibilities and the structure of a payload JSON on the official Apple documentation page Creating the Remote Notification Payload.
Testing push notifications using an APNS file
Another option for testing push notifications on the iOS simulator is by dragging an APNS file into the iOS simulator.
This APNS file looks almost the same as the JSON payload file, but adds a Simulator Target Bundle key describing the bundle identifier to use:
{
  "Simulator Target Bundle": "com.wetransfer.app",
  "aps": {
    "alert": {
      "title": "Transfer Update",
      "body": "Your Transfer has been downloaded"
    }
  }
}
Sharing APNS files in your repository
For large teams, it makes sense to create common payloads once and share them with all developers. This allows you to consistently test the push notifications your app supports.
RocketSim allows you to do this by its JSON syncing feature:
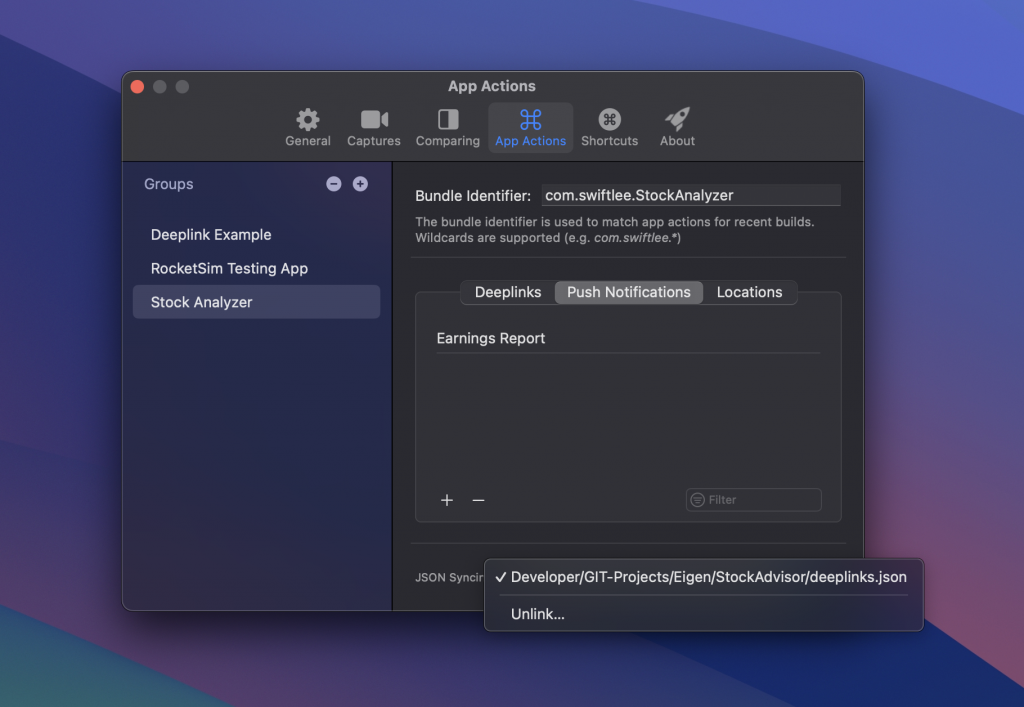
Every time you or your colleague makes a change, the JSON file will be updated within your repository. You can commit the file using Git, and your colleagues will receive the configuration file matching the current state of your code base. This can be useful if you just enhanced your Rich Notifications implementation and want to ensure a matching JSON Payload is in place.
Conclusion
Testing push notifications on the iOS simulator has now become simple. By configuring common JSON payloads for your app as quick actions, you can iterate quickly and verify implementations like Rich Notifications. If you don’t like using third-party tools like RocketSim, you can use the terminal instead.
If you like to improve your workflow, even more, check out the workflow category page. Feel free to contact me or tweet to me on Twitter if you have any additional tips or feedback.
Thanks!