The new App Store Connect API was announced during WWDC 2018 and made it possible to write applications for App Store Connect. You can use the API to fetch metadata for apps, TestFlight builds, download sales reports, and much more. Apple added new endpoints over the years, with most recently the release of their 2.0 version including endpoints for customer reviews and more.
The App Store Connect API follows the OpenAPI specs and comes with rich documentation Apple provides. The OpenAPI specs provided by Apple allowed me to update my App Store Connect Swift SDK to work with the API while writing Swift apps. Let’s dive in and see how you can create your developer tools using the API in Swift.

Give yourself a kickstart
Before diving into code examples and ideas around the API, it’s good to give yourself a headstart by looking into related WWDC sessions.
The WWDC Talk Automating App Store Connect from WWDC 20218 is a great way to get you started. Together with the official API documentation of Apple, you should be up and running to start working with the API.
New API endpoints are often announced during the “What’s new in App Store Connect?” sessions during WWDC, so if you want to dive into more sessions, you can watch the one from WWDC 2022, WWDC 2020, WWDC 2019, or WWDC 2018. A special mention for the Automating App Store Connect session handling the API in depth.
Authenticating with the App Store Connect API
The API is authorized via JSON Web Tokens (JWT) and requires a personal API Key to generate bearer tokens from your organization’s App Store Connect account.
Requesting an App Store Connect API Key
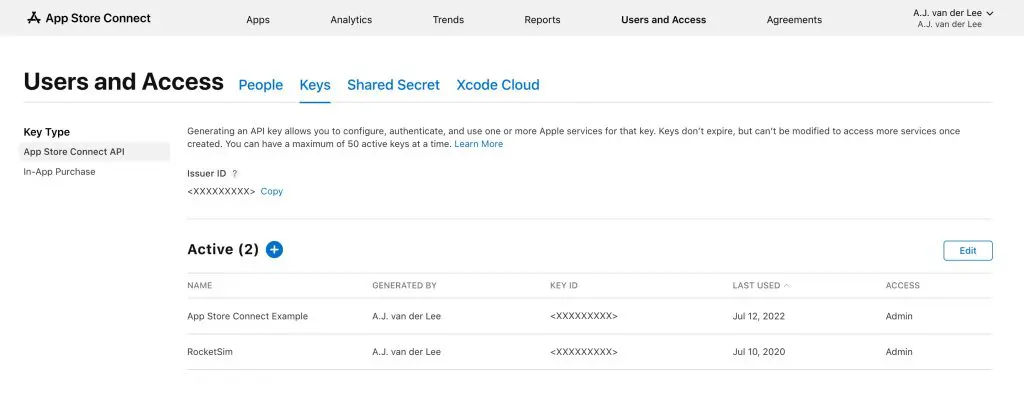
Before you can start using the API, you will have to generate a key inside App Store Connect. You can create a key in the “Users and Access” section:
The JWT token requires a combination of parameters:
- Issuer ID
Identifies the issuer who created the authentication token and is the same for all keys in the same organization. - Key ID
The key identifier is optional inside JSON Web Tokens. It is advantageous when you have multiple keys to sign the tokens with and must look up the right one to verify the signature. - Private Key
The Private Key is associated with the key identifier and used to authenticate you with the App Store Connect API.
You can read more details about authenticated requests in the official documentation, but I believe you don’t need to write this logic yourself. Instead, you can benefit from my work and use the App Store Connect Swift SDK.
Using the App Store Connect API in Swift
You can use the App Store Connect API in Swift by using the App Store Connect Swift SDK open-source package. The SDK uses the OpenAPI specs and already contains the latest endpoints announced during WWDC 2022.
You can integrate the package using Swift Package Manager:
dependencies: [
    .package(url: "https://github.com/AvdLee/appstoreconnect-swift-sdk.git", .upToNextMajor(from: "2.0.0"))
]
Or use the same URL when adding a package in Xcode.
There are many API endpoints for you to explore, but in this example, we’re going to create a simple list of apps and their bundle identifier:
You can also find this example in the repository if you want to try it out immediately.
We start by creating a new view model that takes care of setting up the API provider and running API requests:
final class AppsListViewModel: ObservableObject {
    @Published var apps: [AppStoreConnect_Swift_SDK.App] = []

    /// Go to https://appstoreconnect.apple.com/access/api and create your own key. This is also the page to find the private key ID and the issuer ID.
    /// Download the private key and open it in a text editor. Remove the enters and copy the contents over to the private key parameter.
    private let configuration = APIConfiguration(issuerID: "<YOUR ISSUER ID>", privateKeyID: "<YOUR PRIVATE KEY ID>", privateKey: "<YOUR PRIVATE KEY>")
    private lazy var provider: APIProvider = APIProvider(configuration: configuration)

    func loadApps() {
        Task.detached {
            let request = APIEndpoint
                .v1
                .apps
                .get(parameters: .init(
                    sort: [.bundleID],
                    fieldsApps: [.appInfos, .name, .bundleID],
                    limit: 5
                ))

            do {
                let apps = try await self.provider.request(request).data
                await self.updateApps(to: apps)
            } catch {
                print("Something went wrong fetching the apps: \(error)")
            }
        }
    }

    @MainActor
    private func updateApps(to apps: [AppStoreConnect_Swift_SDK.App]) {
        self.apps = apps
    }
}
The SDK leverages async/await, and @MainActor attributes available in the concurrency framework. You will have to update the APIConfiguration initializer with your keys to make this code work as expected.
Before creating the view, let’s dive into the defined APIEndpoint for fetching a list of apps:
let request = APIEndpoint
    .v1
    .apps
    .get(parameters: .init(
        sort: [.bundleID],
        fieldsApps: [.appInfos, .name, .bundleID],
        limit: 5
    ))
You can create an APIEndpoint by following the official documentation. The v1 namespace is required to identify the API version you want to use since some of the endpoints became available starting in version 2.0.
Each endpoint defines a set of methods you can perform based on the support REST methods. You’ll find entities and paths generated by the open-sourced CreateAPI framework.
You can define the properties, sorting, and limiting you want to apply for each endpoint, giving you the flexibility only to return the data you need.
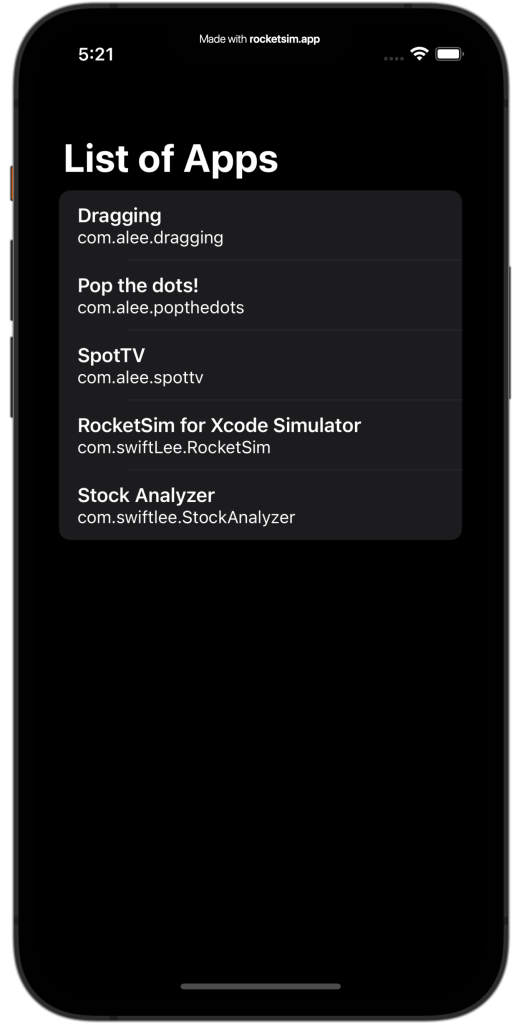
Connecting the data to a SwiftUI View
Now that we have a list of apps to display, we can start creating the user interface. We can do this by creating a simple list and iterating over the collection of apps to show the app’s name and bundle identifier accordingly:
struct AppsListView: View {
    @ObservedObject var viewModel = AppsListViewModel()

    var body: some View {
        NavigationView {
            ZStack {
                List(viewModel.apps, id: \.id) { app in
                    VStack(alignment: .leading) {
                        Text(app.attributes?.name ?? "Unknown name")
                            .font(.headline)
                        Text(app.attributes?.bundleID ?? "Unknown bundle ID")
                            .font(.subheadline)
                    }
                }
                ProgressView()
                    .opacity(viewModel.apps.isEmpty ? 1.0 : 0.0)
            }.navigationTitle("List of Apps")
        }.onAppear {
            viewModel.loadApps()
        }
    }
}
What can I make with the API?
The App Store Connect API contains a lot of endpoints for you to explore, so the possibilities are endless! To inspire you with some ideas, I’ve created a list of developer tools you could build:
- An app to view and reply to customer reviews
- Managing TestFlight users
- Creating a tool to download sales reports quickly
- Communicate with Xcode Cloud workflows and builds
You might have your ideas for developing apps using the API. Let me know if you’ve open-sourced your solution, and I’m happy to list it here.
Can I submit an app to the App Store using this API?
Yes, you can! However, you would have to let users generate their keys for their organization. It’s not possible to let users log in and generate keys automatically. Yet, this shouldn’t stop you from creating a developer tool we can all benefit from!
Conclusion
The App Store Connect API is a rich set of API endpoints allowing you to communicate with App Store Connect data. You can create developer tools for your teams internally or deploy an app to the App Store that anyone can use. By making use of the App Store Connect Swift SDK, you’ll be able to get started in a few minutes.
If you like to improve your Swift knowledge, check out the Swift category page. Feel free to contact me or tweet me on Twitter if you have any additional tips or feedback.
Thanks!