Network Reachability is a vital aspect of apps that use some networking capabilities. Your users won’t always have a good internet connection, so optimizing your app for bad networking conditions is essential.
We can leverage several techniques to optimize our app accordingly, but it’s essential to be aware of common mistakes when you do. After writing several Networking frameworks and tens of apps myself, it’s time to share with you my best practices to prevent you from making mistakes I made in the past.

Wait for connectivity instead of pre-checking for reachability
The most common mistake I see developers make is to pre-check for reachability before making a request. Apple’s Networking frameworks are optimized for a so-called ‘Wait for Connectivity’ model: if an active request encounters missing connectivity, it will wait and continue automatically when the connectivity restores.
Your reachability check validates a moment in time and might not represent what’s happening in the connection. Your user could be in an elevator for seconds, with their connection being restored soon. If your app decided to perform the request instead, it would benefit from a restored connection when the user exits the elevator.
Instead, I recommend optimizing your networking layer for the ‘Wait for Connectivity’ model. For example, you can configure timeouts on your URLSessionConfiguration:
let configuration = URLSessionConfiguration.default
configuration.waitsForConnectivity = true
configuration.timeoutIntervalForRequest = 60 // 1 minute
configuration.timeoutIntervalForResource = 60 * 60 // 1 hour
Depending on the type of app, you can adjust these values to your needs. You might not want to wait more than 1 minute for a simple API Request, but you expect more time for an upload request. The waitsForConnectivity boolean needs to be set to true and indicates whether the session should wait for connectivity to become available or fail immediately.
timeoutIntervalForRequest vs. timeoutIntervalForResource
Both properties look similar but have different purposes.
timeoutIntervalForRequest is designed for regular tasks and controls how long (in seconds) a task should wait for additional data. Note that the associated timer for this timeout resets when new data arrives. In other words, on slow networking connections, you’ll still receive data and won’t likely reach this timeout.
timeoutIntervalForResource controls how long (in seconds) to wait for a complete resource to transfer before giving up. The default value is set to 7 days and might make you wonder: regular API requests should never take so long. You’re right and with that, it should point you in the right direction. This timeout is designed for longer tasks like uploads and downloads that perform on a background URL session. Those sessions automatically retry failed tasks behind the scenes until the timeoutIntervalForResource is reached.
If you’re working with background URL Sessions, you might want to read URLSession: Common pitfalls with background download & upload tasks.

FREE 5-Day Email Course: The Swift Concurrency Playbook
A FREE 5-day email course revealing the 5 biggest mistakes iOS developers make with with async/await that lead to App Store rejections And migration projects taking months instead of days (even if you've been writing Swift for years)
Restricting your app to WiFi only
Similar to pre-checking network reachability, many apps pre-check the type of connectivity before performing any requests. A typical scenario is restricting networking to use WiFi/Ethernet connections only.
Instead, it’s better to configure your networking layer to only allow certain types of connectivity. You can do this by adjusting your URLSessionConfiguration:
let configuration = URLSessionConfiguration.default

/// Set to `false` to only allow WiFi/Ethernet.
configuration.allowsCellularAccess = true

/// Set to `false` to prevent your app from using network interfaces that the system considers expensive.
configuration.allowsExpensiveNetworkAccess = true

/// Indicates whether connections may use the network when the user has specified Low Data Mode.
configuration.allowsConstrainedNetworkAccess = true
You can change these properties anytime if you have a reference to your URLSessionConfiguration instance. By using these properties over Network Reachability checks you allow Apple to perform optimizations for any outgoing network requests.
Responding to Networking Errors
Networking Reachability checks are often made to tell users their app isn’t working due to a lost connection. Without checking for reachability, you can still update your UI based on any returned errors.
I like to compare any errors to this list of codes:
/// A collection of error codes that related to network connection failures.
public var NSURLErrorConnectionFailureCodes: [Int] {
    [
        NSURLErrorBackgroundSessionInUseByAnotherProcess, /// Error Code: `-996`
        NSURLErrorCannotFindHost, /// Error Code: ` -1003`
        NSURLErrorCannotConnectToHost, /// Error Code: ` -1004`
        NSURLErrorNetworkConnectionLost, /// Error Code: ` -1005`
        NSURLErrorNotConnectedToInternet, /// Error Code: ` -1009`
        NSURLErrorSecureConnectionFailed /// Error Code: ` -1200`
    ]
}
Not all the error codes relate to a missing internet connection, but they give me a reason to tell my users their connection isn’t solid. You can make a convenience extension as follows:
extension Error {
/// Indicates an error which is caused by various connection related issue or an unaccepted status code.
/// See: `NSURLErrorConnectionFailureCodes`
var isOtherConnectionError: Bool {
NSURLErrorConnectionFailureCodes.contains(_code)
}
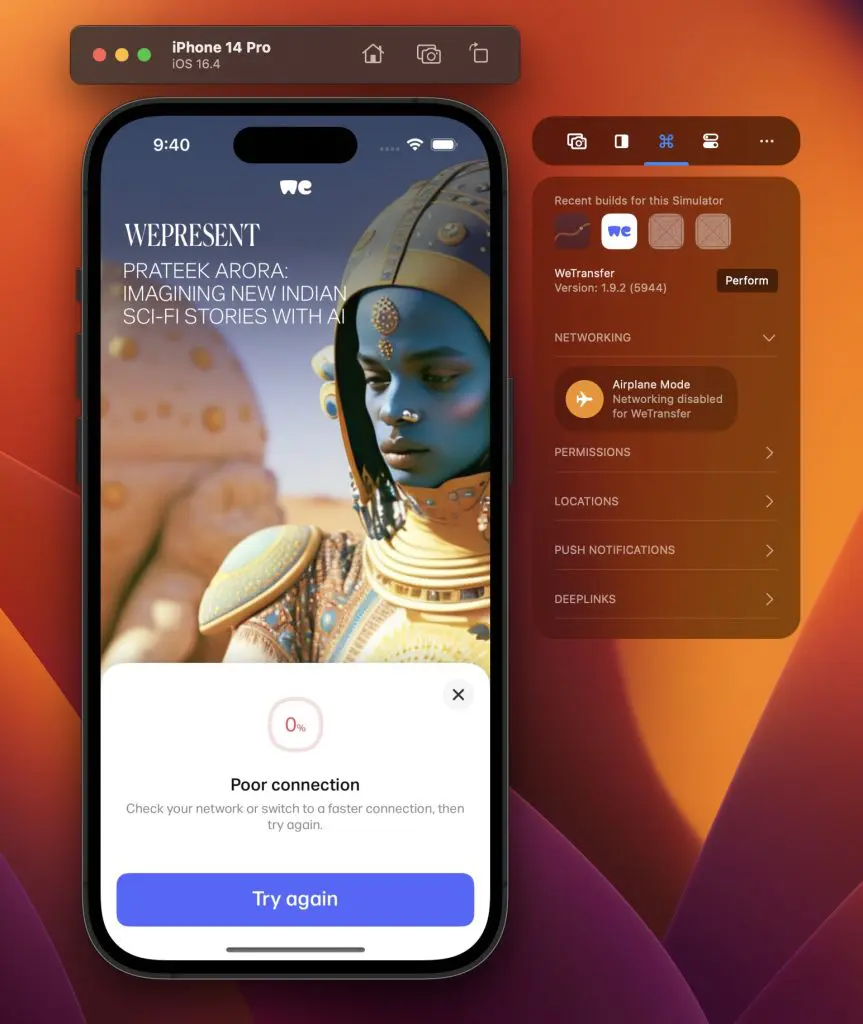
}Update your UI based on the isOtherConnectionError property whenever one of your API requests returns an error to tell your users about an unstable connection. For example, in WeTransfer we show the user a sheet explaining their connection is unstable:
When you should use Networking Reachability checks
At this point, you’ve tried your best to perform the network requests, no matter the connection. You’ve received an error indicating an unstable networking environment, and you might want to retry the request automatically once the connection is restored.
At this point, it’s acceptable to start checking for a restored networking connection. The recommended way of doing this is by making use of the NWPathMonitor:
import Network

let pathMonitor = NWPathMonitor()
pathMonitor.pathUpdateHandler { path in
    switch path.status {
    case .satisfied:
        // Networking connection restored
    default:
        // There's no connection available
    }
}
The above code example represents the most straightforward implementation of the monitor, but it comes with many more options, like checking for a restored cellular connection only. I encourage you to explore the API if you want more options.
Testing your app for Network Connectivity
While implementing support for Network Reachability, creating a stable testing environment is essential. You can run your app on an actual device and switch between WiFi, Cellular, and Airplane mode, but often you want to test on a Simulator to accelerate your development workflow.
Unfortunately, the only way to disable networking on the Simulator is by turning off your Mac’s WiFi. Doing so means you won’t be able to use any other apps or search for answers on Stack Overflow while debugging your implementation. Apple provides a Network Link Conditioner that’s also affecting your entire system’s networking connectivity.
Disabling networking for your Simulator App only
I decided to solve this problem by creating a Network Extension for RocketSim. After quite some Network Extension Debugging on macOS, I managed to create an environment in which a specific Simulator build would be blocked from networking:
In the above example, you can see that I’m trying to create a new transfer. The request starts but fails immediately after it encounters a lost connection. After I confirmed the app was correctly responding with an update for the user, I restored the connection by disabling airplane mode.
You can download RocketSim from the Mac App Store and try Airplane Mode for your app.
Conclusion
Optimizing your app for Network Reachability starts by preventing common mistakes like pre-checking for reachability before performing a request. Once you encounter a missing connection, you can check for a restored connection and resume requests accordingly. Using RocketSim, you’re able to validate your implementation without affecting your Mac’s connection.
If you like to improve your Swift knowledge, even more, check out the Swift category page. Feel free to contact me or tweet to me on Twitter if you have any additional tips or feedback.
Thanks!