Deeplinks allow you to open your app and navigate into a specific location right after launch. An example could be deep linking to a recipe or movie based on the tapped link. You can determine the destination page based on the metadata provided by the URL.
You can use a view modifier in SwiftUI or an AppDelegate method to handle incoming URLs and navigate accordingly. When set up smartly, you can benefit from opening URLs internally and navigating to destinations anywhere in the app.

What are deeplinks?
Before we dive into handling and configuring your app for deeplinks it’s good to know what they are. You can see deeplinks as a way to navigate ‘deep’ into your app. Pages that are normally available only after navigating a few steps will now become available after opening a URL from apps like Safari. For example, you can open WhatsApp and start a message using the following link: whatsapp://send?text=Hello%2C%20World!
Configuring your app for deeplinks
You can start configuring any deeplinks your app can handle inside Xcode. Start by selecting your project file, go to the info tab, and unfold the URL Types section:
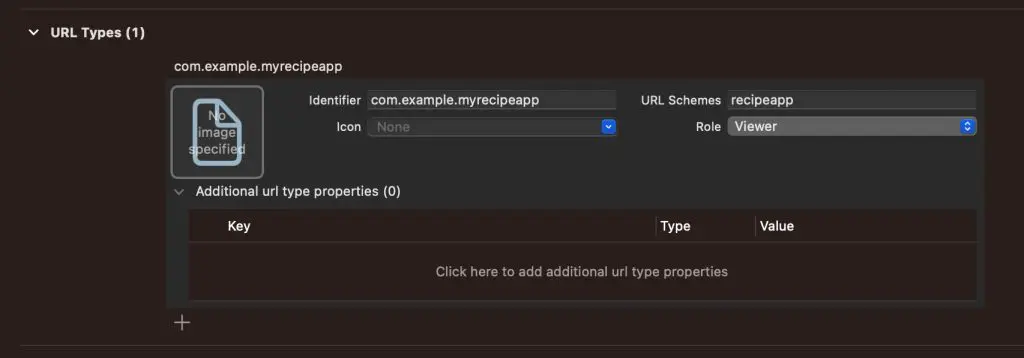
In this case, we’ve configured our app to handle URLs starting with the recipeapp:// scheme. There are a few parts to configure.
Identifier
The identifier distinguishes your app from others in case multiple apps declare support for the same scheme. Using your app’s bundle ID as a prefix is best practice, but it doesn’t prevent any other apps from registering the same scheme. If multiple apps register the same scheme, the app the system targets will be undefined. You should consider using Universal Links instead if uniqueness becomes essential.
URL Schemes
Specifies the URL scheme to use for opening links in your app
Role
Roles are only used on macOS and can be ignored on iOS. They represent what your app can do with incoming URLs using the configured scheme:
- Editor: Read & Write
- Viewer: Read only
- None: The app can’t use the URLs at all
Icon and Additional URL type properties
You don’t have to worry about configuring an icon or additional URL-type properties. I understood they’re used under macOS, but I have yet to find a helpful case.

FREE 5-Day Email Course: The Swift Concurrency Playbook
A FREE 5-day email course revealing the 5 biggest mistakes iOS developers make with with async/await that lead to App Store rejections And migration projects taking months instead of days (even if you've been writing Swift for years)
Handling incoming deeplinks
After defining the URL Schemes your app supports, you can start looking into responding to any incoming URLs. In our example, we will handle the URL: recipeapp://open-recipe?name=recipename, which is built up as follows:
- The URL scheme needs to be
recipeapp:// - Our URL action is named
open-recipe - We will use the query parameter
nameto find the target recipe to open
We can translate these requirements to a new handleIncomingURL method, which we will call from the SwiftUI onOpenURL modifier:
struct ContentView: View {

    /// We store the opened recipe name as a state property to redraw our view accordingly.
    @State private var openedRecipeName: String?

    var body: some View {
        VStack {
            Text("Hello, recipe!")

            if let openedRecipeName {
                Text("Opened recipe: \(openedRecipeName)")
            }
        }
        .padding()
        /// Responds to any URLs opened with our app. In this case, the URLs
        /// defined inside the URL Types section.
        .onOpenURL { incomingURL in
            print("App was opened via URL: \(incomingURL)")
            handleIncomingURL(incomingURL)
        }
    }

    /// Handles the incoming URL and performs validations before acknowledging.
    private func handleIncomingURL(_ url: URL) {
        guard url.scheme == "recipeapp" else {
            return
        }
        guard let components = URLComponents(url: url, resolvingAgainstBaseURL: true) else {
            print("Invalid URL")
            return
        }

        guard let action = components.host, action == "open-recipe" else {
            print("Unknown URL, we can't handle this one!")
            return
        }

        guard let recipeName = components.queryItems?.first(where: { $0.name == "name" })?.value else {
            print("Recipe name not found")
            return
        }

        openedRecipeName = recipeName
    }
}
We’ve added a SwiftUI View Modifier to handle any incoming URLs. The handleIncomingURL method contains requirement checks and fetches the recipe name after confirming the correct URL structure. Once we’ve set the openedRecipeName to the received recipe name, we will redraw our view and represent the value inside a text element.
Handling URLs inside an AppDelegate or SceneDelegate
You can also handle deeplinks from within an AppDelegate by using the following URL:
func application(_ application: UIApplication,
                     open url: URL,
                     options: [UIApplication.OpenURLOptionsKey : Any] = [:]) -> Bool {
    /// Handle the URL property accordingly
}
Or inside a SceneDelegate by extracting the URL from the connection options:
func scene(_ scene: UIScene,
           willConnectTo session: UISceneSession,
           options connectionOptions: UIScene.ConnectionOptions) {
    guard let url = connectionOptions.urlContexts.first?.url {
        return
    }

    /// Handle the URL property accordingly
}
Using deeplinks for other scenarios
While you often use deeplinks for users to navigate to specific pages, you can also use deeplinks for other purposes. A few ideas:
- Create a deeplink as a quick action to log in using a specific account
E.g.myapp://login?account=testaccount&password=StrongPassword - Use a deeplink to switch between a staging and production environment
E.g.myapp://switch-environment?target=staging - Open a debug view based on a particular URL
E.g.myapp://open-debug-view
These are a few ideas that hopefully inspire you to optimize your development workflow further.
The great thing about defining a set of schemes your app can handle is that you can also trigger those URLs from inside your app. For example, we could add a button to our SwiftUI view to open a recipe from any place:
Button("Open Recipe") {
    UIApplication
        .shared
        .open(URL(string: "recipeapp://open-recipe?name=Opened%20from%20inside%20the%20app")!)
}
Instead of passing delegates and coordinator references throughout your app, you can call into the UIApplication.shared.open(...) method from anywhere in your code.
Test opening URLs in the Simulator
During testing or if you use several deeplinks often during development, it’s essential to have a reliable way of testing. I recommend using RocketSim for testing both deeplinks and Universal Links, as you can access them right next to the simulator.
After installing RocketSim, you can open its Settings window and add a new Deeplinks Group:
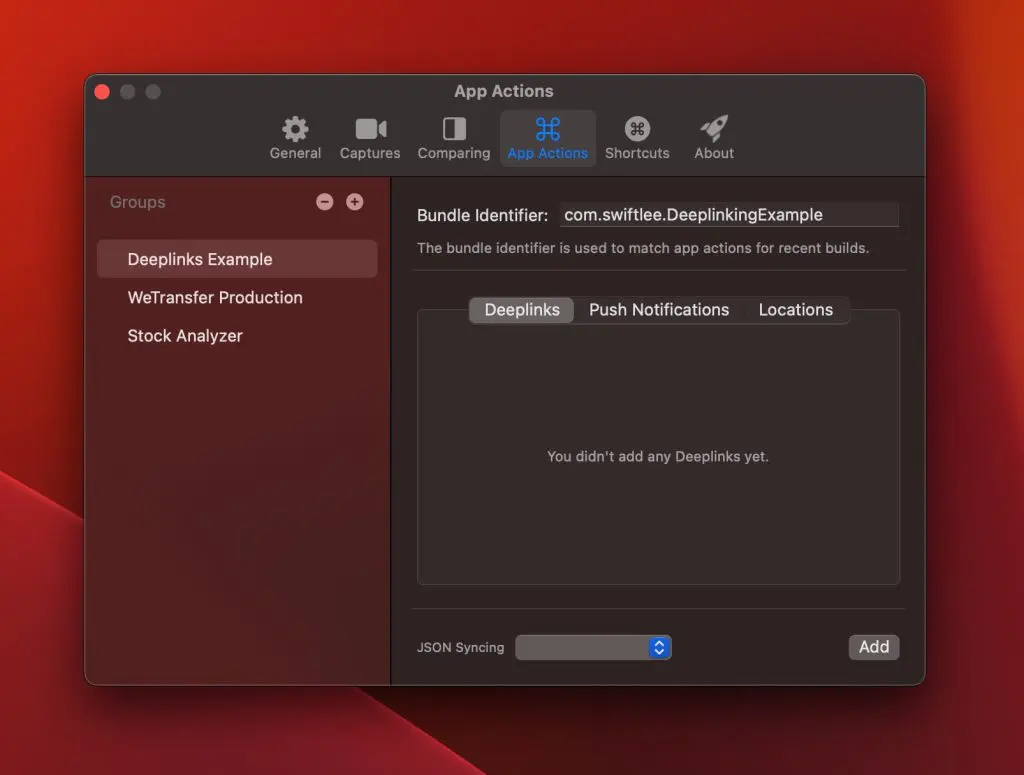
Configuring your bundle identifier to match your app is essential so quick actions appear inside RocketSim’s Recent Builds section (I’ll show that later). Secondly, you need to add a new deeplink using the “Add” button in the bottom-right corner:
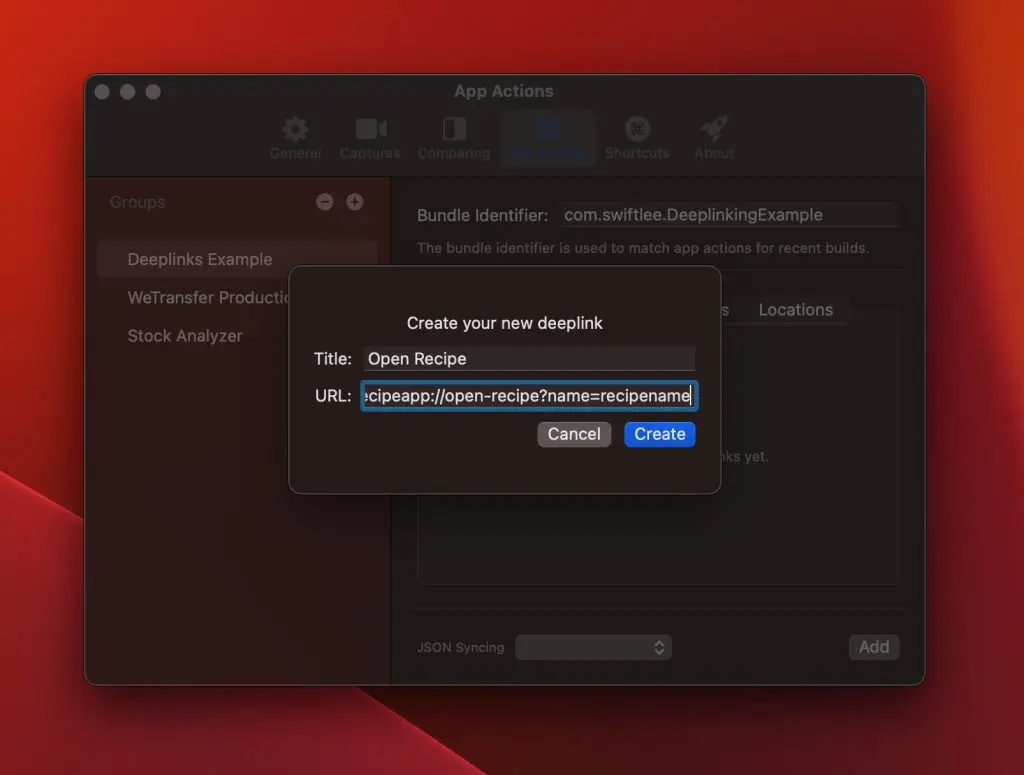
Once you’ve created a group with a deeplink and matching bundle identifier, you can start accessing URLs directly next to the Simulator:
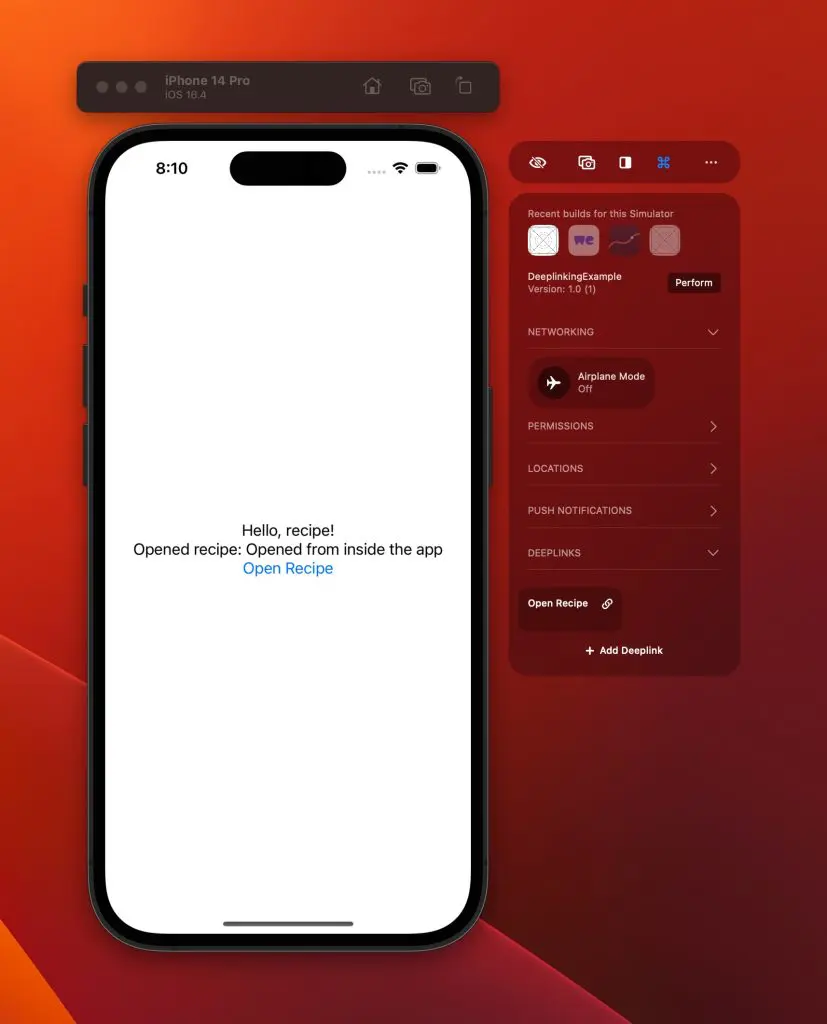
You’ll now only have to tap the “Open Recipe” quick action to open the URL inside your app. RocketSim is excellent for these cases and allows you to do the same for testing locations or push notifications.
Considering security
Deeplinks allow anyone to open your app, and attackers can determine which URLs your app supports. You must consider this when defining support for URLs your app can handle. It’s best practice to validate all incoming URLs and discard those that don’t conform to your defined set of URLs.
Conclusion
Deeplinks are a great way to provide external or internal access to any page inside your app. You can configure specific schemes to handle and use them to your advantage for debugging purposes. RocketSim simplifies testing and it’s crucial to keep security in mind.
If you want to improve your SwiftUI knowledge, even more, check out the SwiftUI category page. Feel free to contact me or tweet me on Twitter if you have any additional tips or feedback.
Thanks!