RocketSim is a developer tool that gives your Xcode Simulator extra functionalities to increase day-to-day development productivity. A floating window becomes visible next to your active Simulator to provide additional functionalities while not too intrusive. Some significant features include recordings with touches, audio, and bezels, location simulation, Simulator airplane mode, and several design comparison features.
You can see this article as a detailed changelog of significant versions of RocketSim, meaning that you’ll also see old design implementations. The first paragraphs you read will represent the latest version available.

I’m guiding you through each feature, and I’ll share background stories and details where possible. If you can’t wait to get started: you can get RocketSim for free from the Mac App Store or explore all features on rocketsim.app.
RocketSim 13.0
RocketSim 13.0 was released on January 20th, 2025, and introduced an often requested feature: Network Speed Control.
It’s been a while since I updated this article, so it’s time to discover the largest feature additions since RocketSim 12.0
Network Link Conditioner for Xcode’s Simulator: Network Speed Control
Similar to the well-known Network Link Conditioner from Apple, RocketSim’s Network Speed Control allows you to simulate slow networking conditions. There’s one crucial difference: RocketSim only affects your Simulator’s application, and your Mac’s connectivity remains fast!

With almost 300 votes on RocketSim’s roadmap, this feature was clearly one of the most requested improvements. After trying to build this for years (literally), I finally found a way to solve it. You can see this feature in action on YouTube:
Network Traffic Monitor
I almost decided to release this feature alone as 13.0.0, but I knew the Network Speed Control was coming. RocketSim’s Network Traffic Monitor allows you to inspect JSON responses, headers, and more for outgoing requests.
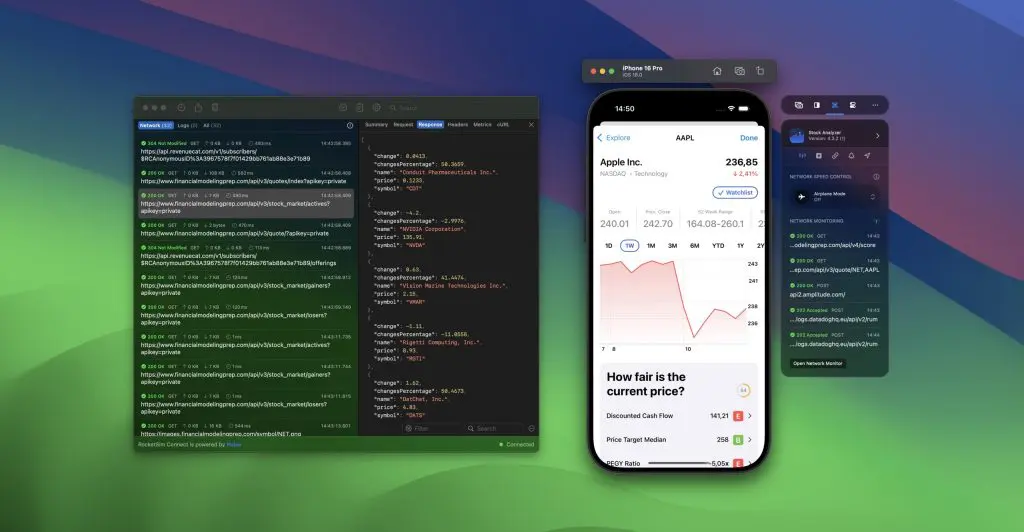
I wrote about this feature before in a dedicated article called Inspect network traffic using the Xcode Simulator. You can see this feature in action on YouTube:
Side Window Redesign
After adding several more features, RocketSim’s side window could use some optimization. Some of RocketSim’s features, like Localization Testing were quite hidden. This major release introduces a redesign which brings actions you would previously found inside the Perform button’s menu into the side window:
You can see this window in action in the localization testing video on YouTube:
New onboarding
A lot has changed under the hood. RocketSim has a brand new onboarding, a new welcome screen, and several onboarding email sequences to help you make the most out of RocketSim. You can check out the new onboarding in the app or by opening this tweet:
RocketSim for Teams
RocketSim started as an app for individual developers. Many companies didn’t even reimburse RocketSim purchases since it was only available in the Mac App Store. We distributed via Gumroad before, but the experience wasn’t pleasant. I’m happy to announce we’re now B2B ready and offer team licenses ánd team-specific features.
RocketSim for Teams aims to make teams more productive. With build insights, you’ll be able to find out which machine setup results in the best build performance. You can get team licenses here.
A brand new YouTube Channel
You might have noticed already, but I shared quite a few YouTube videos in this release update. That’s because we now have a brand new YouTube Channel.
RocketSim 12.0
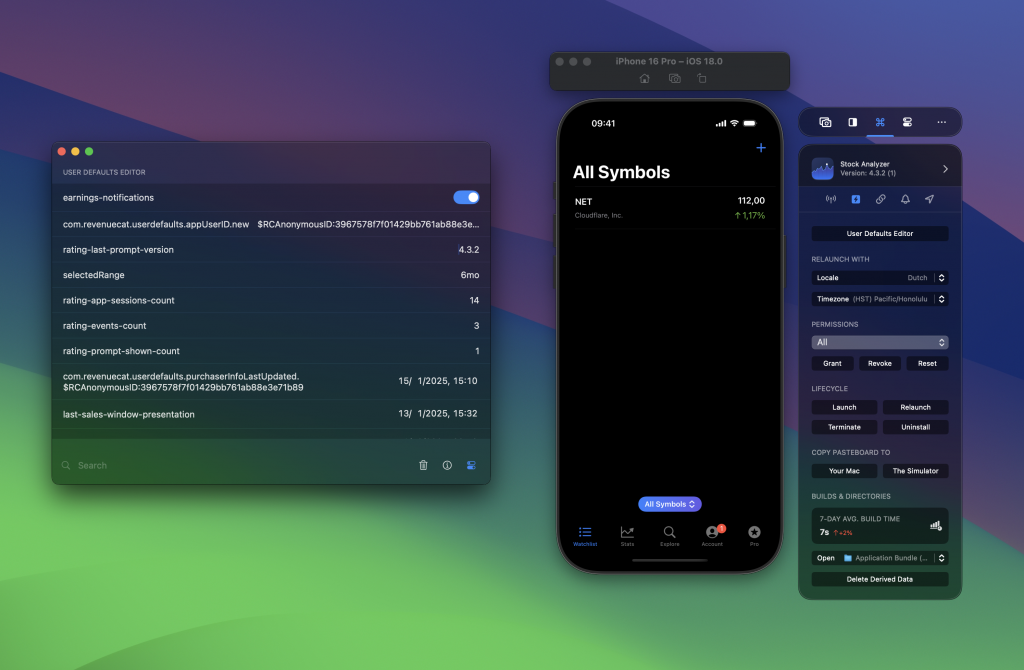
RocketSim 12.0 was released on October 2nd, 2023 and introduced a brand new User Defaults Editor. This is also the first release that came with detailed documentation to help you get started.
RocketSim Documentation
An often requested feature has been documentation around RocketSim’s many features. Since there are so many different ways of using the app, documentation can make a difference in getting the most out of the app.
You can check out the documentation at docs.rocketsim.app like the Getting Started Guide or the list of testimonials.
Onboarding demo video
As part of this significant update, I’ve been working on the first demo video of RocketSim’s features. It does not yet contain the new User Defaults Editor, but it does explain all existing features that help you save hours per week.
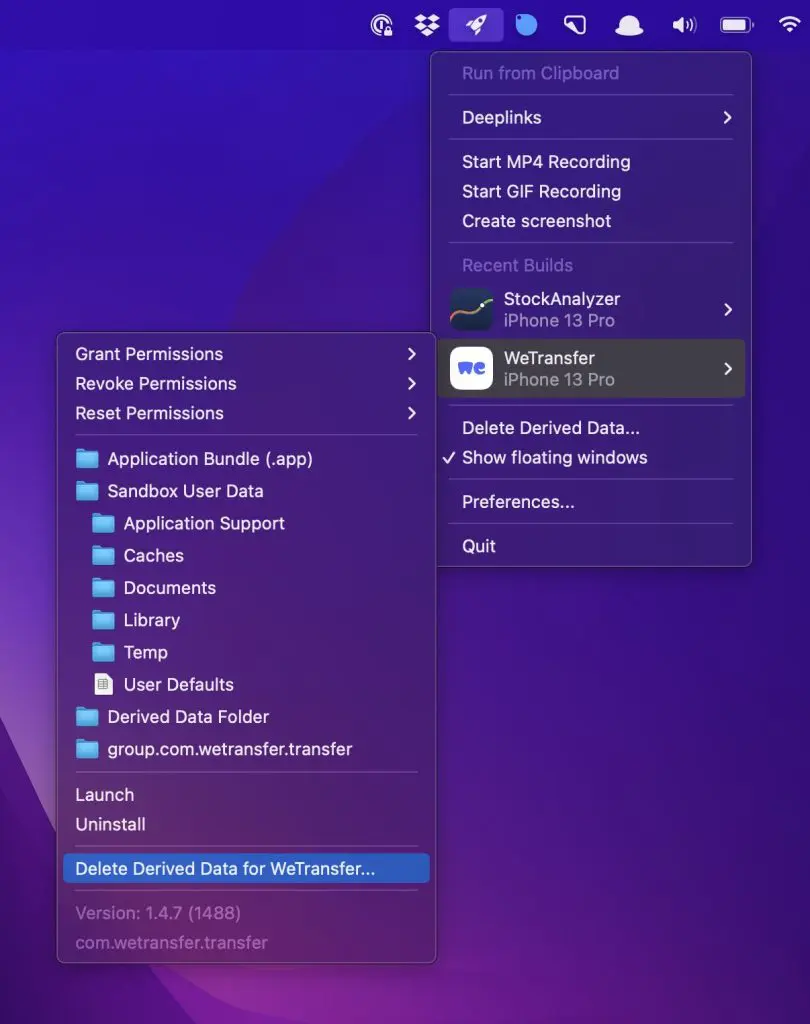
User Defaults Editor
One of the most requested features has been a real-time User Defaults Editor. This functionality can easily save you hours of time when working on features that impact cached state across app launches. The editor allows you to edit and monitor key-value pairs in real-time.
For example, I’m working on a tooltip in the following video that shows inside the WeTransfer application. The tooltip should only be showing once per user, and I want to ensure the User Defaults key hasShownUploadFilesTooltip updates accordingly. You can open the editor by clicking the Perform button and selecting the User Defaults plist file.
The editor monitors values constantly and flashes a blue background color when the value changes. At the same time, I can reset the value using the switch and restart the application using RocketSim to see if the tooltip shows again.
You can imagine this drastically speeds up the workflow of testing implementations that rely on UserDefaults. What’s best is that you can get started for free and test the editor with any standard suites by installing RocketSim from the Mac App Store.
RocketSim 11.0
RocketSim 11.0 was released on July 25th and introduced watchOS and visionOS simulator support. Furthermore, device bezels have been improved and there are new ways of showing touches in recordings.
Improved recordings with touches and bezels
One of the core features of RocketSim focuses on creating professional recordings of the features you develop. You’re able to create recordings with touches, bezels, and audio. New in RocketSim 11.0 are advanced touches that constantly show, allowing viewers to better follow your demonstration:
There’s also a new animation scale for the touchpoint to indicate interaction better. The ‘attention effect’ feature can be enabled from the capturing settings. The default touches feature hides and shows the touchpoint before the interaction happens. New this version is an added in-out animation timespan to follow along easier.
For those looking to further customize their demonstration video there’s a new touchpoint style with an extra stroke animation:
watchOS Support
Long awaited is the support for watchOS simulators. You might have already seen this new feature in the wild on Hidde van der Ploeg’s Twitter:
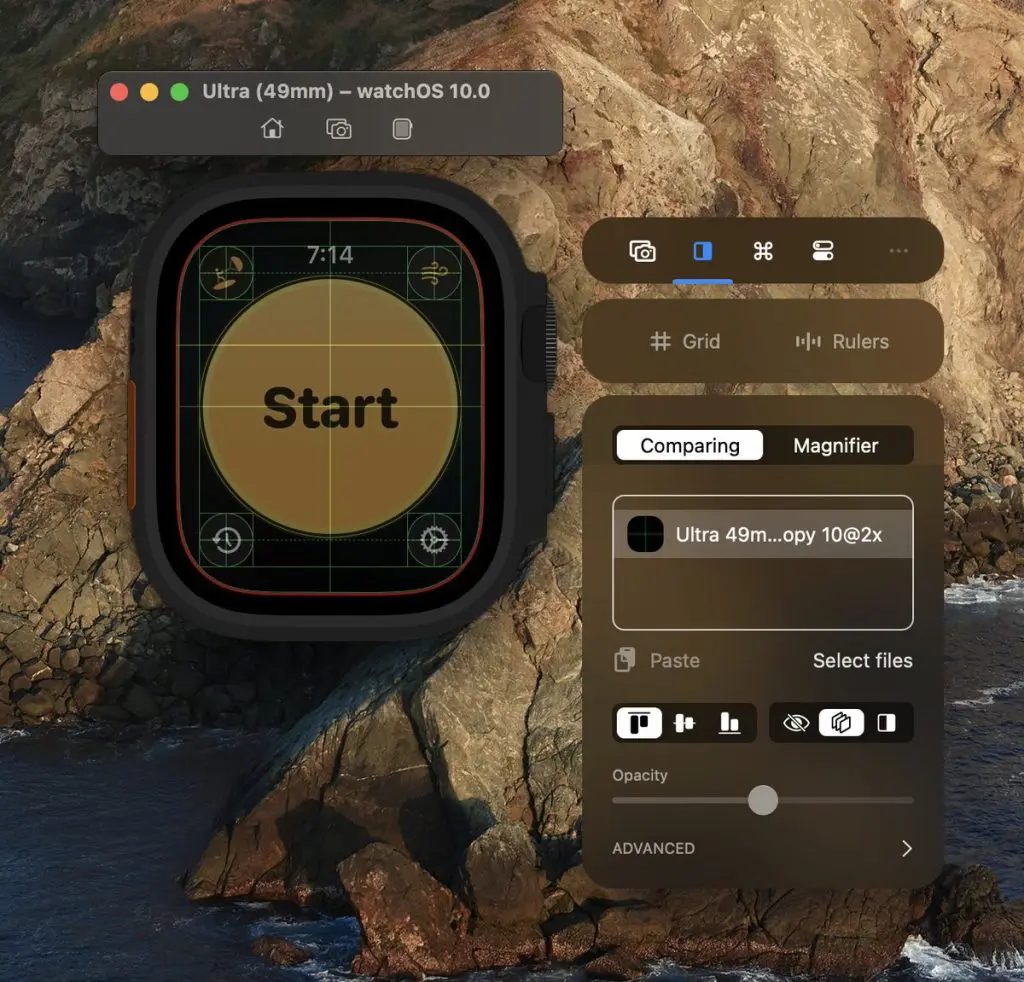
In this case, he used one of Apple’s grid inside the comparing tool to ensure his designs follow recommended standards. Most of the features could be ported and are ready for you to use.
Support for visionOS simulators
Besides adding support for the latest Xcode 15 beta, I also needed to add initial support for the visionOS simulator. Features like touches in recordings are a bit odd in a 3D perspective, but you can already use the environment overrides to test your app for several accessibility features:
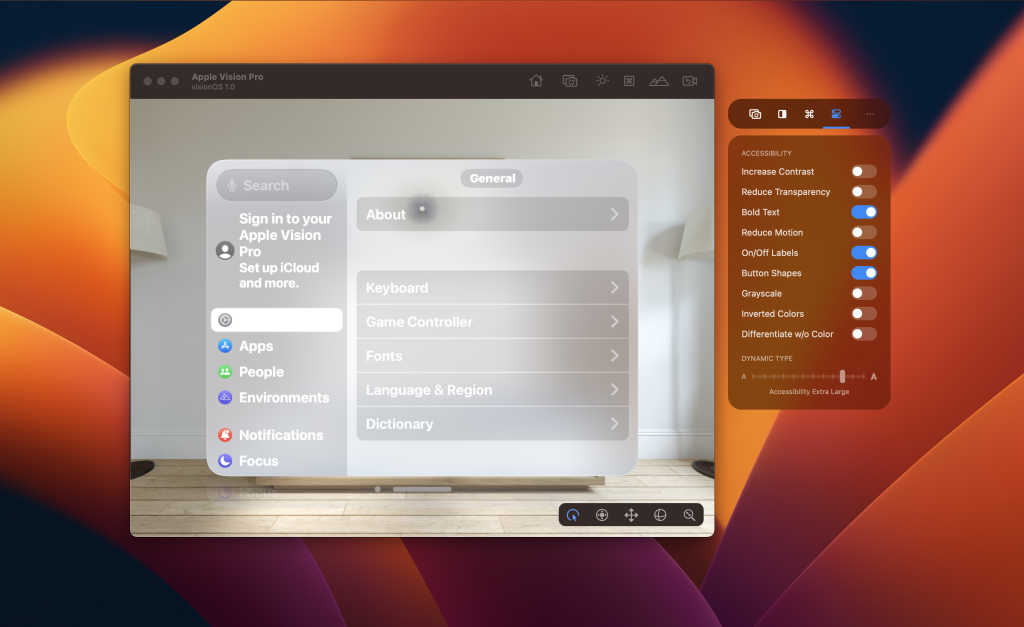
In the above example, we use the environment overrides to increase text size, show button shapes, and more. All other features, like creating recordings or comparing designs, are available now.
RocketSim 10.0
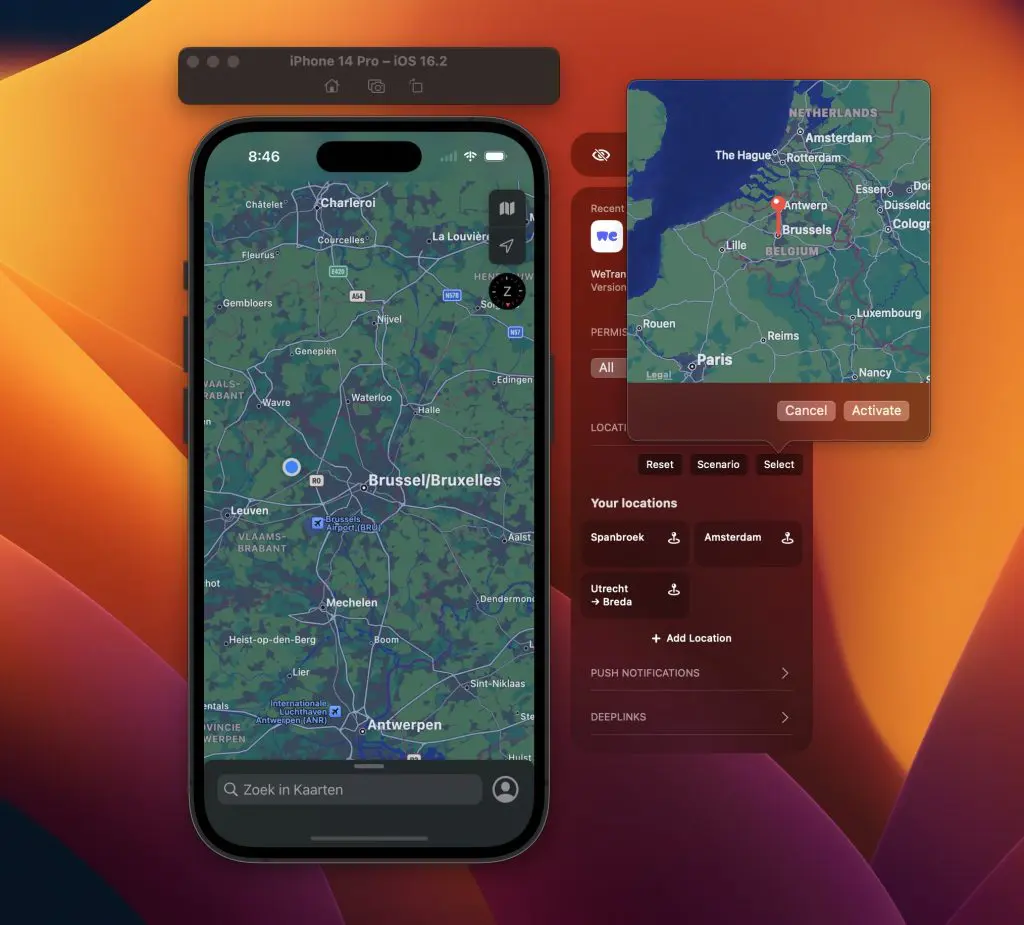
RocketSim 10.0 was released on March 14th and introduced Simulator Location Simulation features in Quick Actions. The floating window has been redesigned to offer extra location functionalities and offers extra focus during development. Besides those two significant highlights, many other improvements have been introduced since the last major update.
Location Simulation Testing
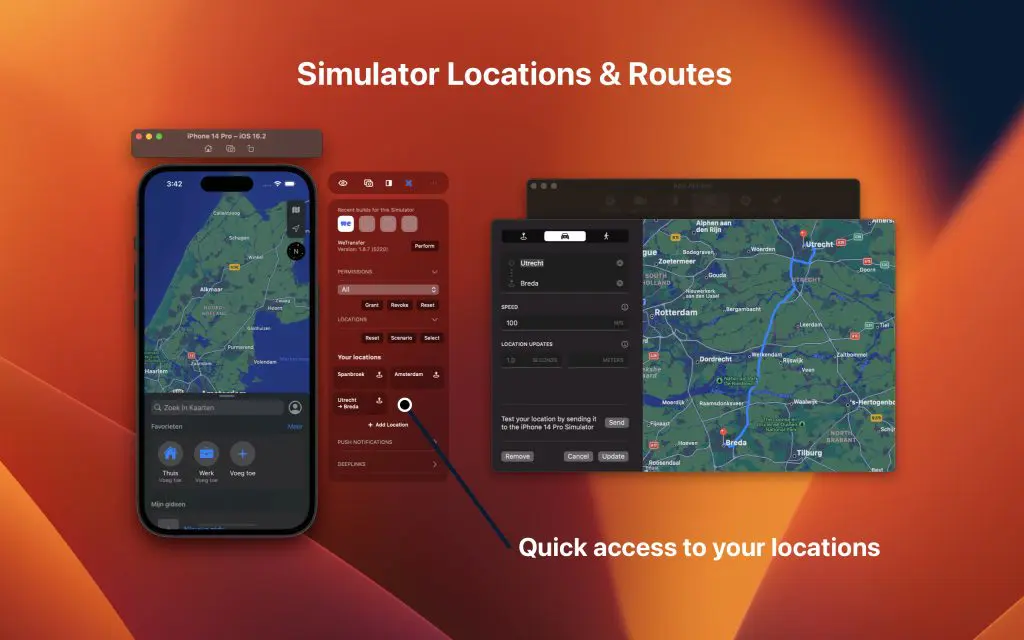
The new location simulation feature allows you to create a car or walking route from start to destination and execute it via a quick action for repetitive testing. I’m translating the MKRoute output into coordinates so that the location simulation follows the given route. You can control how the route will update using the speed and interval parameters.
You can make use of the single location switcher to simulate the location without a quick action:
Location simulation has been one of those features requested by users, and their responses after trying it out have been great:
“That was exactly what I was looking for, so thank you! I can’t really express in words how much of a benefit for me this will be.”
“I’m super happy with the new location simulation features in RocketSim. Makes testing my in-app location features much faster”
It’s one of the best feelings to be able to help developers optimize their day-to-day job!
Recordings with Audio
I opened this issue almost three years ago and finally found a way to implement this without needing virtual drives and complicated user configurations. You can now enable “Record Audio” from the side window, and your Simulator audio will be added to the video recording.
Zoom in on views using the new Magnifier
Kudos to Adam Bell, who encouraged me to build this feature during iOS Conf SG. The new magnifier allows you to zoom in on pixels and verify whether elements look as expected.
Floating Window Minimized Mode
Although the floating window works excellently for all supported features, users haven’t always loved it since it’s always visible. Therefore, I decided to spend time creating a minimized version to hide the windows when you don’t need them.
Vote for your most-wanted features
Together with friends, I introduced Roadmap to allow for public feature voting. Obviously, I had to implement this myself:

Building new features is great, but even better if you know it’s a wanted feature by many end-users.
Other improvements and fixes
Besides the major new features mentioned above, there are a few smaller improvements worth highlighting:
- You can now generate GIFs with device bezels and touches
- PNGs can be dragged directly into App Store Connect to be used as App Screenshots
- Added several animations to improve the look in feel, including a spring animation for the floating window
- The floating Window quick menu allows you to access settings or stick the floating window to the left, right, or bottom (also new!)
- Advanced comparing options allow you to adjust the position and size of the overlay image
- Added a directory for File Provider Storage
- Added a Terminate perform action
- Added a Relaunch perform action
RocketSim 9.0
RocketSim 9.0 was released on the 5th of January 2023 and introduced Quick Actions to test deeplinks and Push Notifications, together with a redesign of the floating window.
Testing Push Notifications & Deeplinks
The new bundle identifier-based quick actions allow you to quickly test universal links and notifications for your app.
When implementing support for Universal links (deeplinks) and Push Notifications, we often have to retest specific flows. Being able to launch relevant links or messages quickly speeds up the implementation of these features. Secondly, many apps have configured deeplink to enable certain development-specific features. Those can now be added as a quick action.
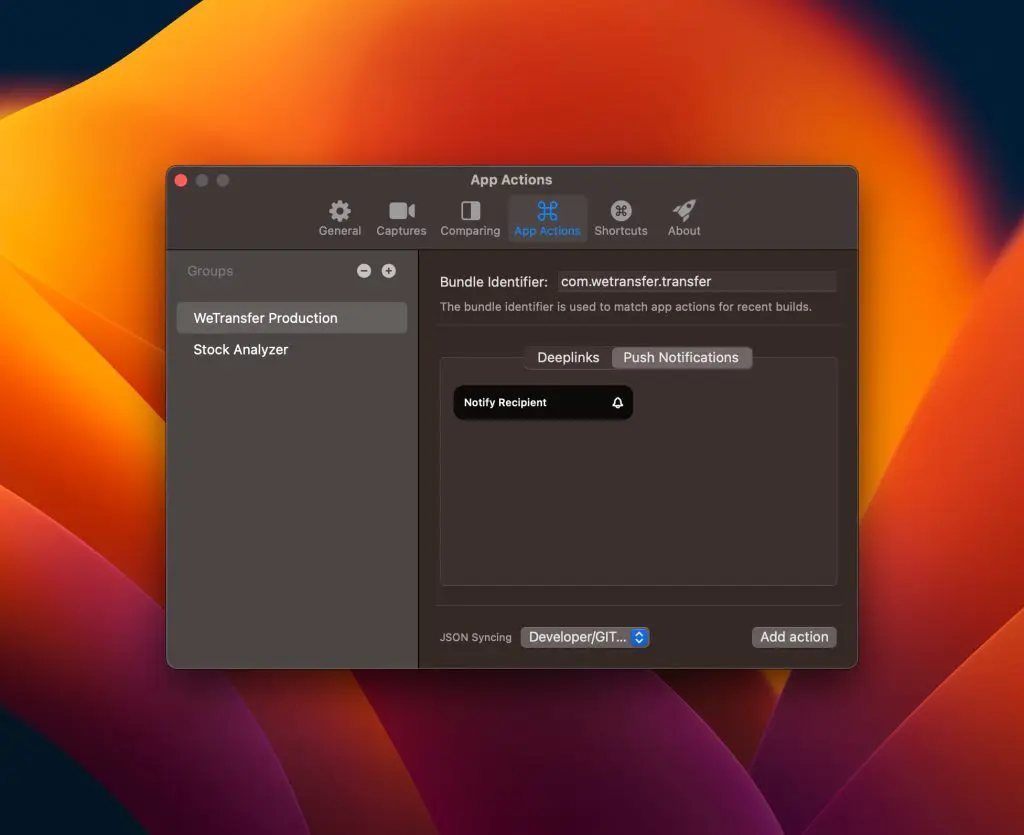
While configuring a new push notification, you likely want to test whether it works as expected. That’s where the send button comes into place when filling in all JSON payload details:
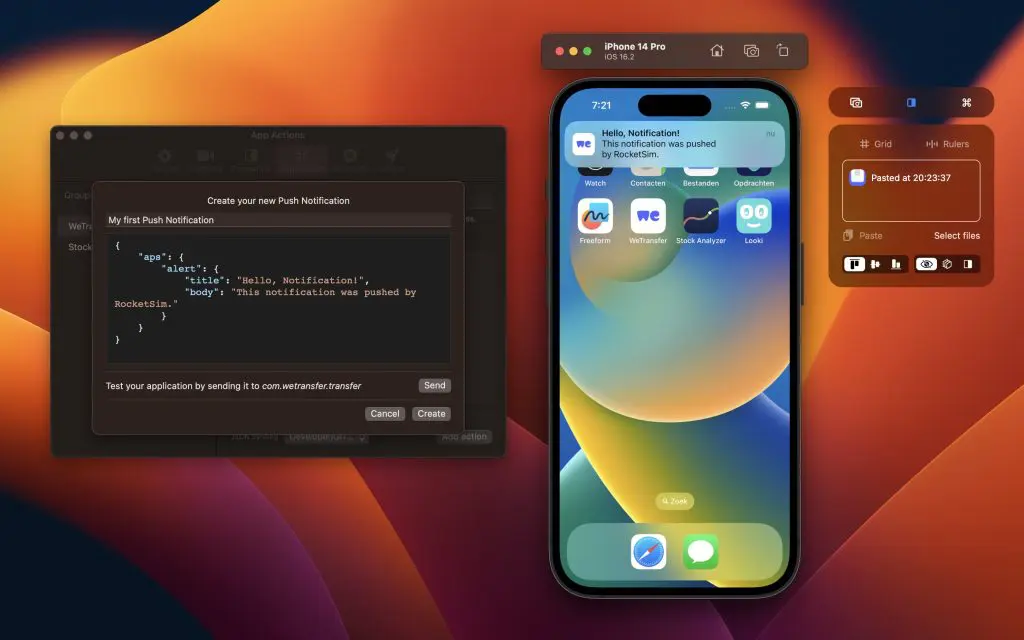
The JSON payload is flexible and supports all types of push notifications. Each group of actions links to a specified bundle identifier, automatically showing actions for the Simulator’s recent builds.
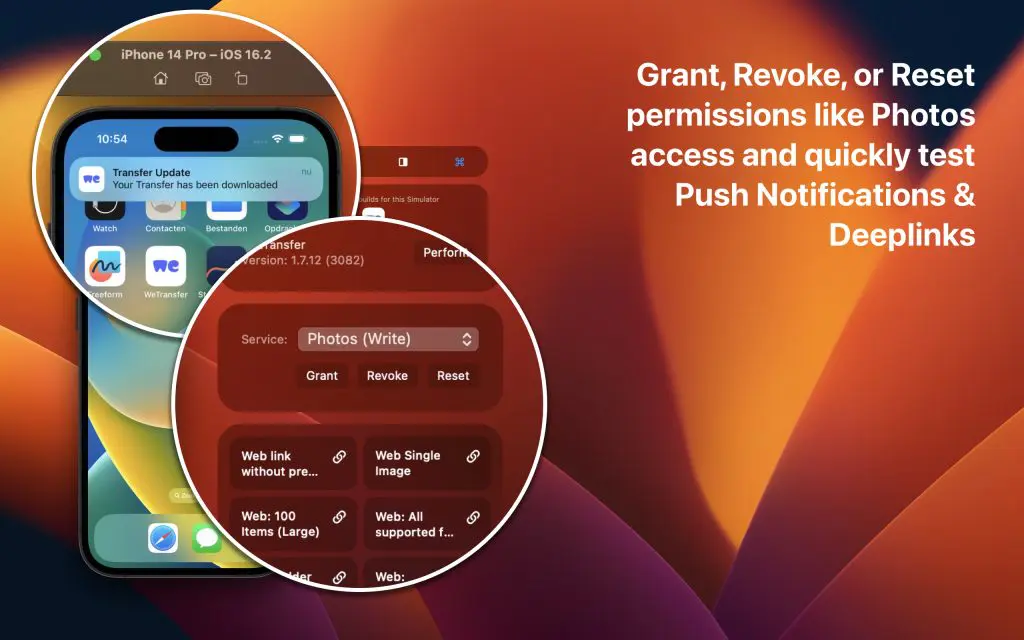
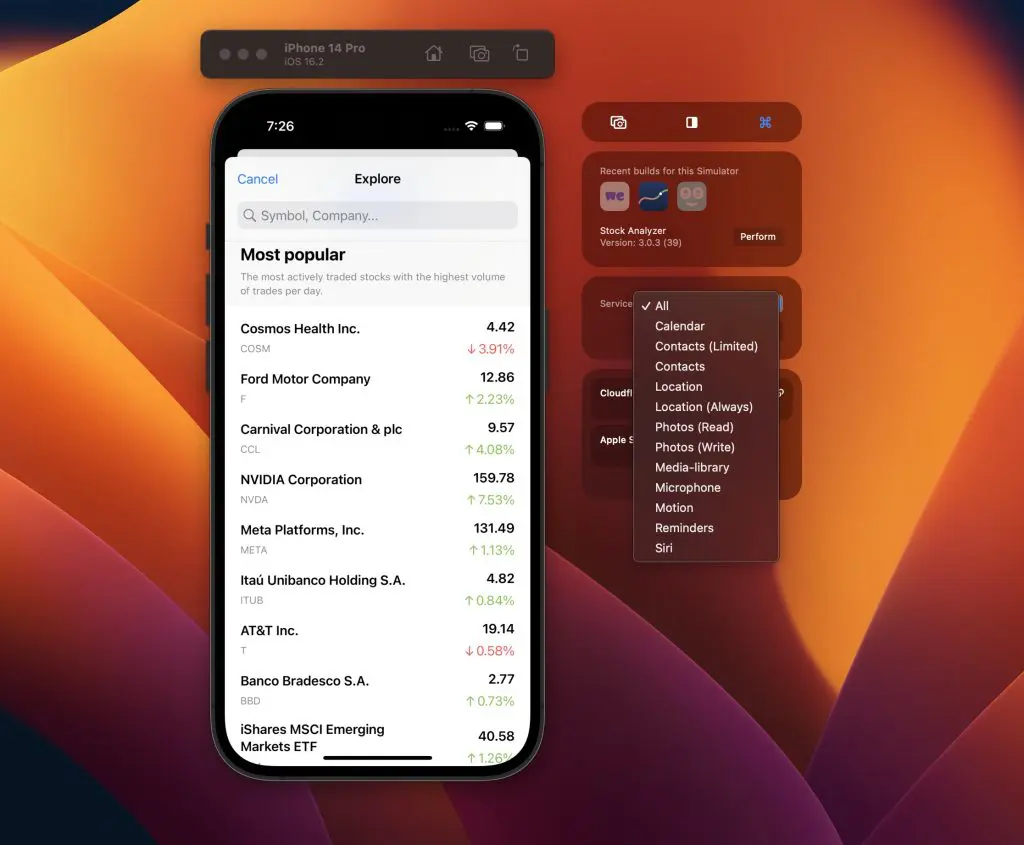
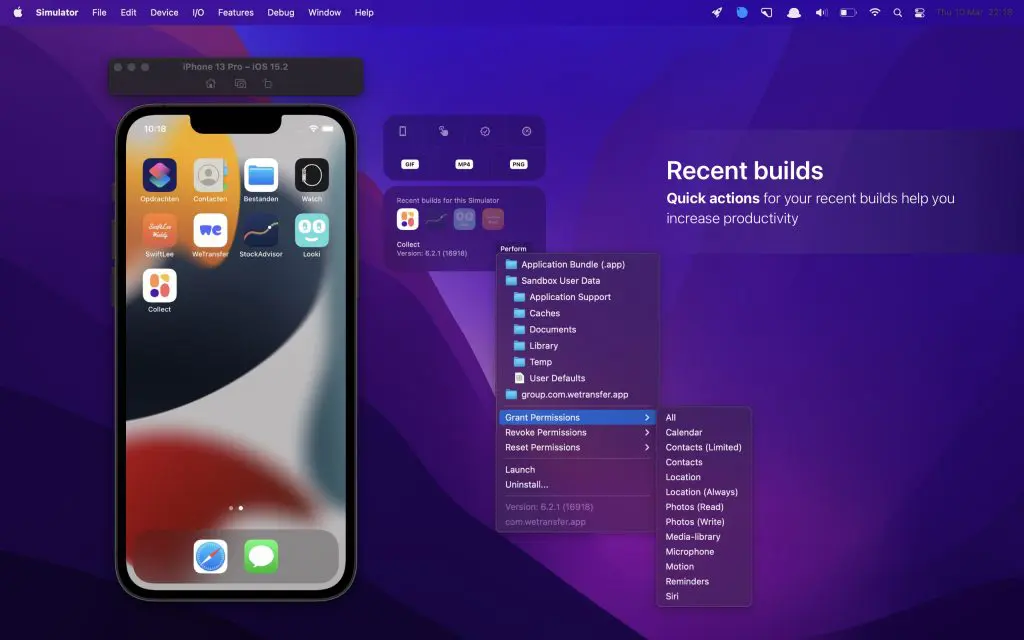
Grant, revoke, or Reset permissions
The new floating window design allows you to focus on one specific task at a time. Whether it’s location, photos, calendar, or any other permission flow you’re integrating: RocketSim helps you to quickly grant, revoke, or reset permissions:
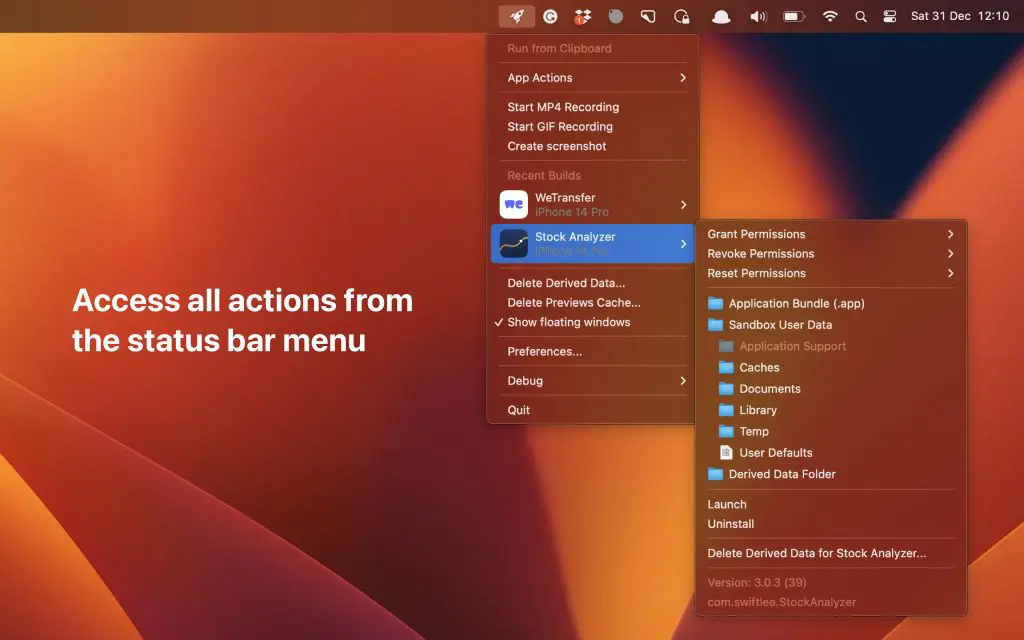
Hiding the floating window and using the menu bar instead
You can access all of the above-mentioned features through the existing status bar menu. If you’re not a fan of the floating window, you can hide it and use the status bar menu instead.
Other improvements and fixes
Besides the above-mentioned major features, a few other improvements found their way into RocketSim 9.0:
- Video recordings now support alpha channels, meaning you can capture videos with bezels and a transparent background. This feature was requested early on and is especially valuable if you integrate Simulator recordings into a YouTube video.
- Added support for latest new Simulators
- More minor improvements like dark mode menu bar support and clipping the rulers view to bounds
RocketSim 8.0
RocketSim 8.0 was released on the 12th of May 2022 and introduced Grids, Rulers, and Derived Data deletion.
Grids
A grid overlay on top of the Simulator allows you to perfectly align elements within your views. The spacing is based on device pixels, matching what you configure in either SwiftUI or UIKit.
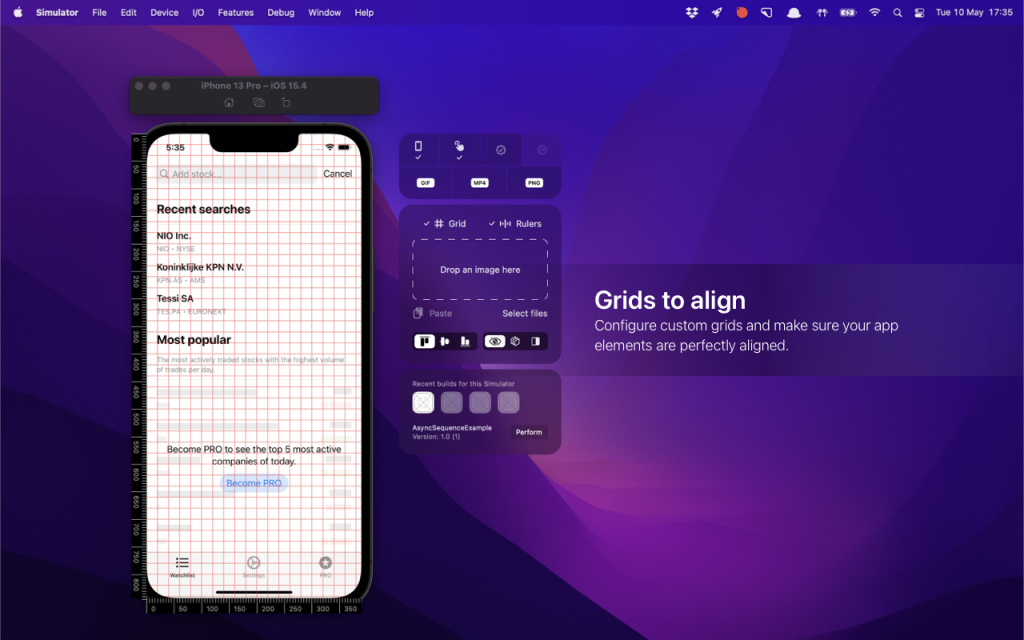
The spacing and color can be configured from the preferences panel to adjust the grid to match your preferred spacings.
Rulers
While grids are great for quickly aligning elements at a fixed spacing, you might want to have more precise control. What if your elements are not following a predefined spacing?
Rulers are the answer and allow you to horizontally or vertically align elements at any position.

Rulers can be placed horizontally and vertically and their position is shown within the ruler. Future versions will allow you to read out values between rulers.
Deleting Derived Data
Deleting Derived Data is still a common thing to do for many app developers. It allows resetting the state of a project to perform a clean build afterward. RocketSim 8.0 allows deleting the Derived Data either globally or per app.
Deleting Dervided Data per app is useful since it makes sure you only have to rebuild the app’s project. When you delete your complete Derived Data folder, you’ll have to rebuild all your Xcode projects including fetching SPM packages.
Community driven fixes
Besides introducing a few major new features, this update also includes several fixes based on community-reported bugs. Make sure to post any bugs or feature requests you have on GitHub!
- Copy of asset now actually copies the file (Thanks, Hidde!)
- The recent build menu now opens correctly on a second screen
- Touch no longer appears in the bottom-left corner (Thanks, Amir, Rob!)
- Floating action buttons now also appear after the conversion completes while hovering
- The first touch is now captured as well during recordings
- Floating thumbnails start a little higher to take into account the dock spacing
- Onboarding images are no longer blurry on non-retina displays (Thanks, Kevin!)
RocketSim 7.0
RocketSim 7.0 was released on the 13th of March 2022 and introduced a new feature called Recent Builds.
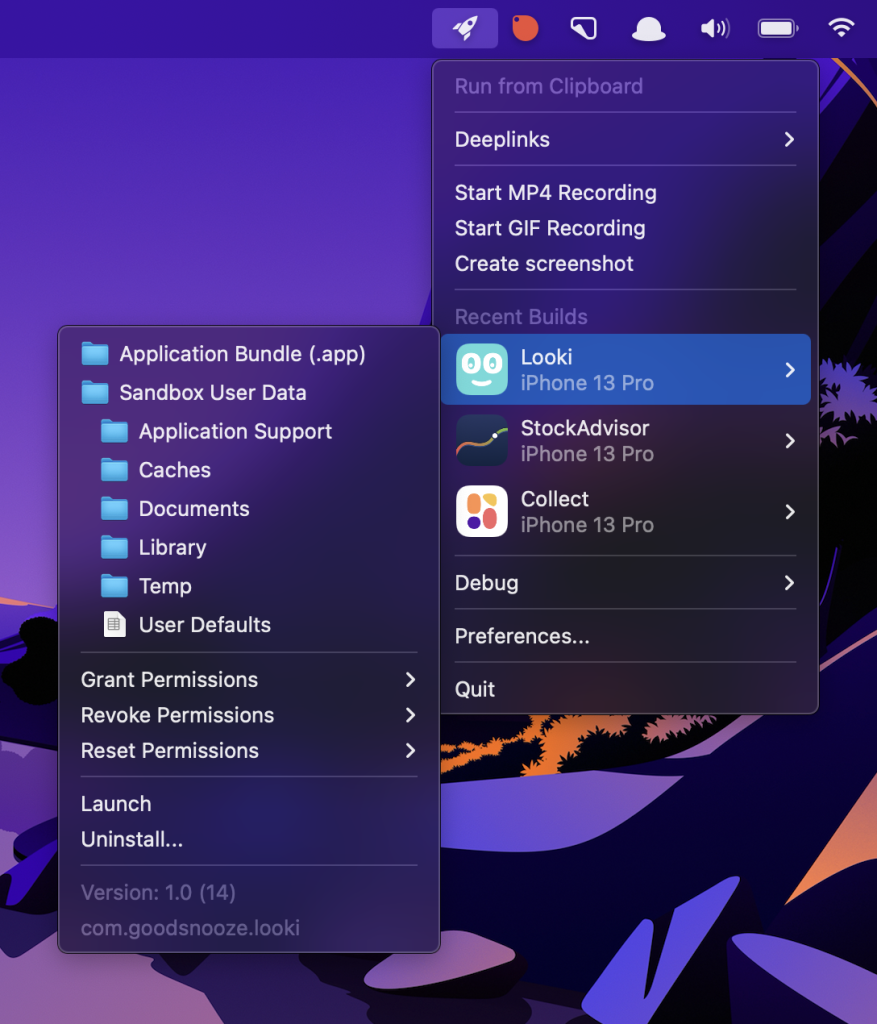
Recent Builds
Performing actions on recent builds allows developers to access common folders quickly, reset permissions, or launch/uninstall an app.
As some of you might know I’m always seeking to increase productivity. The quick actions have been a booster for my personal productivity at least.
Opening common folders and user defaults
As a developer, I often look up the documents directory to find out how my app stores files. With the new recent builds’ quick actions, I can quickly open the Documents directory of the latest build for the current active Simulator. Not having to look up this directory manually is a significant productivity improvement for me, and I hope it will make you develop a little faster.
The user defaults action allows me to look into the user defaults for the currently installed application. It’s an easy way to verify my data saves as expected.
Grant, Revoke, or Reset Permissions
While implementing features that require permissions like location or photo access, we often need to reset permissions to verify our implementation works as expected. The permission quick actions allow you to quickly grant, revoke, or reset permissions and will allow you to test and develop such features faster.
Accessing quick actions from the status bar menu
The same quick actions are available through the status bar menu:
The list of recent builds within the status bar menu represents the most recent builds overall Simulators. The benefit of this is that you don’t have to keep a Simulator open to perform quick actions.
Updated configuration options
RocketSim 7.0 introduces a few extra configuration options to better align with your needs.
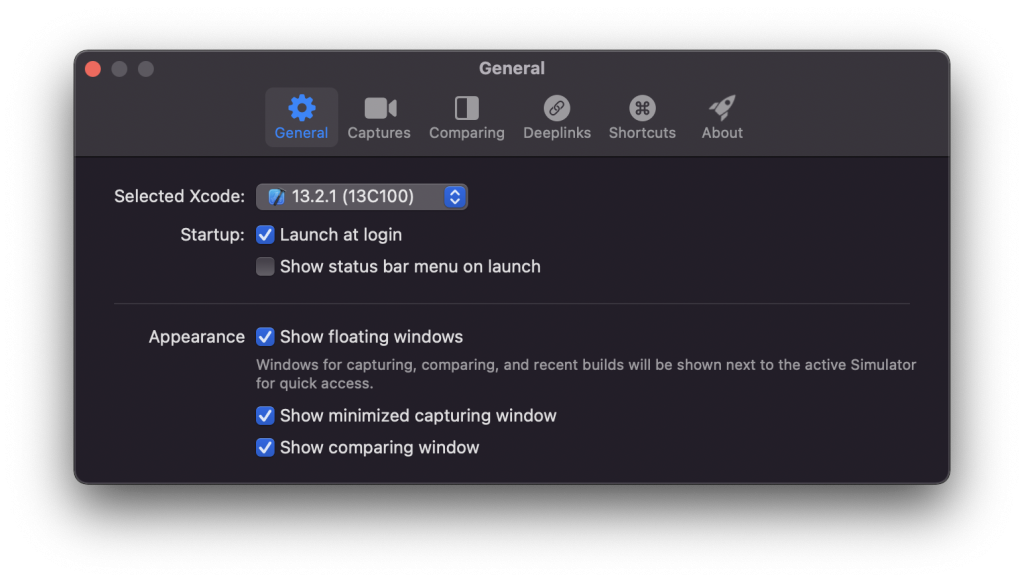
New in this version is the appearance options, allowing you to customize the floating windows. It might be that you’re not interested in the comparing window, in case you can now hide this section entirely.
The captures section represents both recordings and screenshots and allows you to configure custom theming as well as export location and quality of the export.
RocketSim 6.0
RocketSim 6.0 introduced the option to capture recordings and screenshots with device bezels. Capturing screenshots is entirely new and is mostly different from the default Xcode screenshot feature in adding device bezels around your captures.
Recordings with touches and device bezels
Recordings with touches and device bezels allow you to make a professional video of the app you’re developing. Xcode comes with a default recording option, but it has a few downsides:
- Landscape recordings will be exported in portrait
- Touches will not show up
- You’ll always get a square output that doesn’t look like a phone at all
RocketSim solves this by allowing you to record with extra features:
- Enable touches to explain better how your app responds to user interaction
- Device Bezels create that professional impression you need
- Export-ready for App Store Connect. Creating App Previews has never been easier
- Landscape orientation is correctly applied in the exported video
- A floating thumbnail with the resulting recording allows to drag into any destination easily
- Select MP4 or GIF to match your needs
- Trim videos for perfect lengths
- Control the quality of exports for perfect performance
The resulting video could look as follows:
The device bezels make it look like an actual device recording while the touches explain the story along the way. The background color is configurable and can be adjusted to match your branding.
Beautiful screenshots with device bezels
Creating screenshots is something I like to do often during development. It allows me to demonstrate what I’m working on, and it’s the ultimate way of sharing what I’m proud of. The Xcode Simulator allows creating screenshots by pressing CMD + S but the outcome result was not satisfying enough.
With RocketSim 6.0, you can configure another shortcut like CMD+SHIFT+S to let RocketSim handle the screenshot creation. Doing so results in the following benefits:
- Create multiple screenshots at once. The floating thumbnails will stack and stay there until you need the screenshot. This is great when you want to drag multiple screenshots into your pull request on GitHub.
- Add device bezels around your screenshots to make it look like a real app on a real phone
An example screenshot could look as follows, in which I adjusted the background color to match the SwiftLee branding:
Floating thumbnails to keep you in your flow
Especially the resulting floating thumbnails allow me to stay in my flow during development. I can create multiple recordings and screenshots, stack them up, and drag them into the destination when I’m done.

The recording thumbnail allows trimming the output video alongside the default options to copy and save the asset. The thumbnails support dragging, making it easy to drop your captures in apps like Slack, iMessage, Twitter, or GitHub. A typical scenario is to drag the video right into the pull request to demonstrate what I’ve been working on.
App Store Connect App Preview requirements
If you’ve been creating App Store Previews, you know it comes with many requirements. RocketSim takes over this responsibility and makes sure your recordings conform to the rules set by App Store Connect. The only thing you have to do is drag your recording right into App Store Connect.
RocketSim 5.0
RocketSim 5.0 introduced touches for recordings and a design comparison tool, allowing you to create pixel-perfect implementations of delivered designs.
Comparing designs from Figma, Sketch, or any other source
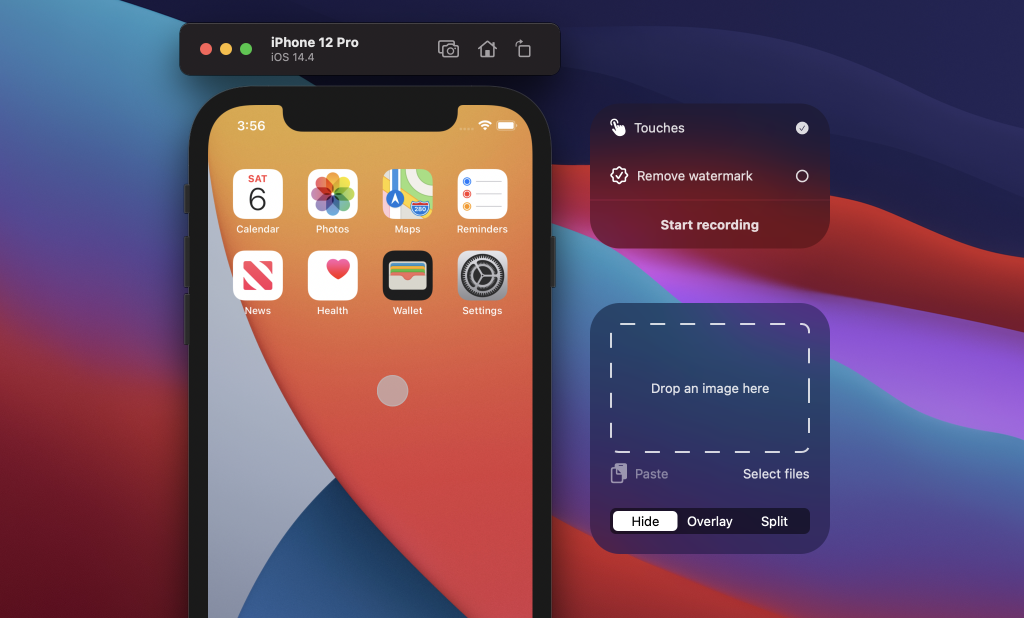
A major new feature in RocketSim 5.0 is the ability to compare designs in the Simulator. You can either paste, select, or use drag & drop to select your design, after which an overlay will appear on the current active simulator:
The default selected overlay allows you to adjust the opacity of the selected design. This creates a way to determine which elements are pixel-perfect and which elements need to be adjusted a bit.
The split mode allows dragging between the implementation and the design overlay. This is just another way to compare and might give better visibility on the alignment of elements than your design.
Recording with Touches
One of the most requested features since the initial launch of RocketSim has been the ability to record with touches. A new recording window appears next to the active Simulator allowing you to configure the recording settings and start a new recording.
Touches make a big difference in explaining features in your app. It shows the source of an event and makes it easier to follow along, step by step.
The following video shows how deleting content works in the Collect by WeTransfer app. The right version with touches makes it much more clear how the feature works.
Showing touches is a new feature that isn’t available in other tools like the Xcode Command Line tool xcrun simctl and makes RocketSim a unique app to have for sharing your recordings.
RocketSim 3.0
RocketSim 3.0 introduced the option to create GIF recordings and improved deeplinks managing.
Recording the Xcode iOS Simulator
RocketSim solves this problem by making it super easy to record the iOS simulator from its status bar menu.
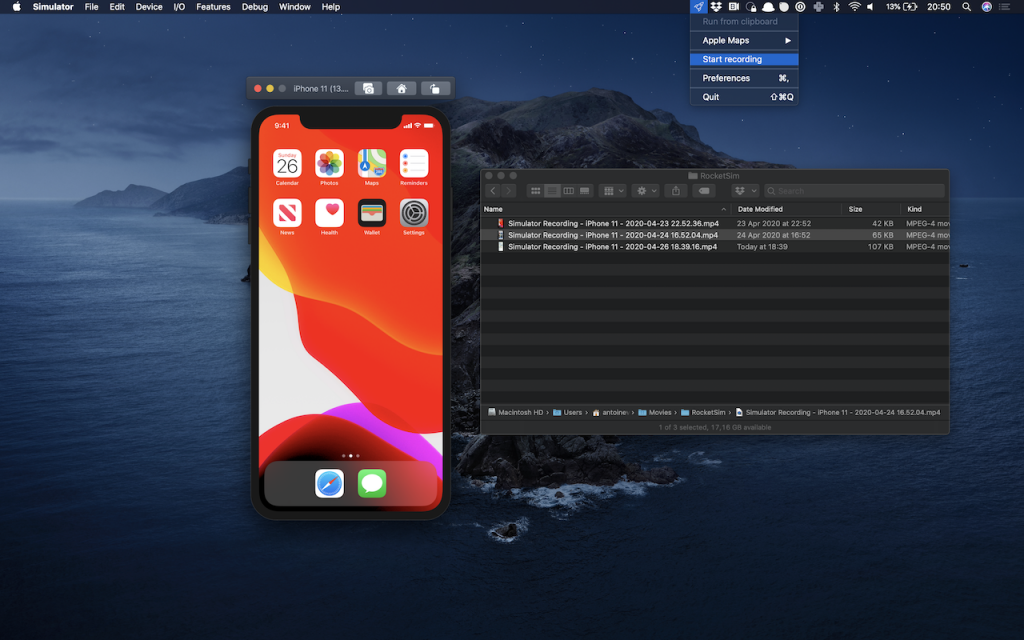
It uses the focused simulator and starts recording directly after clicking “Start recording” from the menu. Recordings are automatically saved into a RocketSim subfolder of your Movies folder and the file is opened in Finder after the recording is stopped from the menu.
The only thing left is to copy and paste the video to share the problem, feature, or impressive animation with your team!
Testing Universal Links
Universal Links make it possible to open content directly in your app. Transfer links get opened directly in the Collect App, location URLs in Apple Maps, and GitHub repositories inside the GitHub app. Those are examples of implementations that rely on universal linking.
Universal links, also known as deeplinks, can be hard to test. You have to manage all types of universal links and make it easy to open them in the simulator. Before RocketSim, I was keeping a list of links in notes, which I would copy into Safari on the simulator so I could open them with the Smart App Banner.
Right now, I’ve created groups for both staging and production so I can easily access them from the RocketSim menu. Those testing links are private but a similar group for Apple Maps could look as follows:
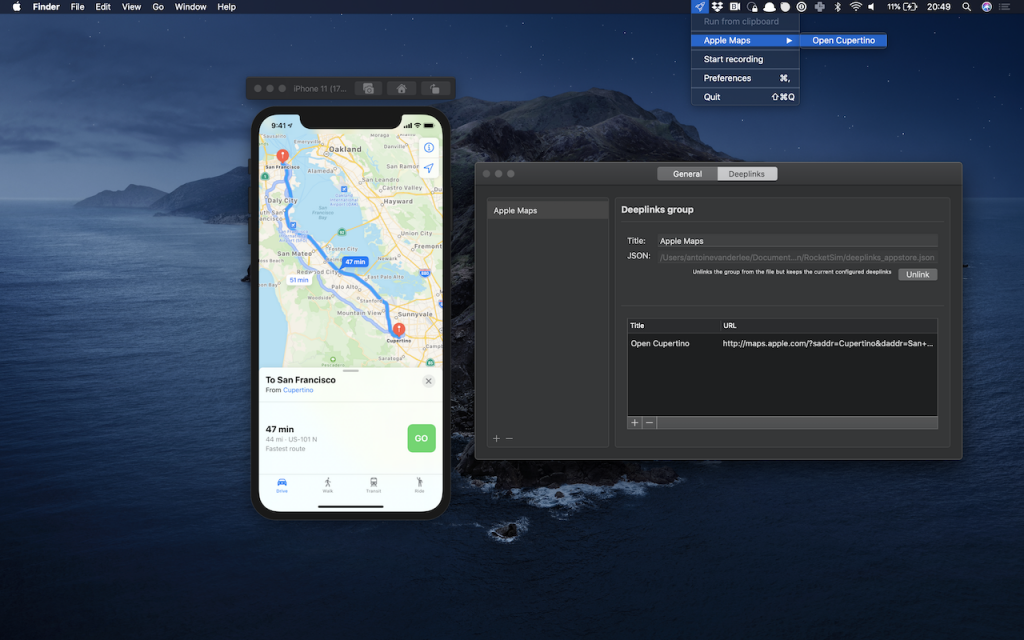
The greatest thing is that you can set a shortcut to re-run the latest launched deeplink. The shortcuts only work when the simulator is active so they don’t override other app shortcuts (I couldn’t use CMD+SHIFT+D for sending emails anymore, eat your own dog food!).
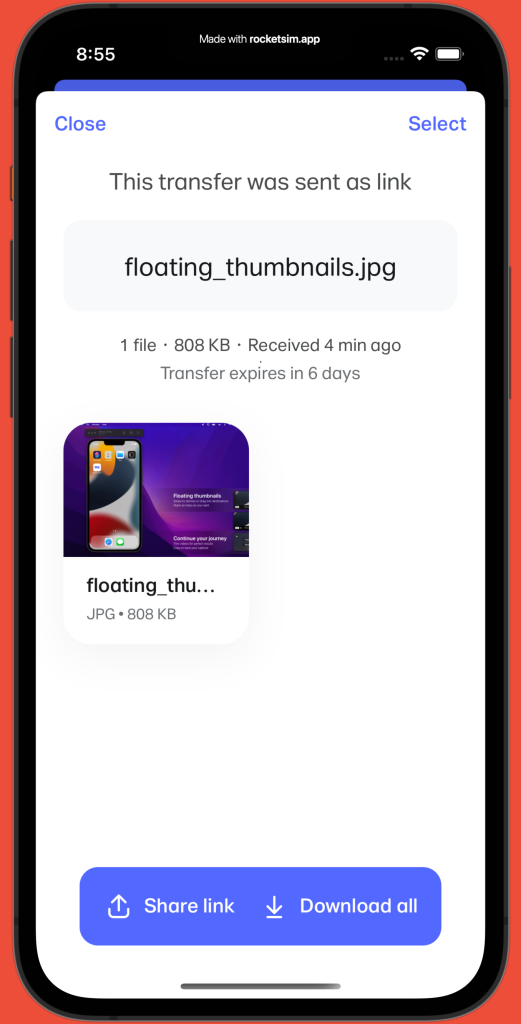
Last but not least, you can directly execute deeplinks from the clipboard. This helped me to quickly open a transfer that was shared with me to reproduce certain specific bugs. If you often have to test universal links in your app, this will be a great productivity booster.
Reporting bugs and feature requests
The project will not be open-sourced. Still, I decided to open a GitHub repository for managing bugs and feature requests. It allows me to develop in the open and get insights into what issues are most important for users to be fixed. Of course, it helps that I’m building a developer tool so I’m pretty sure that all my end users are familiar with GitHub.
Reporting a bug or requesting a feature is as simple as creating an issue in the RocketSim public repository.
Staying up to date on current development
You can follow active development on Twitter or get an overview of all features at rocketsim.app.
Download RocketSim
Ready to get started?