App Intents have been new since iOS 16 and offer a programmatic way to service your app’s content and functionality to Siri and the Shortcuts app. New in iOS 17 is the option to surface App Shortcuts integrated into Spotlight, making your app’s functionality even more discoverable.
App Intents are the engine behind many features like Widgets and Live Activities. By using them smartly, you’ll create a reusable framework for your app’s functionality. For example, the App Intent we’re creating for Spotlight Shortcuts could be reused for interactive widgets.
What are App Intents?
You can see App Intents as bits of integrations available for your app. Imagine having an app full of recipes; you could define intents to get a list of all recipes or to start creating a new recipe.
In other words, an App Intent defines the code to perform a specific app action while describing the data you require from the system or your app. Each intent can provide a reusable piece of logic, allowing you to use it for features like interactive widgets, Live Activity actions, or Shortcuts integrations.
Defining an App Intent
In this example, I will take you through an implementation I did for the WeTransfer app. It’s an intent allowing users to initiate a new file transfer. The final result makes the App Intent available as an integration into Spotlight:
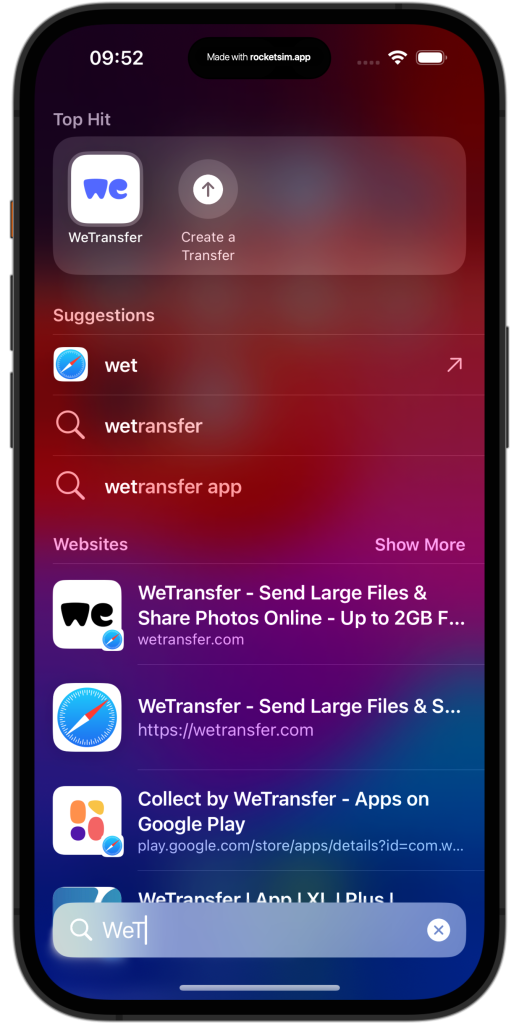
You can define App Intents using Swift code by adding a new file to your main app target. The system will automatically discover any intents defined by your app and shows them accordingly where appropriate.
The intent for our app looks as follows:
import AppIntents

struct CreateTransferIntent: AppIntent {
    static let title: LocalizedStringResource = "Create a Transfer"
    static let description: LocalizedStringResource = "Starts a new File Transfer"

    /// Launch your app when the system triggers this intent.
    static let openAppWhenRun: Bool = true

    @Parameter(
        title: "Files",
        description: "Files to Transfer",
        supportedTypeIdentifiers: ["public.image"],
        inputConnectionBehavior: .connectToPreviousIntentResult
    )
    var fileURLs: [IntentFile]?

    /// Define the method that the system calls when it triggers this event.
    @MainActor
    func perform() async throws -> some IntentResult {
        if let fileURLs = fileURLs?.compactMap({ $0.fileURL }), !fileURLs.isEmpty {
            /// Import and handle file URLs
        }

        /// Deeplink into the Transfer Creation page
        DeepLinkManager.handle(TransferURLScheme.createTransferFromShareExtension)

        /// Return an empty result since we're opening the app
        return .result()
    }
}
We define the title and description to explain the action to our users. The openAppWhenRun boolean needs to be set to true to ensure our app opens and navigates the user to the transfer creation page.
In our case, we define a Files parameter that users inside Shortcuts can use. A possible workflow could be to provide images from the Photos app and transfer them accordingly.
The perform() method is where you must implement the actual intent implementation. In our case, we import the files and navigate the user to the transfer creation page. We added the MainActor attribute since we’re performing a UI interaction. You can learn more about this attribute in my article MainActor usage in Swift explained to dispatch to the main thread.
If you’ve done Deeplink URL handling in SwiftUI before, you can benefit from that logic here. In our case, we already had a deeplink available to navigate the user forward.

FREE 5-Day Email Course: The Swift Concurrency Playbook
A FREE 5-day email course revealing the 5 biggest mistakes iOS developers make with with async/await that lead to App Store rejections And migration projects taking months instead of days (even if you've been writing Swift for years)

Exposing your Intents using Shortcuts
Defining your App Intent is not enough to get it discovered as a Shortcut. The final missing piece is a so-called App Shortcuts Provider instance:
struct TransferAppShortcutsProvider: AppShortcutsProvider {
    static var appShortcuts: [AppShortcut] {
        AppShortcut(
            intent: CreateTransferIntent(),
            phrases: [
                "Create a \(.applicationName) transfer"
            ],
            shortTitle: "Create a Transfer",
            systemImageName: "arrow.up.circle.fill"
        )
    }
}
By defining the short title and image, we allow our shortcut to appear next to our App Icon inside Spotlight. We defined a single phrase to use the action with Siri and linked our transfer creation Intent accordingly. This is all the code you need to make your app’s functionality available as a Shortcut.
Conclusion
App Intents are a powerful way to integrate your app’s content and functionality into the system. You can use them for interactive widgets, Live Activity actions, or as a Shortcut integration. You can define any action in code, after which the system will automatically detect any provided integrations.
If you want to improve your SwiftUI knowledge, even more, check out the SwiftUI category page. Feel free to contact me or tweet me on Twitter if you have any additional tips or feedback.
Thanks!